
An Interest In:
Web News this Week
- April 25, 2024
- April 24, 2024
- April 23, 2024
- April 22, 2024
- April 21, 2024
- April 20, 2024
- April 19, 2024
Some of Our Sources
- Engadget
- Techcrunch
- Just Creative
- Smashing Apps
- Naldz Graphics
- FanExtra - PSD
- Crazy Leaf Design
- My Ink Blog
- Web Design Ledger
- CSS Globe
Help Webnuz
Referal links:
How to Quickly Use Wondershare Filmora X For Creative Video Editing
More than ever, viewers turn to video content. YouTube reports over 5 billion videos watched per day. Instagram is increasingly dominated by video clips, both in your feed and on Instagram Stories. It's easy to see why more artists and creatives turn to video as their go-to format of choice.

Have you tried a few video editing apps, but haven't found the right fit for you? In this tutorial, we're going to show you how to use Filmora, a powerful and easy video editor.
What Is Wondershare Filmora X?
It's hard to find a video editing app that fits your needs. It's easy to see why: software makers sometimes seem conflicted about if the app is for making home videos or producing Hollywood-quality blockbusters. The result is that many apps lack features, while others are too complex.
The best apps don't make you choose between "powerful" and "easy-to-use." They focus on giving you tools to make your vision come to life, but they're intuitive and make it easy to achieve.
Filmora video editing software fits the "best of both worlds" idea perfectly. It's got all the features you need to create a video, but you won't spend hours watching YouTube tutorials to master the basics. That helps you focus on your project—not learning to use the app itself.

As you'll see in this tutorial, Filmora is one of the top video editing software platforms. It's available both for Windows and macOS. Here are some reasons to learn how to use Filmora:
Included Video Effects: Bring one-click creative looks and feels to your video footage with no other apps needed.
Motion Tracking: Follow the movement in a scene easily and automatically with easy-to-add motion tracking that's intuitive for beginners.
Animation Keyframing: Keyframing is a crucial skill, but some apps make it cumbersome. Not Filmora. Single click presets make it easy to add pre-built keyframe setups for easy animation.
Color Matching: For consistent color, Filmora includes really easy matching options. That helps to replicate color across scenes for a harmonized look throughout your video project.
Motion Elements: Easily add these for simpler animation techniques.
Green Screen: Add simulated backgrounds with less work than almost any other app.
Direct Upload to Leading Social and Sharing Platforms: Upload to YouTube, Facebook, Instagram, and more.
With over 77 million users globally, the people have spoken: it's easy to learn how to use Filmora. Make sure to download a free trial to learn how to use Filmora.
How to Use Wondershare Filmora X to Create a Video
Let's walk through a quick Filmora example. My example will create a video that's great for a social platform like YouTube. Follow along by repeating these steps to learn how to edit video with Filmora:
1. Start a New Project
After you download and install Filmora, it's time to start a new project. Open the app, then choose a dropdown option from the Select Project Aspect Ratio.
This setting influences the "shape" of the video. The aspect ratio describes the relative width to the height of the finished video. Because our screens vary, so too should our video projects.
A great example of this would be to choose a 1:1 (Instagram) option. Square-shaped content is still most popular on Instagram and this aspect ratio is the ideal one for the platform.

For the example project in this tutorial, I'm going to use a 16:9 aspect ratio. That's the classic widescreen format, and it's ideal for landscape mode on mobile or most other devices. Many YouTube videos are natively uploaded in this aspect ratio.
When you're ready, click on New Project to start learning how to edit videos on Wondershare Filmora.
2. Import Your Media
Video projects revolve around the footage, photos, and audio that you choose to use. In this tutorial, I'm going to work with a series of video clips from Envato Elements' stock video library clips.
As I start to build up a video project, I typically will save all the files I'm going to use in a single folder. It helps to stay organized and group files together by project.
After you've grouped up your files, it's time to import them. Browse to the File > Import Media Folder menu in Filmora, then select the folder that contains your files.
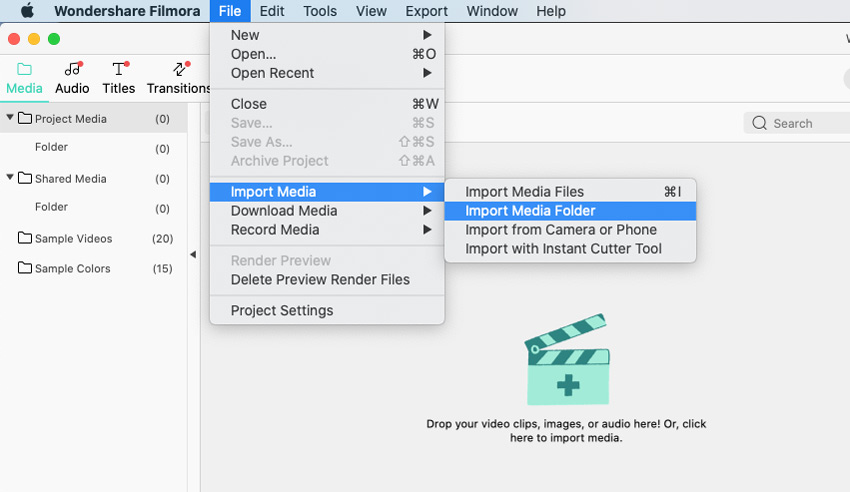
Once you've imported your folder, you'll see thumbnails for each file in the top half of the application. Double-click on any of the thumbnails to play a preview in Filmora.

If you want to follow along and learn how to use Filmora, it helps to know that Filmora includes sample video clips. If you haven't captured all your footage but want to see Filmora video editing software, browse to the Sample Videos folder in the screenshot above.
So, your media is all inside of the app as part of this Filmora tutorial. Now what? This quick Filmora tutorial will show you the complete guide to creating a finished video.
3. Add Clips to the Timeline
If you've used video editing software in the past, you probably already know how to use Filmora. Keep in mind that your media library (near the top of the app) is just a view of the available files. To add them to your video, you need to add them to the timeline near the bottom of the app.
With your media library in view, it's as easy as dragging-and-dropping a clip on the timeline to add it to your project. Repeat this process for any video or photo you wish to include in your project.

Remember: as you begin using Filmora video editing software, it pays to know that it supports media clips of many formats, including audio. Most projects will include background music or narration tracks. As you drag them to the timeline, the audio will appear below your video clips.
Learning how to edit video with Filmora will feel familiar if you've used any other video editing app. Drag-and-drop clips from the library to the timeline to begin to use them in your video project.
4. Trim and Adjust Your Clips
The art of producing a video includes editing the source clips you use. Even the best footage might need a few tweaks to make an impact in your finished video project.
Once you've got a clip added to your timeline, it's easy to adjust it. To shorten the clip, click on the left or right edges of the clip on the timeline and drag it to shorten it.

You can also split a clip. Click on a clip in the app timeline, then click the scissors icon to split it into parts.
As you begin to work with footage, press the spacebar on your keyboard to play a preview. That helps you to see how your video footage is coming together. Repeat the process of adding clips, trimming them to preference, and adding more to build out your video project.
5. Sequence Your Film Clips
After you start trimming and perfecting the runtime of each clip, you might want to re-order your clips on the timeline. If you're learning how to use Filmora, have no fear: this is as easy as drag-and-drop.
On the timeline, click on any clip, then drag it to your desired position. Video editing is all about setting the order of clips and this makes it easy.
Again, learning how to edit video with Filmora is a breeze: just drag-and-drop the clip thumbnails on your timeline.
6. Add Video Effects
So far, our adjustments haven't changed the look and feel of a clip. But as part of learning how to edit videos on Wondershare Filmora, it helps to know that the software can adjust the clip visually.
With a clip selected, click on the Effects icon at the top of the app. You'll instantly see a deep visual library of effects you can add to your project. Just double click on an effect and you'll add it to the active clip.

While learning how to edit videos on Wondershare Filmora, don't miss out on adding effects. A quick Filmora tip we love to share is to use these one-click adjustments to visually transform a clip.
7. Add Transitions Between Clips
Learning how to use Filmora also includes classic video editing skills, like creating transitions between video clips. Transitions help cut from scene-to-scene and establish your audience's attention.

With a clip selected, click on Transitions above the editing area. Double-click on any of the many transition presets (over 200!) in order to blend two clips together.
8. Add Text Overlays
Before we complete our project (and learning how to edit videos on Wondershare Filmora) it helps to add text to a video. This is useful whether you're adding a caption, text title, or more.
Again, this is where a quick Filmora effect really shines. It already has so many of the text essentials built-in that you won't need much help to create a video. Click on Titles above the video editor to open the menu.

Once the menu is open, it's easy to see how to edit videos on Wondershare Filmora with the help of these presets. You'll see a selection of text effects, conveniently organized into important categories like titles, lower thirds, and more.
Drag-and-drop any of these effects on top of your timeline to add it to the video. Then, you'll have the freedom to customize the specifics of your chosen text effect, all while working in Filmora.

After you add a text effect to the timeline, notice that it appears on its own track. Double-click it to edit it and you'll see a totally custom menu to adjust it. Type over the text placeholders, adjust size and font, and more. It's another way that the Filmora video editing software makes editing easy.
9. Export Your Finished Video
After you've spent your time building up a finished video in this Filmora tutorial, you've reached the most exciting point: exporting! That takes a project from inside of Filmora and renders a finished video that's ready to publish.
The Export button is always in view above the editing area. For my example, I'll click on it, then switch to the YouTube tab. Log into your YouTube account with the Sign In link in the sidebar.

Not ready to share? Use the Format tab to export your video with the many built-in export presets. They help you easily find the right balance between quality and file size. Each preset is a different way to complete your video project as part of our Filmora tutorial.
That's it! Whether you saved your video offline as a finished file or published it to a social platform, you've learned how to edit videos on Wondershare Filmora. This quick Filmora tutorial covered all the essentials to create a video.
Learn More About Filmora Products
Are you interested in learning more about how to use Filmora products? Here are two more tutorials to help:
 iOSHow to Easily Migrate From iOS to Android and Transfer Data Between Smartphones
 VideoHow to Easily Convert Audio, Video and Photo File Formats With UniConverter
You Learned How to Use Filmora Video Editing Software
This quick Filmora tutorial highlighted the power of the app. Learning how to edit videos on Wondershare Filmora shows that video editing doesn't have to be an overly complex process. Instead, this Filmora tutorial shows that video editing doesn't have to be hard!
Now that you've seen how to use Filmora, you should jump to try Filmora on the official website. It's easiest to learn how to edit videos on Wondershare Filmora by trying it out on your own. The free trial is the best way to learn how to use Filmora, so don't hesitate to download it.
Original Link: https://business.tutsplus.com/tutorials/use-wondershare-filmora-x-for-video-editing--cms-36132
Freelance Switch
More About this Source Visit Freelance Switch