
An Interest In:
Web News this Week
- April 29, 2024
- April 28, 2024
- April 27, 2024
- April 26, 2024
- April 25, 2024
- April 24, 2024
- April 23, 2024
Some of Our Sources
- You The Designer
- Noupe
- Reencoded
- CSS Globe
- Spyre Studios
- Freelance Switch
- Android Dissected
- Android Headlines
- Willems Lab
- The Verge
Help Webnuz
Referal links:
How to Create a Quick Vintage Text Effect in Adobe InDesign

Want to create a stunning text effect in next to no time? While Photoshop is great for creating advanced type effects, you can also create similar designs using the Effects panel in Adobe InDesign.
Here we’ll put together a vintage type effect with letterpress-style detailing.The best news? This type effect only takes a few minutes to create. So what are you waiting for?
On the hunt forletterpress or vintage fontsfor your next project? You'll find a huge selection of cool typefaces over onGraphicRiverandEnvato Elements.
How to Create a Vintage Text Effect in InDesign
For this effect, you’ll need a condensed font style (such asBebas Neue Bold, which is used here) and a paper texture image (try thisvintage paper backgroundfromPhotoDune).

Step 1
Open upInDesignand go toFile > New > Documentto create a new document if you wish. If you want to integrate the effect into an existing InDesign document, you can skip this step and create the effect directly on your existing layout. Here I’ve set up the page toA3landscape, and theIntenttoPrint.
To create this vintage letterpress-style effect, you’ll need four color swatches—two pairs of different colored swatches in light and dark versions. Expand theSwatchespanel(Window > Color > Swatches)and selectNew Color Swatchfrom the panel’s drop-down menu. To create the swatches I’ve used here, add these CMYK swatches to your panel:
- Blue: C=76 M=32 Y=1 K=0
- Dark Blue: C=100 M=79 Y=46 K=53
- Mustard: C=10 M=15 Y=73 K=1
- Gold: C=25 M=35 Y=98 K=0

Step 2
Expand theLayerspanel(Window > Layers)and create two layers:Backgroundat the bottom andTypeabove. Lock theTypelayer, so that we’re working onBackgroundfor now.

Take theRectangle Tool (M)and drag across the whole page, setting theFilltoMustardfrom theSwatchespanel.

Select theRectangle Frame Tool (F)and create an image frame over the top, with the same dimensions as the colored rectangle below. Go toFile > Place, choose your paper texture image, andOpen, allowing it to fill the frame completely.
With the image frame selected go toObject > Effects > Transparency,setting theModetoMultiplyand bringing theOpacitydown to50%.

Click onGradient Featherat the bottom of the panel’s left-hand menu. ChooseRadialfor theType, allowing the lighter part of the gradient to extend outwards from the center of the page. ClickOKto exit the window.

Step 3
Lock theBackgroundlayer and unlock the layer above,Type.
Take theType Tool (T)and create a large text frame in the center of the page. Type in your text, and set the font to your condensed style (or another style if you prefer), likeBebas Neue Bold.
Once you’re happy with the formatting of the text,Edit > Copy, Edit > Pastea copy onto the pasteboard to preserve a copy. Select the original text frame and head up toType > Create Outlines, to convert the text into a vector.

Step 4
From theSwatchespanel, set theFillof the vector to the paler of your dark swatches (here,Gold), and theStroketo the darkest (here,Dark Blue).

Go toObject > Effects > Inner Shadowand apply aMultiply Modeshadow effect, with aGold Effect Color. Bring up theChoketo about40%andNoiseto around40%.

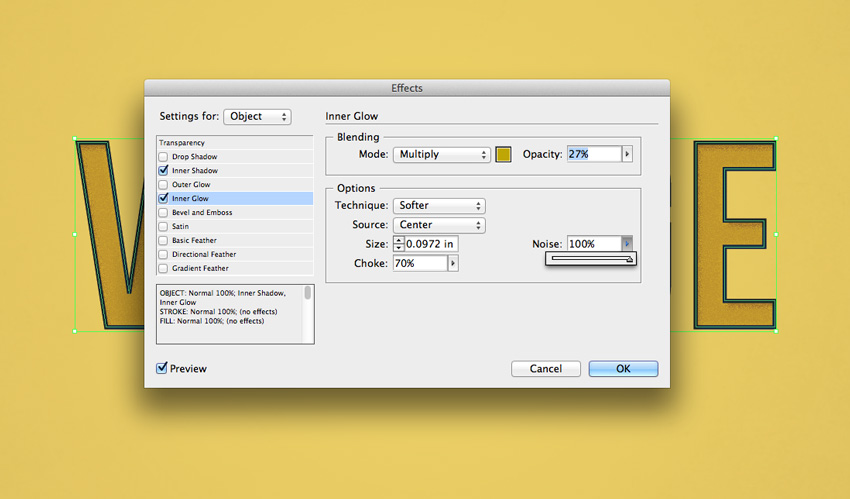
Click onInner Glowin the left-hand menu and apply aGoldeffect with a lowOpacity, and highChoke (70%)and highNoise (100%).

Step 5
Select the vector andEdit > Copy, Edit > Paste in Place, shifting it slightly down and to the left using the arrow keys. Set theFillto[None]andStroketoGold.

Then go toObject > Effects > Transparencyand set theModetoMultiplyandOpacityto80%. This will give the effect a slight misprinted effect, adding to the vintage feel of the text.

Step 6
Edit > Paste in Placeanother copy of the text vector, and thenRight-Click > Arrange > Send to Back. Shift the position down and to the right, creating a shadow effect. Set theStroketo[None]andFilltoBlue.

Go toObject > Effects > Drop Shadowand chooseDark Bluefor theEffect Color.Increase theSpreadto about60%and theNoiseto10%.

ClickOK, and you’ve finished your vintage type effect.
Conclusion: Your Finished Type Effect
Great job! This vintage type effect would make a great addition to poster artwork or as a cool logo for a branding project.
Looking forvintage-inspired fontsfor your next project? Head over toGraphicRiverorEnvato Elementsto track down letterpress-inspired typefaces to give your designs a retro edge.
Original Link:
TutsPlus - Design
More About this Source Visit TutsPlus - Design