
An Interest In:
Web News this Week
- April 12, 2024
- April 11, 2024
- April 10, 2024
- April 9, 2024
- April 8, 2024
- April 7, 2024
- April 6, 2024
Some of Our Sources
- Mashable
- Technology Review
- Joshua Blankenship
- Creative Curio
- Noupe
- CSS Globe
- Android Dissected
- Android Headlines
- Hashedout
- TechPowerUp
Help Webnuz
Referal links:
How to Make a Simple One Page Website: From a Parallax WordPress Theme
A simple one page website is a great way to get your company’s presence established online. It allows you to share important information about your business in a concise way, letting your visitors see everything at a glance.
One of the reasons one page websites are so attractive is because they make great use of the parallax effect to add visual appeal without slowing your website down. There are more key advantages to consider making a one page website:
Why Make a One Page Website (With Parallax Effect)
This type of website is a great choice for any business owner who doesn’t have a lot of time to spend on maintaining their website or for any new business that’s just getting started. Busy freelancers or design agencies can also benefit from showcasing their company through a one page website.
Finally, one page websites are perfect for app developers or companies looking to tease a product launch. Since one page websites are usually accompanied by multiple calls to action, they can be a great way to build your email list before you’re ready for the official launch.
As is often the case with WordPress, there is no shortage of one page themes with beautiful parallax effects. From multipurpose themes to corporate and portfolio themes, you can find a one page theme that suits your industry and the nature of your business. There are more top WP themes featured here:

How to Use a One Page Parallax Theme to Make Your Website
In this article, we’ll show you how to use one of those great WordPress themes to make a simple one page website with a parallax effect.
What You'll Need to Get Started
Let's walk through the steps of how to make one page website. Before creating your site, there are a few things you’ll need to get started. Aside from the theme you’ll be using, you’ll also need to purchase a domain name and a hosting plan. Finding a nice set of images to go along with your website is recommended to take full advantage of the parallax effect. Now, let’s get started:
1. Purchase Your Domain Name
Before anything else, you will need a domain for your new website. It’s your online home and the face of your business. If you have a business name, the obvious choice is to use your business name as the domain name. But if you’re a freelancer doing business under their own name, then your domain name should reflect that.
2. Select a Quality Hosting Plan
After you've decided on the domain name, next up is to purchase your hosting plan. Most hosting companies will allow you to purchase a domain name at the same time when you sign up for a hosting plan. In fact, most of them will include a free domain name for a year. A shared hosting plan is a good place to start and you can always upgrade your plan later on if you decide to switch to a multi-page website.
3. Grab a Top One Page WordPress Theme
Both free and premium themes are available for WordPress, but it is often recommended to choose a premium theme. A premium WordPress theme will include dedicated support from the theme developer which means it will always be kept up to date and follow development best practices.
And in case you need help with the theme setup, a developer of a premium theme is more likely to get back to you in a timely manner. Or, you can purchase additional theme support at the time of purchase.
For this tutorial, I’m using powerful The Ark theme from ThemeForest. It’s a one-page theme that comes with several different demo layouts:

On top of that, it’s also completely responsive so your site will display perfectly across various screen sizes. It also includes a page builder that will allow you to create a completely unique one page website layout from scratch or to easily add extra sections to your site on a whim.

You can browse through the one page themes to find the one you like. When you’ve found a theme that meets your needs, go ahead and purchase it and then download the theme files to your computer.

4. Compile Your Content and Images
The last thing on our list are the content and the images. While it’s true that one page websites are limited in terms of how much content you can display, it still helps if you already have your content pre-written, rather than coming up with it on the spot.
You should also take some time to gather all the images you want to use. This includes background images for the parallax sections which can be photos of your workspace, your employees, your company, or even your product. Don’t forget to include photos of past clients for the testimonial section or team member photos if you want to add a more personal touch to your brand.
Getting Started
Once you’ve purchased the hosting plan along with the domain and the theme, it’s time to get started with your website. The first step is to install WordPress, then your theme, as well as any needed plugins.
1. Installing WordPress
Your hosting company will send you a welcome email with all the necessary information about your hosting plan. Open the email and make note of the username and password for your cPanel. Click the link that will take you immediately to the cPanel login page. Enter the provided username and password and then you’ll be ready to install WordPress.
- In the cPanel, look for Website Installers or Fantastico Installer or Softaculous Installer. Click on the WordPress icon and then click on Install button. You will be asked to provide a username and password and select the domain where to install WordPress.
- Choose a username and a strong password that contains both uppercase and lowercase letters as well as numbers and a special symbol. Write the username and password down somewhere safe.
- Click on Install button once more to finish the installation process.
When WordPress has finished installing, you will see a notification screen with a link to your WordPress dashboard. Click on the link and then enter the username and password you chose during the installation process.
2. Installing Your WordPress Theme
Now that you’re logged into your WordPress website, click to Appearance > Themes > Add new. On the screen that loads, select Upload Theme.

Click on the button to select the zipped folder with your theme files and then click Upload. Once the theme is installed click on Activate.
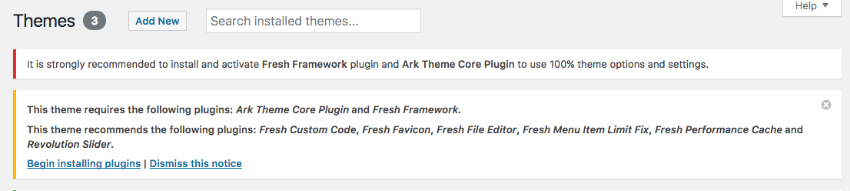
3. Install and Activate Required Plugins
After the WordPress theme has been activated, it will give you a notice that it requires additional plugins to be installed. To install them, click on the Begin Installing Plugins, select all the plugins and click on Install in the drop down menu.

After that, navigate to Plugins > Installed Plugins and select all the plugins that you just installed and this time select Activate from the drop-down menu.
How to Setup Your One Page WordPress Site
Now that your WordPress theme is activated and the additional plugins have been installed, it’s time to customize the theme to match your brand and to add in your content. One of the easiest ways to set up your one page website is to start with a premade layout.
Thankfully, most premium WordPress themes include several layouts that are already configured, so all you need to do is replace the information with your own. For this tutorial, I’ve selected the main demo as it has a wide range of premade page layouts, including attractive one page layouts.
Once your chosen demo is installed, you can begin customizing the theme and replacing the information.
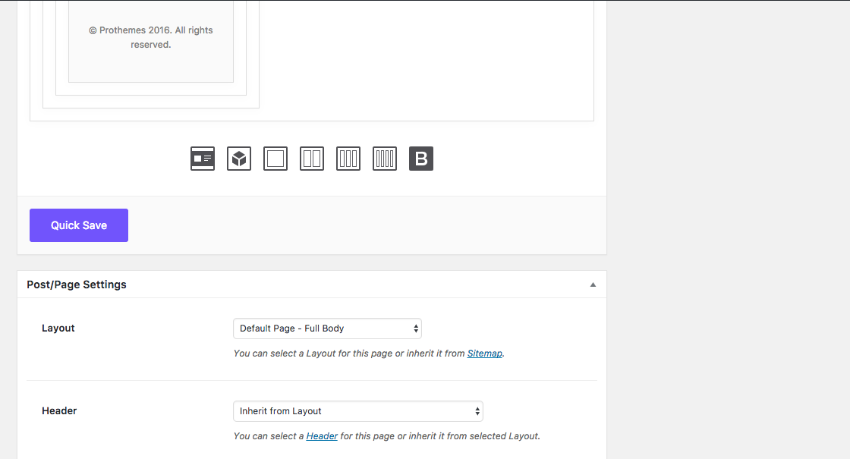
First, click on Settings > Reading > Front Page Displays a Static Page and choose one of the one page layouts as your homepage. Then select the desired layout for your posts page and click on Save Settings.
To replace the content, navigate to Pages > All Pages, choose your homepage and click on Edit.
To customize the images used in the header, click on the Edit icon for the section you want to customize and then select Box Model. Scroll down to the Image or Parallax section and replace the image with your own. Remember to use images that aren’t too distracting so your copy stands out and conveys the message about your company.

Keep the headings and main text short and to the point as you don’t want the text to become too hard to read on the image. You can also customize the colors and adjust margins and paddings in this area, as well as customize the fonts.
To edit the demo content, click on the section that contains text and enter your own copy in the Visual Editor. Simply repeat this process for each section that needs editing. As you are editing sections, click on element.style tab and enter an ID with lowercase letters in the ID field. This will help you set up your navigation menu shortly.

The Ark submenu also includes options for customizing headers, footers, sidebars, and more.
Now that you’ve replaced the content with your own, let’s setup the navigation menu. Go to Appearance > Menus and choose One Page Navigation from the dropdown. Tick the box next to the Main Navigation under Display Location and click Save.

Click on Custom URL and enter the ID of all the sections that you named during the content editing process in the URL field. Click on Update Menu and your navigation is all set.
The final step is to customize the WordPress theme to match your branding. In your dashboard, click on Ark > Theme Options. On this page you can change which headers you want to use on your site, customize your colors, add custom fonts or select Google Fonts.

Keep in mind that the colors you choose should complement each other, but do make sure to make your accent color stands out from the rest of the page. This will bring your call to action buttons into main focus.
How to Add Extra Sections to Your One Page Website
In case you need to add more sections added to your one page website, you can easily do so by going to your page, scrolling to the bottom and clicking the icon to add a section, a row, or any other element.
You can also create a completely new layout by clicking on Pages > Add New > Use Fresh Builder and adding sections as elements the way you want them to appear. New layout can also be created by going to Ark > Sitemap > Default Page layout button and clicking the + sign at the bottom. Simply, give your template a name, click Save, and then add sections and elements that you want.

And with that, your one page website is setup. Now that you've learned how to make one page website from a WordPress theme, it’s now time to start driving traffic to it.
What To Do After Your Site is Live (Promote It)
Just because your website is live, that doesn’t mean people will immediately know that they can find your business online. The first step is to update your social media profiles and add a link to your site in the profile section.
Another easy way to promote your website is to include the link to it on your business cards and any other collateral you might have, such as: your letterhead, brochures, or fliers. You can also include your new website in your email signature as email is still widely used today.
The best way, however, is to add a blog and publish content on a regular basis. This will not only give you your own content to share on social media, but it will help drive traffic to your website where people can learn more about what you do.
Get Started (Quickly) With a Great One Page WordPress Theme
A business website doesn’t always have to include multiple pages to convey information about your products or services. Sometimes, a one page website is more than enough to pique the interest of your target audience and encourage them to contact you. Take advantage of being able to present your information on a single page and use one of our premium WordPress themes to create a great one page website for your business.
Original Link:
Freelance Switch
More About this Source Visit Freelance Switch