
An Interest In:
Web News this Week
- April 13, 2024
- April 12, 2024
- April 11, 2024
- April 10, 2024
- April 9, 2024
- April 8, 2024
- April 7, 2024
Some of Our Sources
- Engadget
- TutsPlus - Code
- The Logo Smith
- Six Revisions
- FanExtra - PSD
- CSS Globe
- Codrops
- Dev To
- Hashedout
- TechPowerUp
Help Webnuz
Referal links:
How to Quickly Make a One Page Website: From a Responsive Template
Getting your website up and running doesn’t have to be complicated. In fact, you can create a simple yet effective business site with the help of a one-page website template. Using a one page template allows you to give your business a much-needed online presence and present all the information about the services or products you offer.
An added benefit is the fact that people interested in your business can immediately see all the details they need without having to click through multiple pages. And because one page sites often feature multiple calls to action, you have a much higher chance of converting visitors into potential buyers.
In this tutorial, we’ll walk you through the steps of setting up your website with a one page HTML template. We’ll cover the tools you will need, the technical details of customizing your template, and how to upload it to your server. We'll also give you a few important tips on how to make one page websites that are effective. Let’s begin!
Before You Get Started
Before you create your one page website, there are a few things you will need. Let’s go over them below.
1. Domain Name
The most obvious choice is to use your business name for your domain. In the event the name is taken, you could try adding words like company, agency, or studio and then purchase the domain name.
It’s also recommended to use a .com extension as it’s one of the oldest and most credible extensions. However, if you cannot get a suitable name with the .com extension, using a .net extension is worth considering.
2. Hosting Company
Finding a good hosting company might seem like an impossible task at first. In general, you want to look for a host that has good reviews on third-party websites as those are more likely to be unbiased. Pay attention to what people say about their uptimes, customer support, and ease of use.
3. HTML Template
The next step is to find a template for your website. A good place to start your search is the ThemeForest marketplace. You can choose from hundreds of professional one page site templates that cater to a variety of niches, or browse through our curated selection of some of the best:

4. Code Editor and FTP Client
Since you will need to edit the template to replace the information with your own, you need a code editor. It will highlight the code syntax and make it easier to find the parts of the code that need to be modified.
For this tutorial, I’ll be using Sublime Text which can be used on Mac, Windows, and Linux and comes with a free trial version.
You will also need an FTP client such as FileZilla to connect to your server and upload the website files without having to upload them one by one. FileZilla is free and available for all operating systems.
Now let's look at the details of how to make one page website, beginning with downloading and setting up your site template.
How to Edit Your Website Template's Content
After you’ve gathered all the files and tools you'll need, now it's time to modify the HTML template. For this tutorial, I’ll be using the Wander website template. Begin by downloading the template files from your Downloads page on ThemeForest. Extract the contents of the zipped folder and open the folder. You’ll notice that it contains a documentation folder as well as all the site template files.

Since this is a multipurpose template, it has quite a few files inside. Your template may only come with a single HTML file and folders that contain the stylesheets, script files, and images.
To edit the template to your liking, you will need to modify the HTML file which is usually called index.html. In the case of Wander, I’ll be editing the file called home-one-page.html, as we're making a one page website.
Working With HTML
If you’ve never worked with an HTML template before, the file will probably look intimidating if you try to open it in Sublime Text or any other editor. While a complete HTML tutorial is out of the scope of this article, let’s cover the basics of what HTML is and what it looks like.
HTML is a markup language that consists of tags like <h1>, <p>, <li>, and others. The tags come in pairs, each of them having an opening and a closing. They help the browser understand how it should display what’s in between those tags.
A paragraph in an HTML document will look like this: <p>This is my paragraph.</p>. A heading will be surrounded by an h tag accompanied with a number from 1-6 which signifies heading level 1 through heading level 6.
When you’re editing an HTML template, you don’t have to edit any of the tags, just the text in between them. However, if you wish to copy a part of the code or to delete it, you will need to select the entire part from the opening tag to the closing tag, and then copy it or delete it.
The easiest way to edit your template is to open it in a browser and then inspect the code. First, double-click the HTML file to open it in your default browser. Right off the bat, you’ll see that you need to edit the text in the header section. Right click on the sentence that reads We Make BRANDS Shine and select Inspect.

A panel will pop up at the bottom that will show you the HTML code of our template. The line that has the selected sentence will be on the left-hand side of the Inspector panel. You’ll see that the sentence is wrapped in a <h1> tag with the class of large mt20.
Now, open the template in your code editor by right-clicking on the template name and select Open with Sublime Text. Find the same line of code that you saw in the Inspector panel, select the text between the tags and replace it with your company tagline.

To edit the paragraph directly below the headline you just replaced, go back to your browser, right click on the paragraph and select Inspect. This time, the sentence is wrapped in between <p> tags with the class of white. Go back to your code editor, find the corresponding line of code, click between the tags and add your information.
Continue with these steps until you have replaced all the demo content with your own. Delete unwanted sections by selecting everything from the opening to the closing tag of a particular code section.
In a similar fashion, if you want to duplicate a part of the template, find the code that holds that section and select everything including the opening and closing tags, then copy and paste it where you want the content to appear.
In the screenshot below, I wanted to add another testimonial, so I selected the code for the third testimonial and copied it immediately below.

Notice that in most cases, sections of the code will be wrapped in <div> tags before you run into any heading and paragraph tags. If you want to duplicate or delete that section, you have to select the <div> tags too; otherwise, your content will not display correctly.
After you're done editing the content, you need to replace the images. The most convenient way to switch them out is to take note of the image names in your template folder and then name your images the same way. Once your images are properly named, copy them over to the images folder.
How to Style Your One Page Website Template
There is one more thing left to do before uploading the files to your server, and that’s styling the template to match your existing brand. The styles are located in the CSS folder. In the case of Wander, there are several stylesheets along with the folder named Colors.
To begin editing the CSS file, you can follow the same steps we used to edit the HTML file. To find out how a particular element is styled, right-click on it in your browser and click Inspect. This time, look to the right-hand side, and you’ll notice the corresponding style for that element. The same panel will also have the name of the style file that you need to edit along with the line where that code is located.

Open the file in your code editor. In this case it’s theme.css. Since I want to edit the background color of the second section that has all the features, I need to find the line 5378 in the theme.css file. Let’s change it to black:

Look for the line of code that says:
<link href="css/colors/blue.css" id="color-scheme" rel="stylesheet" type="text/css">
Changing the name to green.css will change the colors of buttons, links, and icons:

To change the fonts, inspect any of the text and look at the right part of the Inspector panel. You’ll see the name of the font the text is using, as well as the line of code where you can change it to a font that you prefer.

How To Upload Your Site Template to the Server
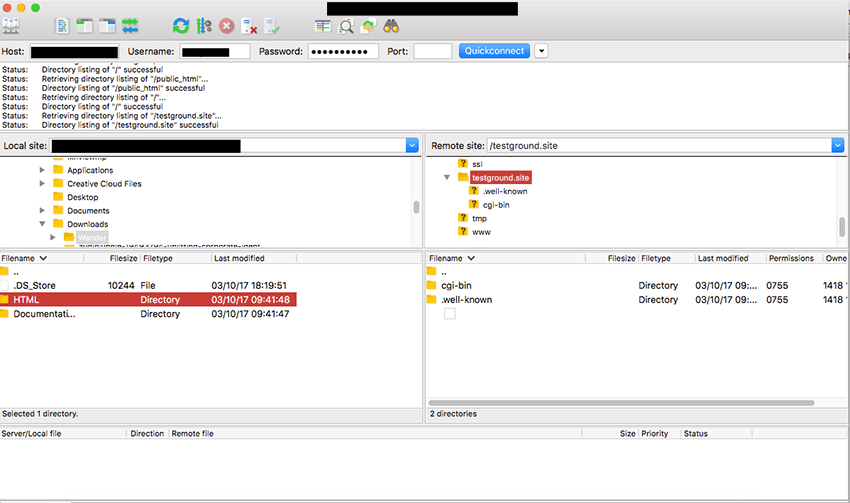
Now that you’ve modified and styled your one page website template, you can upload it to your hosting server. Your host will provide you with the username and password needed to use the FTP connection.
To begin the upload process, open FileZilla and enter the server name, username, and password in the top bar, then click on QuickConnect.
Locate the folder with your template on your computer on the left side of the screen, and click on it to expand it. In the lower left side, select all the files and folders and drag them over to the right side of the screen into the root folder of your hosting server located in the public_html folder.
5 Important Tips for Better One Page Websites
Now that your website is live, here are a few key tips to keep in mind.
1. Keep Your Message Succinct
Unlike a traditional site, a one page template has limited space available, so that means less room to get your message across. That’s why it’s crucial to eliminate all the jargon and unnecessary details, leaving only the most relevant information. Explain clearly what you have to offer and the benefits your product or service provides.
2. Use Strong Calls to Action
Given the limited space, your call to action needs to be strong and convincing. You also need to include it several times for the maximum effect. By default, most one page website templates already come with multiple sections which incorporate a call to action, so make the most out of them. Direct visitors to a section that has the pricing plans or to a contact form where they can get in touch with you.
3. Keep Navigation Accessible And Simple
Set your navigation to jump to different sections of your website. You’ll be one step ahead of the game if you opt for a template that already has a sticky navigation that stays in place as a visitor scrolls down. Include only the links to your website sections and avoid placing any external links as that will throw off anyone who visits your page.
4. Use Visuals
Using images or video will help you tell your story and share more about what you have to offer without taking up too much space. In the case of one page websites, visuals are your best friend.
5. Maintain Hierarchy
Place the most important information at the top of your site and then slowly guide the user down the page to more specific information that supports your core message. This will help you maintain hierarchy and present the information in a logical way.
Get Started With Your Own One Page Website
If you’ve followed this tutorial, you now have the knowledge to quickly create a one page website using a responsive template. Start your journey with the right website template and refer to this tutorial to help set it up fast.
Original Link:
Freelance Switch
More About this Source Visit Freelance Switch