
An Interest In:
Web News this Week
- April 28, 2024
- April 27, 2024
- April 26, 2024
- April 25, 2024
- April 24, 2024
- April 23, 2024
- April 22, 2024
Some of Our Sources
- BoingBoing
- Simplebits
- Pearsonified
- Noupe
- CSS Globe
- Specky Boy
- CSS Tricks
- Freelance Switch
- Android Dissected
- The Verge
Help Webnuz
Referal links:
Animation for Beginners: How to Animate Squash and Stretch
In this tutorial, I will be taking you through the steps of how to animate a squash and stretch. Incorporating squash and stretch into animation of a character or even an object such as a bouncing ball gives your animation so much life!
I will show you how to put squash and stretch into your own animation. This is animation! The sky is the limit, so don't be afraid to exaggerate!
Do you remember our bouncing ball tutorial? There was a wee bit of squash and stretch in our ball animation. Let's use our ball as an example to learn about squash and stretch. Look at this example of the bouncing ball. It looks a bit stiff.
Now, in this example of a bouncing ball, notice how the ball elongates as it comes down. This emphasizes the speed of the ball falling. That is the stretch. Then the ball becomes flatter as it hits the ground as it emphasizes the speed and weight of the ball. That is the squash. I exaggerated the squash and stretch for the sake of this demo.

Let's look at the drawings lined up. The start pose of our ball is at the top in red. The ball's stretched pose is in green. The squashed pose of our ball is in red on the bottom. Pretty cool, huh? Now let's animate our own squash and stretch using a character! Let's go!

1.Draw Our Poses
I thought I would use a really fun cartoony character with a bean-shaped body to really show exaggerated squash and stretch. He's a cute little guy, don't you think? We are going to animate our character jumping from the left side of the frame to the right side of the frame.

Step 1
Let's start by drawing a floor guideline.

Step 2
Draw our first pose/extreme. I've started with our little guy in the start position. If you want to have a little extra fun, you can draw hairs on the character's head. As we go along, notice how the hair can be affected by the character's primary movements. That is called the secondary action.

Step 3
For our second pose, our character makes an anticipatory movement down before he jumps.

I put a little bit of a squash into his anticipation pose.

Step 4
Draw our third pose. I'm working very rough! Don't be afraid to get messy and have sketch lines all over the place. Squash and stretch can be messy and fun sometimes!

Notice how our character is beginning to elongate yet I am keeping the character's mass the same. As he is getting longer and taller, his sides are closer together. The character is getting skinnier, but the mass does not change. If he jumps and he gets longer but his sides do not come closer together, he would just look as if he's growing and becoming a giant!

Step 5
Draw pose number 4. He is back to his original mass/size and he is at the top of the frame. He is about to start his descent down.

Step 6
Let's draw our fifth pose. He is starting to become elongated again on the way down.

See how stretched out he is in comparison to the pose before.

Step 7
Let's draw our sixth pose. As the character makes contact with the ground, he's really stretched out as he quickly descends to the ground.

Step 8
Let’s draw our seventh pose.Now the character's feet are really planted on the ground.

Step 9
Now that he has come to a stop, he keeps moving downward and squashes as his weight keeps moving downwards. I really exaggerated the squash in pose 8, so much so that his squat little body has hidden his feet! Don't be afraid to really exaggerate when you animate (hey, that rhymed!).

Step 10
Let's draw our ninth pose. In this pose, after he squashes, he stretches slightly as he springs back up.

Step 11
Lets draw our final pose number 10. In this pose, he then settles back down into his end pose.

Notice how pose 9 over-shoots the last drawing, and then he settles back down to his original "size" in pose 10. This adds a little bit of a "cushion" to our action.Our character has successfully completed his jump. Good work! Let's see how it looks!

Really good work! Looks great! It could use an in-between here and there to smooth out the action.

2.Add Some In-Betweens
Step 1
Looking back on the animation, I feel that we could use an in-between between pose 1 and pose 2. This smooths out the motion between the pose 1 and pose 2, which is our anticipation pose.
See how the in-between is positioned between pose 1 and pose 2.

Step 2
Now let's add an in-between between our second and third pose.

Step 3
Looking good! Now we could use an in-between between pose 8 and 9 as he comes up out of his squashed pose.

Step 4
Lastly, he can use an in-between between pose 9 and 10 as he settles back into his normal standing pose.

That looks great! Now that's a bouncy, stretchy, squashy guy!

3.Tighten Up Our Animation Drawings
Now that we have our animation looking sweet, we can start tightening up the line for our character. I'm still working loose with an ink line, but improving small things as I go along.
I want to show you the progress so I left my rough line in light grey. I am inking my final line in black so we can see the line against the grey.
Step 1
Clean up drawing 1. See how I left my rough animation line in grey. I cleaned up the line in black in all the steps just to show you how I streamline, neaten and improve the drawing as I go along.

Step 2
Clean up drawing 2.

Step 3
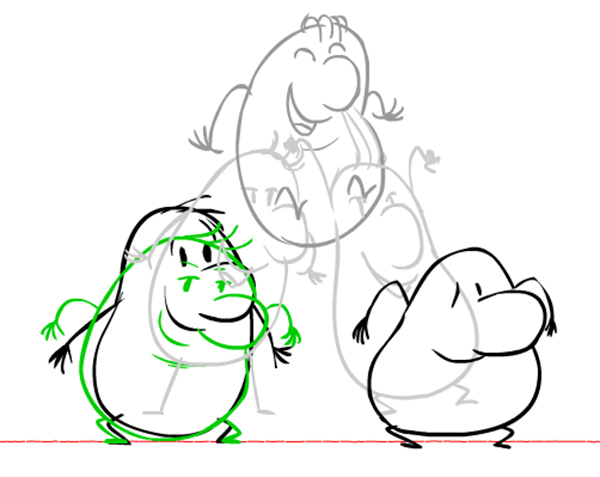
Clean up drawing 3. Notice how I keep the proportions and feel of my original drawing, but I made small improvements. I made the feet feel more grounded and lined them up more with the feet in the previous drawing.

Step 4
Clean up drawing 4. Notice how I changed the position of the feet slightly so the feet are grounded in the same spot as the previous drains; this way the feet aren't sliding all over the place. Don't be afraid to play back the animation as you clean up each drawing to make sure the animation looks ok as you go along.

Step 5
Clean up the rest of your drawings.


Keep going—you're almost done! Notice how in drawing 12 I improved the position of the mouth. I thought the mouth was a little low in my original drawing.


You are done—this is your last drawing! I cleaned him up and made him look more identical to the original start pose.

Here is our final drawing in all its glory; I am showing it to you sans sketch lines. Good job!!

Congrats! Great Job!
You did a great job! You're really getting the hang of squash and stretch! Try it out on all of your animation: a bouncing ball, a character jumping or falling. Any number of actions can be enhanced by squash and stretch.
Don't be afraid to exaggerate or make the squash and stretch in your animation subtle. It is your special animation, so make it yours! And remember, practice makes perfect, so keep animating!

Original Link:
TutsPlus - Design
More About this Source Visit TutsPlus - Design