
Some of Our Sources
- Engadget
- Technology Review
- Team Treehouse
- The Logo Smith
- Web Designer Depot
- Web Design Ledger
- Freelance Switch
- Android Dissected
- Dev To
- The Verge
Help Webnuz
Referal links:
2 Ways to Create a Slow Motion Video Effect With Photoshop
Most people might not know that Photoshop also includes some powerful, but limited, video editing capabilities. In this tutorial, we will show you 2 ways that you can create a slow motion video effect in less than 5 minutes. Lets get started!
Final Video Result
Before You Begin
In this tutorial, we will show you 2 ways to create a slow motion video effect in Photoshop. In the first method, we will show you how to create a slow motion effect by simply slowing down your video. In the second method, we will create the slow motion effect by re-interpreting the video and decreasing the number of frames per second (fps).
Keep in mind that Photoshop is primarily a pixel-editing tool. It’s not a video editor, and Photoshop’s video editing tools are a bit limited. If you don’t have access to a video-editing app, like Adobe Premiere, or don’t have advanced video editing skills, then Photoshop CC is a fantastic alternative, and a great gateway to those other applications.
1. Slowing Down the Duration
The first method that we will show you involves simply slowing down the duration of your video. This isn’t really the best way to create a slow motion video, as the end-result tends to look a bit choppy. If your video was shot at 24 or 25 fps, this is pretty much the only option you have to slow your video down in Photoshop.
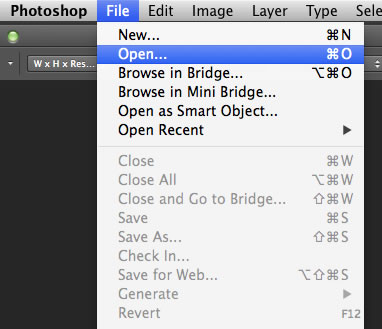
Step 1
Load DSC_7372 – Full Speed – 24 fps.mp4 into Photoshop by simply opening the video. Go to File > Open > and Select your video.
Step 2
Once your video is open, go to Window > Timeline and open up the Timeline Panel, if it is not already open.


Step 3
Now right-click on the video in the Timeline Panel and reduce the Speed to 50%.

Step 4
Drag the Timeline Magnification Slider so that you can see the entire length of the video in the Timeline Panel.

Step 5
At this point, we have told Photoshop to reduce the speed of the video by 50% but we have not told Photoshop to increase the length of the video. We can do this by dragging the handle on the timeline to the right, as shown. The handle to drag the video clip will show up as you mouseover the area to the left of the red arrow below. Drag the handle to the right. The length of your video should be about twice as long now.


Step 6
At this point, you’re pretty much finished creating your slow motion video. You can preview it by pressing the Play button in the Timeline Panel.

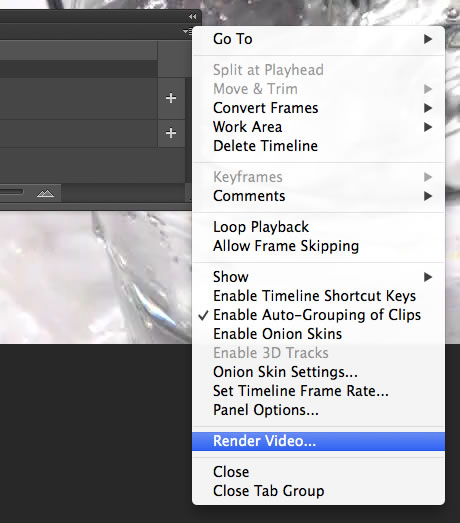
Once you’re satisfied, go ahead and render the video by clicking on the Flyout Menu as shown below. Select Render Video and use the settings below.

Final Video 1
After your video has rendered, you should have a result similar to the video below. Because we simply slowed down a video that was at 24 fps, you may see a bit of choppiness in your end result. While that may negatively affect the quality of your final image, it is perfectly normal for this technique. If your original video is 24 fps, unfortunately there is nothing you can do to improve it.
2. Interpret the Footage
As we mentioned earlier, while slowing down the video by 50% may do the job, it isn’t really the best way to create a slow motion video. The best way to create a slow motion video is to shoot your video at a much higher rate than 24 fps. If you shoot your video at a much higher fps, your slow motion video will look much more smooth. In this section, we will show how to create a slow motion video in Photoshop by shooting a video at 60 fps and then by reducing the fps to 24 by interpreting the footage. This will create a much smoother video.
Step 1
Load DSC_7372 – Full Speed – 60 fps.mp4 into Photoshop. Go to File > Open > and Select your video.
Step 2
If your Timeline Panel is not open, open it by going to Window > Timeline.
Step 3
With the video in your timeline selected, go to Layer > Video Layers > Interpret Footage. Now set your Frame Rate to 24. Click OK.


Step 4
Now we will need to extend the length of the video, just as we did in Section 1.5 of this tutorial. We are doing this for the same reason as in Section 1.5. We told Photoshop to reduce the Frame Rate but now we need to tell it to increase the length of the video. Dragging it out will make the length of your video more longer, depending on your video’s original FPS. Slide the timeline’s magnification as shown to let you see the entire length of the video within the panel. Now drag out the length of the video.


Step 5
As explained in Section 1.6, go ahead and render the video using the Flyout Menu of the Timeline Panel as shown below. Select Render Video and use the settings below. Make sure to set the Frame Rate to 24.

Final Video 2
Conclusion
In this tutorial, we showed you 2 ways to create slow motion video in Photoshop. The first method, you would only use if you didn’t shoot the original video at a higher frame rate. The second method would be the method you would use if you had more control of the original video and were able to shoot it at 60 fps or above. We hope you have learned something from this tutorial and can use this technique to produce your own slow motion video footage.
Original Link: http://feedproxy.google.com/~r/psdtuts/~3/75DETrWxH2U/
TutsPlus - Design
More About this Source Visit TutsPlus - Design