
An Interest In:
Web News this Week
- April 18, 2024
- April 17, 2024
- April 16, 2024
- April 15, 2024
- April 14, 2024
- April 13, 2024
- April 12, 2024
Some of Our Sources
- Slashdot
- Just Creative
- Smashing Magazine
- Smashing Apps
- Web Designer Depot
- Crazy Leaf Design
- CSS Globe
- Line 25
- Freelance Switch
- Web Resource Source
Help Webnuz
Referal links:
My Docker stack to deploy a Django Celery web app
- Introduction
- Project Structure
- Stack Diagram
- Docker images
- Django image
- Nginx image
- Redis image
- Docker Compose
- Environment Variables
- The file
- Deploying
- Building
- Deploying with Docker Compose
After many iterations, this is my current process to deploy a django application.
The cool thing is that I'm now deploying with only an .env file and nothing else.
Note that this is just a single instance of the stack, without Kubernetes or any kind of load balancer.
Introduction
My stack consists on:
- A Postgres database
- A Redis database
- A django instance
- Celery beat and workers
I won't go into details of how to set up anything like this here, if you want to learn more about celery in their docs.
Project Structure
To understand the docker-compose.yml file below, it's important to see how I structure my django project:
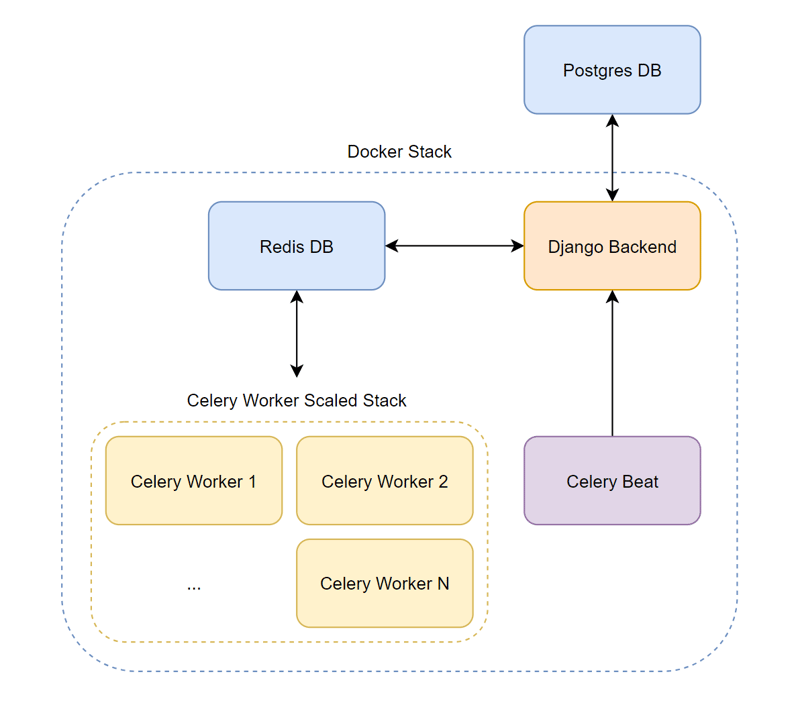
MY-DJANGO-PROJECT/ core # settings.py lives here app1/ migrations models.py ... app2/ migrations models.py ... data # A data directory where I store stuff like logs nginx/ certs/ fullchain.pem privkey.pem conf/ default.conf prod.conf staging.conf Dockerfile Dockerfile entrypoint-django.sh entrypoint-beat.sh entrypoint-worker.sh Pipfile ...Stack Diagram
To visualize the flow better here's a diagram that describes how everything is interconnected:
Docker images
The stack, though it might seem complicated, is only composed of 3 images, 2 of which are custom:
Django image
This is a custom image built from python.
This image will be used for django, celery workers and celery beat containers.
Here's the Dockerfile for it:
# Python as the base image# I use bullseye because I'm more comfortable with it# but you can use Alpine for a more lightweight containerFROM python:3.11-bullseye# Exposes port 8000# Make sure to change this to your used portEXPOSE 8000# Keeps Python from generating .pyc files in the containerENV PYTHONDONTWRITEBYTECODE=1# Turns off buffering for easier container loggingENV PYTHONUNBUFFERED=1# Working directoryWORKDIR /app/backend# Install pipenv# This is not necessary if you use pip in your codeRUN pip install -U pipenv# Install pipenv requirements# Turns the Pipfile to a requirements.txt# so it can be installed globally with pipCOPY Pipfile Pipfile.lock /app/backend/RUN pipenv requirements > requirements.txtRUN pip install -r requirements.txtRUN rm -rf ./Pipfile ./Pipfile.lock# Copy all the code overCOPY . .# Create the media directoryRUN mkdir -p /app/backend/media# Create a volume for the media directoryVOLUME /app/backend/media# Create a volume for the static directoryVOLUME /app/backend/django_static# Make the entrypoint scripts executable# There's one entrypoint for each service that uses this imageRUN chmod +x /app/backend/entrypoint-django.shRUN chmod +x /app/backend/entrypoint-worker.shRUN chmod +x /app/backend/entrypoint-beat.sh# Set the default entrypoint in case this Dockerfile is run# by itselfENTRYPOINT ["/app/backend/entrypoint-django.sh"]These are the entry point files for each service:
django entry point
#!/bin/bash# Migrate any new migrations to the database on deploymentecho "Migrating..."python manage.py migrate --no-input# Collect static filesecho "Collecting static files..."python manage.py collectstatic --no-input# Ensure the data directory exists# I use the data directory to store files such as logsmkdir -p data# Start gunicornecho "Starting server..."gunicorn core.wsgi:application --forwarded-allow-ips="*" --bind 0.0.0.0:8000Worker entry point
#!/bin/sh# Wait until the backend directory is createduntil cd /app/backenddo echo "Waiting for server volume..."done# run a worker# I like having only one task per worker but you can change it# by increasing the concurrencyecho "Starting celery worker..."celery -A core worker -l info --concurrency 1 -EBeat entry point
#!/bin/sh# Wait until the server volume is availableuntil cd /app/backenddo echo "Waiting for server volume..."done# run celery beatecho "Starting celery beat..."celery -A core beat -l infoNginx image
This container serves the application.
I create a custom nginx image that includes my certificates and configuration, so I don't have to copy them over to the server.
Note: I don't use certbot, as I find it more straightfoward to generate the certificates from cloudflare and just store them in the custom image
This means that the image should be secure in a private registry with authentication, otherwise you risk security of your web app.
Here's the Dockerfile for it:
FROM nginx:stable-bullseye# Export ports 80 and 443EXPOSE 80EXPOSE 443# Copy the nginx configuration files to the imageCOPY ./conf/default.conf /etc/nginx/conf.d/default.confCOPY ./conf/prod.conf /etc/nginx/conf.d/prod.confCOPY ./conf/staging.conf /etc/nginx/conf.d/staging.conf# Copy the CloudFlare Origin CA certificate to the imageCOPY ./certs/fullchain.pem /etc/nginx/certs/fullchain.pemCOPY ./certs/privkey.pem /etc/nginx/certs/privkey.pemRedis image
I just use the default Redis image for this.
Just want to note that, because this is a single instance deployment, I like deploying Redis directly here as I find it's enough.
It is recommended, though, to spin up a Redis database somewhere more centralized.
Docker Compose
Environment Variables
Before I get into the gist of the Docker Compose file here are some environment variables I put in my .env file for deployment:
DOCKER_REGISTRY: My private, authentication enabled, docker registry where I upload the build imagesDJANGO_DOCKER_IMAGE: The name I give the django imageNGINX_DOCKER_IMAGE: The name I give the NGINX imageDOCKER_TAG: Usually the version I want to deploy, i.e.:1.5orlatest
The file
version: "3"services: redis: container_name: redis restart: unless-stopped image: redis:7.2.0-alpine expose: - 6379 backend: restart: unless-stopped image: ${DOCKER_REGISTRY}/${DJANGO_DOCKER_IMAGE}:${DOCKER_TAG} env_file: - ./.env entrypoint: /app/backend/entrypoint-django.sh ports: - 8000:8000 volumes: - ./data:/app/backend/data healthcheck: test: ["CMD", "curl", "-f", "http://localhost:8000/healthcheck/"] interval: 30s timeout: 10s retries: 3 start_period: 20s worker: restart: unless-stopped image: ${DOCKER_REGISTRY}/${DJANGO_DOCKER_IMAGE}:${DOCKER_TAG} env_file: - ./.env entrypoint: /app/backend/entrypoint-worker.sh volumes: - ./data:/app/backend/data depends_on: backend condition: service_healthy redis condition: service_started beat: restart: unless-stopped image: ${DOCKER_REGISTRY}/${DJANGO_DOCKER_IMAGE}:${DOCKER_TAG} env_file: - ./.env entrypoint: /app/backend/entrypoint-beat.sh volumes: - ./data:/app/backend/data depends_on: backend condition: service_healthy redis condition: service_started nginx: restart: unless-stopped image: ${DOCKER_REGISTRY}/${NGINX_DOCKER_IMAGE}:${DOCKER_TAG} ports: - 80:80 - 443:443 depends_on: backend condition: service_healthyAs you can see, the compose file has the 5 services, Redis, django, celery worker, celery beat and NGINX.
Deploying
Building
First I build the images and push them to the registry. Before, I did this manually, now I use a GitHub action. You can learn more about this automation here.
Deploying with Docker Compose
Then I head to the server where I want to deploy this. Make sure that the .env file is updated and then just:
docker compose down: Spin the old instance downdocker system prune -a -f: This makes sure I remove thelatestimage to force the download of the new one from the registry.docker compose up --scale worker=5 -d: Spin the new instance upThat's it!
Original Link: https://dev.to/onticdani/my-docker-stack-to-deploy-a-django-celery-web-app-4b13
Dev To
More About this Source Visit Dev To