
An Interest In:
Web News this Week
- April 29, 2024
- April 28, 2024
- April 27, 2024
- April 26, 2024
- April 25, 2024
- April 24, 2024
- April 23, 2024
Some of Our Sources
- Engadget
- TutsPlus - Code
- Joshua Blankenship
- TutsPlus - Design
- CSS Globe
- Line 25
- Wal You
- Spyre Studios
- Codrops
- Dev To
Help Webnuz
Referal links:
DarkSky to WeatherKit: from API keys to signed JWTs
As of March 31st, the Dark Sky API is no more, replaced by Apple's WeatherKit. I've used the Dark Sky API as it had a generous free-tier, was easy to use and flexible enough to customize.
Remember a few years ago when customized terminal prompts were all the rage? Pepperidge Farm remembers - especially people like me who probably went a bit overboard.

Note the weather & stock price. Stock price comes from Yahoo (and follows the same pattern as the weather data), weather data came from Dark Sky. The prompt would read from a cache file.
weatherData=$(curl -s "https://api.darksky.net/forecast/${API_KEY}/${LATLON}?exclude=minutely,hourly,daily,alerts,flags")echo $weatherData > $weatherCacheFileAPI key was a static string - could be regenerated on-demand. To run on a trusted machine (like my own), it was no sweat and easy to use. Of course I wouldn't want to distribute that key, but it was for my use locally. It was especially easy to use in shell scripting.
Enter WeatherKit
Apple pushed the Dark Sky cutoff date a few times, of course, I missed it and wondered why I was getting 301s and parse error for weather info. On March 31st, the API was dead and I'd have to migrate over to WeatherKit.
At first glance I figured it'd be pretty similar - this is weather data, after all - but was surprised to see that Apple's only accepted authorization scheme for the API was a bearer token, an EC-signed, asymmetric JWT! Needless to say I was surprised

Here's an example:
{ "kid": "<KEY ID>", "id": "<TEAM ID>.<SERVICE ID>", "typ": "JWT", "alg": "ES256"},{ "iss": "<TEAM ID>", "iat": 1682008228, "exp": 1682011828, "sub": "<SERVICE ID>"}.<signature>Get all of your pieces
Sadly, this is not free - unlike the Dark Sky API, this requires an Apple Dev membership. While the WeatherKit API itself has a generous starting tier (500k calls/month) that doesn't have any additional cost, you'll still be out the $99 for the annual membership. Students and non-profits can get it cheaper, so ask around.
Apple's docs cover most of what you'll need:
- your Team ID
- the
.p8file that contains your key - the key ID
- the service ID
- lat/lon coordinates of a location
The Service ID is a string (like dev.jpda.terminal-weather) of your choosing.
Testing with Postman's excellent JWT signer
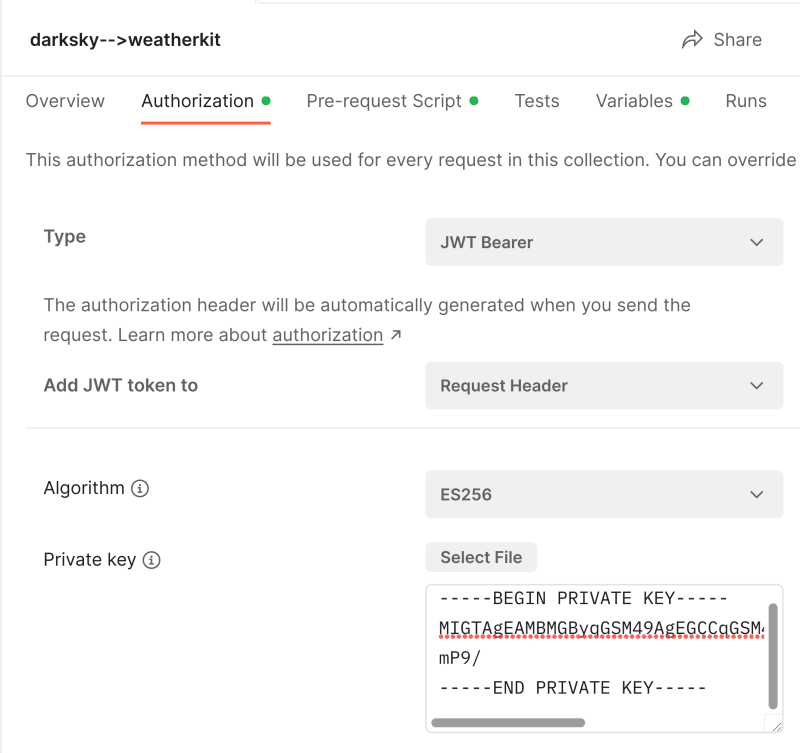
To start, Postman has an excellent JWT Bearer auth type that includes an ES256 signer, which makes it much easier to get familiar with the API. I find creating a collection to make this easier (as the authorization settings can be set at the collection level instead of per-request). Here we can configure our token. Choose JWT Bearer as the type, ES256 as the algorithm, get your private key from the .p8 file from Apple.
JWT Payload

The payload is where we'll add our specific claims - there are four we need: iss,iat (issued at), exp (expires on) and subject (who/what the token is about).
- iss: your team ID
- sub: your service ID
The two timestamps we'll have to sort out. Postman has a $timestamp global that gives us a unix epoch time (seconds since 1/1/1970) making iat easy. exp we'll need calculate off of iat, which we can do via Pre-request scripts.
I've left my information in below as an example:
{ "iss":"6RT85M24SE", "iat": {{$timestamp}}, "exp": {{exp_timestamp}}, "sub":"dev.jpda.terminal-weather"}Pay particular attention to the timestamps - they should not be in quotations, as they are longs. This will complain because exp_timestamp is not defined, which is OK, we're going to go define it next.
Variables & pre-request script
We'll need at least one variable to hold the calculated expiration value. I put my coordinates in variables called HOME_LAT and HOME_LON since they will be available to the whole collection.
Add a variable called exp_timestamp - it doesn't need an initial value.

Lastly head into your pre-request scripts tab. Here we can calculate the expiration timestamp like so:
var now = pm.variables.replaceIn("{{$timestamp}}")*1;var exp = now + 3600; // adds +1 hourpm.collectionVariables.set("exp_timestamp", exp);Because of how Postman's variables work, replaceIn is required to use the global $timestamp variable.
JWT Header

Back in the Authorization tab, we have one more item to manage - we need to add two fields to the JWT's header - the kid (key ID) and id - the team ID + service ID of your app. This is under 'advanced configuration.' We can add our claims and postman will handle adding claims like alg for the algorithm and type.
I've left my values in as an example:
{ "kid":"PMV7JU5DJJ", "id":"6RT85M24SE.dev.jpda.terminal-weather"}Ready! Let's get the weather...! Right?
OK, at long last we are ready to get the temperature! Well, not quite. First we need to see what datasets are available for your location.
Get a new request (making sure to save it/add it to your collection we just configured for authorization) and drop in this url:
https://weatherkit.apple.com/api/v1/availability/{{HOME_LAT}}/{{HOME_LON}}?country=USMake sure your authorization tab is configured for 'inherit from parent' and you have variables set for {{HOME_LAT}} and {{HOME_LON}} and update your country if necessary. Run this and, if all went well, we should get a response with an array of the available datasets for that location.
[ "currentWeather", "forecastDaily", "forecastHourly", "forecastNextHour", "weatherAlerts"]If you get an error, take the generated JWT (from the headers tab of the request) and drop it in your favorite JWT decoder (like jwt.io) and check the contents.

Note that these may be out-of-date, to get the specific token used in the failed request, look in the Postman console (View --> Show Console).
Ok so NOW we can get the weather?
At long last, now that we know what's available, currentWeather should give us what we're looking for. Create a new request in Postman in this collection and let's apply what we've determined:
https://weatherkit.apple.com/api/v1/weather/en/{{HOME_LAT}}/{{HOME_LON}}?dataSets=currentWeather&country=USNote the /en/ in the path - use the ISO country code for your region. I am only interested in current weather, so that's the dataset I'll request.
{ "currentWeather": { "name": "CurrentWeather", "metadata": { "attributionURL": "https://weatherkit.apple.com/legal-attribution.html", "expireTime": "2023-04-20T21:20:01Z", "latitude": 42.860, "longitude": -82.590, "readTime": "2023-04-20T21:15:01Z", "reportedTime": "2023-04-20T20:02:16Z", "units": "m", "version": 1 }, "asOf": "2023-04-20T21:15:01Z", "cloudCover": 0.65, "cloudCoverLowAltPct": 0.03, "cloudCoverMidAltPct": 0.66, "cloudCoverHighAltPct": 0.34, "conditionCode": "MostlyCloudy", "daylight": true, "humidity": 0.55, "precipitationIntensity": 0.0, "pressure": 1013.66, "pressureTrend": "falling", "temperature": 18.98, "temperatureApparent": 18.33, "temperatureDewPoint": 9.65, "uvIndex": 2, "visibility": 30544.32, "windDirection": 147, "windGust": 28.80, "windSpeed": 16.96 }}Success! It's all in metric units, and the docs seem to indicate that's what it is and you'll like it. So a bit of work to convert from Cs to Fs (or Ks if you're adventurous).
Now what?
Now that we can at least get the data again, how are we going to leverage it? Remember I was using this in my terminal - using curl to go fetch the data with an environment variable with the API key. What's best here?
Whatever we use is going to need to access the private key - meaning whatever is generating those JWTs will need to be trusted - local, remote, etc.
Local executable
This is pretty straightforward, could easily balance JWT lifetime with overhead. Perhaps once-per-day with a 24-hour JWT? I wouldn't normally advocate for long-lived tokens but as it's locally generated, and it's relatively low-risk data, it seems like a decent tradeoff.
Remote
Something remote sounds neat too - like a Lambda or Azure Function - but once we leave our trusted space, we'll have to figure out how only the correct clients can get tokens to call the weather service. Something like AAD, Okta, Auth0, etc to secure the API to get JWTs. Which, at that point, maybe is easier to just let the function/etc get the weather data itself and cache it, further reducing the number of paid API calls to WeatherKit. Something like:
Client --> (secured via cloud auth service) http proxy API (keeps Apple private key + generates JWTs) --> WeatherKit
This is, in fact, a lot like the BFF pattern (backends for frontends) used for things like storing secrets securely, caching API responses, etc.
Remote has tradeoffs, of course, like hosting, downtime, etc. And it's one more thing to break :D
Next, we'll pick!
Join me on Twitch and we'll decide what's next!
Original Link: https://dev.to/jpda/darksky-to-weatherkit-from-api-keys-to-signed-jwts-269j
Dev To
More About this Source Visit Dev To