
An Interest In:
Web News this Week
- April 3, 2024
- April 2, 2024
- April 1, 2024
- March 31, 2024
- March 30, 2024
- March 29, 2024
- March 28, 2024
Some of Our Sources
- Engadget
- Techcrunch
- TutsPlus - Code
- Pearsonified
- Smashing Magazine
- Vandelay Design
- FanExtra - PSD
- Noupe
- Android Dissected
- Daily Now
Help Webnuz
Referal links:
FERNtastic Web Development: A Starter's Walkthrough of the FERN Stack
Today Im going to walk you through my set up getting started with the FERN stack - that stands for Firebase, Express, React, Node.js. Its a variant on the incredibly popular MERN stack. But youll see that by swapping out MongoDB for Firebase RTDB, were doing a bit more than swapping out our database provider.
For the React app, were going to use Vite, React Router, React Query, and Material UI. These are my preferences, by no means are they necessary! The FERN stack is flexible. Were going serve a static React app in this walkthrough, but this stack sets you up for SSR success just as well!
For those of you who are unaware, Firebase grew from a Chat API-as-a-Service company called Envolve. The Founders quickly realized that developers were taking advantage of the powerful real-time architecture they had built to power games, platforms, and other real-time services. This spun out into Firebase, they were acquired by Google in 2014, and now offers a whole suite of products to help developers ship quality products quickly.
Firebase has a whole range of features, but in this walk-through, were specifically going to be focusing on Firebase Realtime Database and Firebase Authentication.
This walkthrough assumes a baseline knowledge of Node.js and React.
Getting Started
Hop into your favourite IDE and lets get set up! Start by making and moving into your project directory, and get the project set up.
mkdir fern-stack-walkthrough && cd fern-stack-walkthrough
npm init -y
Now well install express and a few dependencies were going to need to get started, and then make our index file.
npm install express cors dotenv path url nodemon firebase firebase-admin
touch index.js
I personally like to use ESModules (or ECMAScript Modules). You can still with Common JS if you prefer, but Im going to change my package.json to include type:modules, and Im also going to want live refreshes, so well put in our start script. It should look something like this:
//package.json{ "name": "fern-stack-walkthrough", "version": "1.0.0", "description": "", "main": "index.js", "type": "module", "scripts": { "start": "nodemon .", "test": "echo \"Error: no test specified\" && exit 1" }, "keywords": [], "author": "", "license": "ISC", "dependencies": { "cors": "^2.8.5", "dotenv": "^16.0.3", "express": "^4.18.2", "path": "^0.12.7", "url": "^0.11.0" }}Now that our environment is all set up, we can get coding. Head over to index.js, and import the dependancies. Take note of how we import dotenv.
//index.jsimport express, {json} from 'express';import * as dotenv from 'dotenv'import cors from 'cors';Now, use those dependancies to start setting up your server
//index.js//...imports dotenv.config();const app = express();const port = process.env.PORT || 3000;app.use(cors());app.use(json());app.get('/', (req, res) => res.send(`Hello World!`));app.listen(port, () => console.log(`Express app listening on ${port}`))Alright, lets break down what weve done here:
- First, we initialize dotenv. This allows us to process variables passed in from the .env file. We dont have anything in there yet, but we will soon!
- Defining what were calling our server (in this case app)
- Defining the PORT that were running on. First we check to see if its defined in the environment, or we default to 3000.
- Telling our app use the Cross Origin Resource Sharing middleware on all routes. In production, youll want to be more restrictive with your usage, but in development were going to allow all requests.
- Using the express.json middleware on all routes. This allows us to retrieve the req.body object from any HTTP request with the Content-Type: application/json header.
- Defined our / route to return Hello World!
- Start the app on port 3000 and listen for HTTP requests!
Fire it up with a quick npm run start and you should see something a little like this:
> fern-stack-walkthrough@1.0.0 start> nodemon .[nodemon] 2.0.20[nodemon] to restart at any time, enter `rs`[nodemon] watching path(s): *.*[nodemon] watching extensions: js,mjs,json[nodemon] starting `node .`Express app listening on 3000Congratulations! Your server is up and running. You can now navigate to http://localhost:3000/ and you should see something that looks like this:

Front-end setup
Now that we have our server up and running, lets start building our front-end! Open a new terminal window in your IDE, and lets get started with our client!
npm create vite@latest client -- --template react
cd client
Now, before we fire it up, lets install our dependancies:
npm install @mui/material @emotion/react @emotion/styled @mui/icons-material react-router-dom react-query firebase
Now that the dependancies are all installed, head over to the vite.config.js, and we will proxy our API requests to the backend. It should look a little something like this:
// vite.config.jsimport react from '@vitejs/plugin-react';export default { plugins: [react()], server: { proxy: { '/api': { target: 'http://localhost:3000', changeOrigin: true, rewrite: (path) => path.replace(/^\/api/, ''), }, }, },};This is our config file for our vite server. Here, were telling vite to proxy any requests made to /api* should be sent through to our express app at Port 3000 (make sure you define the correct port).
Now by default, the Vite template has a lot in it. We can safely get rid of the App.css file, anything in the public folder, anything in the assets folder, as well as the majority of the index.css and App.jsx files. At this point, your entire directory should look like:
- index.js- package.json- package-lock.json- node-modules/...- client/ - index.html - vite.config.js - public/ - node-modules/... - src/ - assets/ - App.jsx - index.css - main.jsx// client/src/App.jsximport { useState } from 'react'function App() { return ( <div className="App"> <h1>FERN</h1> </div> )}export default App// client/src/main.jsximport React from 'react'import ReactDOM from 'react-dom/client'import App from './App'import './index.css'ReactDOM.createRoot(document.getElementById('root')).render( <React.StrictMode> <App /> </React.StrictMode>,)/* client/src/index.css */body { margin: 0; display: flex; min-width: 320px; min-height: 100vh;}And with that, your website should now look likethis:

Pages and Routing
Well work on that soon. For now, we have the App running, and we can start getting our pages together. For now, were going to build some very basic pages. Well revisit them once weve set up a but more code. Create a new folder /src/pages and create the following very basic pages.
//Home.jsxconst Home = () => { return(<h1>Home</h1>)}export default Home;//About.jsxconst About = () => { return(<h1>About</h1>)};export default About;//Login.jsxconst Login = () => { return(<h1>Login</h1>)};export default Login;Now that we have our pages, we have to render them! Head back to your App.jsx, and well set it up to import our pages, and display them to the user!
//App.jsximport React, { useState, useEffect, Suspense } from 'react';import {BrowserRouter as Router, Route, Routes} from 'react-router-dom';const App = () => { const [routes, setRoutes] = useState([]); useEffect(() => { function loadPages() { const context = import.meta.globEager('./pages/*.jsx'); const routeList = []; for (const path in context) { const module = context[path]; const pageName = path.replace('./pages/', '').replace('.jsx', ''); const routePath = pageName === 'Home' ? '/' : `/${pageName.toLowerCase()}`; const route = { path: routePath, component: module.default, }; routeList.push(route); } setRoutes(routeList); } loadPages(); }, []); return ( <Router> <Suspense fallback={<div>Loading...</div>}> <Routes> {routes.map((route, index) => ( <Route key={index} path={route.path} element={<route.component />} /> ))} </Routes> </Suspense> </Router> );};export default App;Ok WOAH. Thats a lot of changes. Lets go through how we went from our simple, 9-line App.jsx file to *that*.
Right away, youll notice were importing quite a bit more from the React library, including the Suspense component, which allows us to display a fallback component until the children have loaded.
In this case, were waiting for the Routes to load. Once they are loaded, we map them into the React Router component, which uses the browser location, and renders the associated component.
<Router> <Suspense fallback={<div>Loading...</div>}> <Routes> {routes.map((route, index) => ( <Route key={index} path={route.path} element={<route.component />} /> ))} </Routes> </Suspense> </Router>But where did we load those components? Thats what the useEffect() is for! In there, we take advantage of the Vite import.meta.globEager() to import any component that we create in our ./pages/ directory. That means if you create an /src/pages/Contact component, youll also automatically have a page at https://localhost:*PORT*/contact.
From there, we iterate over each path that weve found in our ./pages/ directory, and we assign the Pages with names by removing the .jsx extension, and changing it to lowercase.
We also replace Home with /, so that it navigates to our Homepage component at the root.
We then use the setRoutes() function to update the state with our newly created pages, and render them in the previously shows code.
useEffect(() => { function loadPages() { const context = import.meta.globEager('./pages/*.jsx'); //Imports all components in the ./pages/ directory const routeList = []; for (const path in context) { const module = context[path]; const pageName = path.replace('./pages/', '').replace('.jsx', ''); const routePath = pageName === 'Home' ? '/' : `/${pageName.toLowerCase()}`; const route = { path: routePath, component: module.default, pageName, }; routeList.push(route); } setRoutes(routeList); } loadPages(); }, []);Its important to remember that useEffect is a React Hook that lets you synchronize a component with an external system, and should be used for that purpose. In this case, the external system is the import.meta.globEager() which is a special Vite method that occurs asynchronously.
You can now visit Home (/), About (/about), and Login (/Login), and youll be greeted with the very basic titles. Now that we have our pages set up, lets start making things a bit more pretty.
Getting started with Material UI
While we really havent gotten into the meat of what were doing in terms of integration with Firebase and Auth quite yet, Im the type of person who simply cant work in LoFi. I dont need it to be high design, but lets start establishing our pages!
Were going to start by creating a Layout context. This will enable us to keep our always on components, as well as our theme, well defined and easily accessible. Start by creating a new src/contexts/ folder, and create a new PageLayout.jsx file.
//PageLayout.jsximport Grid from '@mui/material/Grid';import Container from '@mui/material/Container';const PageLayout = ({ children }) => ( <Grid container direction="column" minHeight="100vh"> <Grid item xs={12} py={4}> <Container component="main"> {children} </Container> </Grid> </Grid>);export default PageLayoutWhat weve made here is a context component. It accepts the children which are nested inside of it, and applies its context universally. We simply have to head over to our App.jsx, and wrap our pages in it.
Now, every one of our pages will have consistent spacing and basic layout. But lets make this a bit more powerful. Were going to use our context to add a universal Navigation Bar, and a Footer, providing users with a consistent browsing experience.
//App.jsximport PageLayout from './contexts/PageLayout';//...Other codereturn ( <Router> <PageLayout> <Suspense fallback={<div>Loading...</div>}> <Routes> {routes.map((route, index) => ( <Route key={index} path={route.path} element={<route.component />} /> ))} </Routes> </Suspense> </PageLayout> </Router> );//PageLayout.jsximport AppBar from '@mui/material/AppBar';import Toolbar from '@mui/material/Toolbar';import Typography from '@mui/material/Typography';import Grid from '@mui/material/Grid';import Container from '@mui/material/Container';const Navbar = () => ( <AppBar position="static"> <Toolbar> <Typography variant="h6" component="div"> My App </Typography> </Toolbar> </AppBar>);const Footer = () => ( <Grid item xs={12} sx={{ py: 3, mt: 'auto', backgroundColor: '#f8f8f8' }}> <Container maxWidth="sm"> <Typography variant="body2" color="text.secondary" align="center"> {new Date().getFullYear()} My first FERN App! </Typography> </Container> </Grid>);const PageLayout = ({ children }) => ( <Grid container direction="column" minHeight="100vh"> <Grid item xs={12}> <Navbar /> </Grid> <Grid item xs={12} py={4}> <Container component="main"> {children} </Container> </Grid> <Footer /> </Grid>);export default PageLayout;So in here, weve imported the necessary components from MUI, weve created a Footer which fetches the current year and returns it as our copyright date, weve built a Nav Bar (well get to the Nav part soon), and weve added those components into our PageLayout.
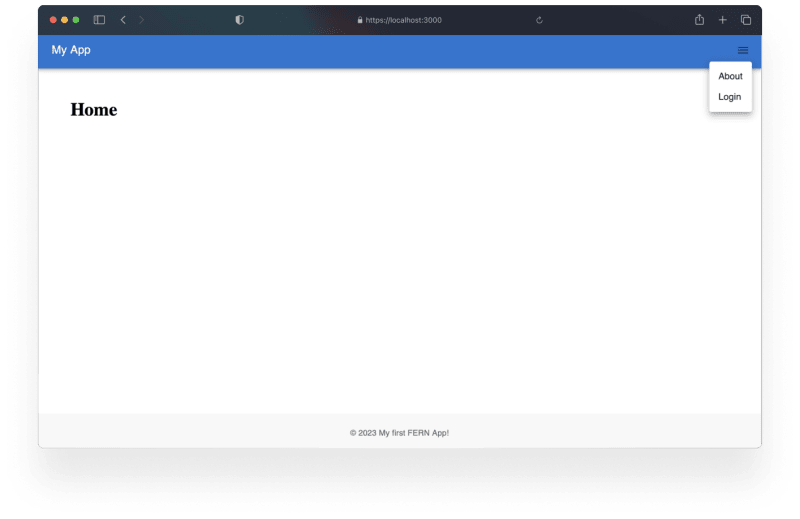
If everything was implemented correctly, it should look like this:

So thats at least an improvement over the white blank page we were seeing earlier. But now that we have the Nav Bar in place, it should at least have some functionality. In App.jsx, update the PageLayout component, and pass in the our routes state, and update the PageLayout.jsx to pass the routes into the NavBar
//App.jsx<Router> <PageLayout routes={routes}> {//...Routes} </PageLayout></Router>Now, we can access the routes in the NavBar object, and set it up to help us actually navigate!
Now, once were done, our NavBar component is going to be quite large.
//PageLayout.jsxconst PageLayout = ({children, routes}) => ( <Grid container direction="column" minHeight="100vh"> <Grid item xs={12}> <Navbar routes={routes} /> </Grid> <Grid item xs={12} py={4}> <Container component="main"> {children} </Container> </Grid> <Footer /> </Grid>);Before we start building it out any further, lets move it into its own functional component. Create the /src/components directory, and then the NavBar.jsx file inside. Update your PageLayout.jsx to look like this:
//PageLayout.jsximport Typography from '@mui/material/Typography';import Grid from '@mui/material/Grid';import Container from '@mui/material/Container';import Navbar from '../components/NavBar';const Footer = () => ( <Grid item xs={12} sx={{py: 3, mt: 'auto', backgroundColor: '#f8f8f8'}}> <Container maxWidth="sm"> <Typography variant="body2" color="text.secondary" align="center"> {new Date ().getFullYear ()} My first FERN App! </Typography> </Container> </Grid>);const PageLayout = ({children, routes}) => ( <Grid container direction="column" minHeight="100vh"> <Grid item xs={12}> <Navbar routes={routes} /> </Grid> <Grid item xs={12} py={4}> <Container component="main"> {children} </Container> </Grid> <Footer /> </Grid>);export default PageLayout;And well build our our NavBar component. Currently, it should look something like this:
// /components/NavBar.jsximport AppBar from '@mui/material/AppBar';import Toolbar from '@mui/material/Toolbar';import Typography from '@mui/material/Typography';const Navbar = () => ( <AppBar position="static"> <Toolbar> <Typography variant="h6" component="div"> My App </Typography> </Toolbar> </AppBar>);Were going to update this component by: accepting the routes prop. Creating a Menu, and iterating over each of the routes to create a menu item.
const Navbar = ({routes}) => { return ( <AppBar position="static"> <Toolbar > <Typography variant="h6" component="div"> My App </Typography> <IconButton edge="end" sx={{ml:'auto'}}> <MenuIcon /> </IconButton> <Menu> {routes.map ((route, index) => { return ( <MenuItem key={index} component={Link} to={route.path} onClick={handleMenuClose} > {route.pageName} </MenuItem> ); })} </Menu> </Toolbar> </AppBar>);In here, we have created our Menu, iterated over each of the menu items, and used the pageName of each route as the item. Now, we need to add some logic to this to make it actually work!
const Navbar = ({routes}) => { const [navMenuAnchorEl, setNavMenuAnchorEl] = useState (null); const handleMenuClick = e => { setNavMenuAnchorEl (e.currentTarget); }; const handleMenuClose = () => { setNavMenuAnchorEl (null); };// ...<Menu anchorEl={navMenuAnchorEl} open={!!navMenuAnchorEl} MenuListProps={{ onMouseLeave: handleMenuClose, }}>Here, we have defined our handleMenuClick to assign our Menus Anchor Element to the clicked button icon as our navMenuAnchorEl. We have created the logic to open the menu when navMenuAnchorEl isnt nullish, and when our mouse exits the Menu hover, it will close the menu by resetting the anchorEl state.

Ok awesome! But we probably dont want our homepage in there. Lets use the My App on the left to navigate home, and remove the Home item from our popover menu:
return ( <AppBar position="static"> <Toolbar> <Typography variant="h6" component={Link} to="/" sx={{textDecoration:'none', color:'white'}}> My App </Typography> <IconButton edge="end" onClick={handleMenuClick} sx={{ml: 'auto'}}> <MenuIcon /> </IconButton> <Menu anchorEl={navMenuAnchorEl} open={!!navMenuAnchorEl} MenuListProps={{ onMouseLeave: handleMenuClose, }} > {routes.map ((route, index) => { if (route.path === '/') return; return ( <MenuItem key={index} component={Link} to={route.path} onClick={handleMenuClose} > {route.pageName} </MenuItem> ); })} </Menu> </Toolbar> </AppBar> );Weve added the Link component to our Typography in order to keep it the expected colour. In our Menu component, we are skipping any routes that navigate back to /, you could also use if (route.pageName === 'Home') if you prefer. Same effect.
Great. Now we have some basics in place. Lets start building our Auth logic!
Firebase Auth Integration
Firebase Auth is a massively powerful, drop-in solution with OAuth2.0 support, support for Sign in with Google, Twitter, SSO, SAML, and basic username and password.
Thats what were going to be using here. To get started, head over to console.firebase.google.com and create a new Project.

Click on the Web icon, give your app a name, and then on the next page, you should see the instructions to add the Firebase SDK. Were going to take these values and create our Firebase instance for our app. In /src/ create a new firebaseConfig.js. It will look something like this:
// .../src/firebaseConfig.jsimport { initializeApp } from "firebase/app";import { getDatabase } from "firebase/database";const firebaseConfig = { apiKey: "YOUR-API-KEY", authDomain: "YOUR-PROJECT.firebaseapp.com", projectId: "YOUR-PROJECT", storageBucket: "YOUR-PROJECT.appspot.com", messagingSenderId: "YOURID", appId: "YOURAPPID", databaseURL: "https://DATABASENAME.firebaseio.com",};const app = initializeApp (firebaseConfig);const auth = getAuth(app);const db = getDatabase(app);export {app, auth, db};So here, we have set up our Firebase App (app), our Auth, and our db, all in one file. To create your RTDB, in Firebase, navigate to Build Realtime Database. Youll then be presented with the Database URL, which you can populate into your firebaseConfig.js. Take this time to also set up Authentication. For this Walkthrough, you will need to activate Email/Password sign in.
Now were going to wrap our App in the Auth. Create a new file in /src/contexts called AuthProvider.jsx. Much like our PageLayout.jsx, this is a Context which will provide our Users auth status to the entire application.
// ./src/contexts/AuthProvider.jsximport React, { createContext, useState, useEffect } from "react";import { auth } from "../firebaseConfig";export const AuthContext = createContext();export const AuthProvider = ({ children }) => { const [currentUser, setCurrentUser] = useState(null); useEffect(() => { const unsubscribe = auth.onAuthStateChanged(user => { setCurrentUser(user); }); return () => unsubscribe(); }, []); return ( <AuthContext.Provider value={{ currentUser }}> {children} </AuthContext.Provider> );};So here, we are creating a context which all of the child elements can read from and manipulate. Were using the useEffect hook to listen for any changes in the authentication state, and keeping the context up to date with the currentUser. When the component is unmounted or the effect dependencies change, we remove the observer by calling the unsubscribe function. And, just like with our PageLayout.jsx, were going to wrap the App in this context.
//App.jsx//...other importsimport {AuthProvider} from './contexts/AuthProvider';//...other codereturn ( <Router> <AuthProvider> <PageLayout routes={routes}> <Suspense fallback={<div>Loading...</div>}> <Routes> {routes.map ((route, index) => ( <Route key={index} path={route.path} element={<route.component />} /> ))} </Routes> </Suspense> </PageLayout> </AuthProvider> </Router> );Now that we have our AuthProvider in place, lets create our Sign in and Sign Up page! Lets start by creating our Login In and Sign Up forms.
// LoginForm.jsximport React, { useState } from "react";import { getAuth, signInWithEmailAndPassword } from 'firebase/auth';import { useNavigate } from "react-router-dom";import { TextField, Button, Typography } from "@mui/material";const LoginForm = () => { const [email, setEmail] = useState(""); const [password, setPassword] = useState(""); const navigate = useNavigate(); const auth = getAuth(); const handleSignIn = async (e) => { e.preventDefault(); try { await signInWithEmailAndPassword(auth, email, password); navigate("/dashboard"); } catch (error) { console.error("Error signing in", error); } }; return ( <form onSubmit={handleSignIn}> <Typography variant="h5">Sign In</Typography> <TextField type="email" label="Email" variant="outlined" value={email} onChange={e => setEmail (e.target.value)} fullWidth margin="normal" /> <TextField type="password" label="Password" variant="outlined" value={password} onChange={e => setPassword (e.target.value)} fullWidth margin="normal" /> <Button type="submit" variant="contained" color="primary" fullWidth> Sign In </Button> </form> );};export default LoginForm;// /components/SignUpForm.jsximport React, { useState, useContext } from "react";import { auth } from "../firebaseConfig";import { AuthContext } from "../contexts/AuthProvider";import { useNavigate } from "react-router-dom";import { TextField, Button, Typography } from "@mui/material";const SignUpForm = () => { const [email, setEmail] = useState(""); const [password, setPassword] = useState(""); const { currentUser } = useContext(AuthContext); const navigate = useNavigate(); const handleSignUp = async (e) => { e.preventDefault(); try { await auth.createUserWithEmailAndPassword(email, password); navigate("/"); } catch (error) { console.error("Error signing up", error); } }; return ( <form onSubmit={handleSignUp}> <Typography variant="h5">Sign Up</Typography> <TextField type="email" label="Email" variant="outlined" value={email} onChange={e => setEmail (e.target.value)} fullWidth margin="normal" /> <TextField type="password" label="Password" variant="outlined" value={password} onChange={e => setPassword (e.target.value)} fullWidth margin="normal" /> <Button type="submit" variant="contained" color="primary" fullWidth> Sign Up </Button> </form> );};export default SignUpForm;Both of these components are relatively straightforward. Were importing the firestore/auth library, and getting our up-to-date Auth object, which we can then use to Log in or Sign up. Now, we need to render these at our Login Page!
// Login.jsximport React, { useState } from "react";import { Box, Button, Paper } from "@mui/material";import LoginForm from "../components/LoginForm";import SignUpForm from "../components/SignUpForm";const Login = () => { const [showLoginForm, setShowLoginForm] = useState(true); const handleToggleForm = () => { setShowLoginForm(!showLoginForm); }; return ( <Box display="flex" flexDirection="column" alignItems="center" > <Paper elevation={3} sx={{ p: 4 }}> {showLoginForm ? <LoginForm /> : <SignUpForm />} <Box mt={2}> <Button onClick={handleToggleForm}> {showLoginForm ? "Don't have an account? Sign up" : "Already have an account? Sign in"} </Button> </Box> </Paper> </Box> );};export default Login;Here, weve imported the Login and Signup form, and were using a basic state to determine which form is being rendered. We have our handler function, which, when clicked, simple changes the state from its current state to the opposite. Then, depending on the state, we either render the Sign Up or Login Form. It should look like this!

Now, before you go and test this out, we have to make sure theres a way that were testing its success. Right now, both the Sign up and Log In forms redirect you to the Home page after a successful sign in. Thats not really helpful! Were going to create another context. This one will help to verify that the user is signed in, and if they arent well shoot them off to the login page!
Lets create another file in /src/context, this one called PrivatePage.jsx.
// PrivatePage.jsximport { useContext } from "react";import { Navigate } from "react-router-dom";import { AuthContext } from "./AuthProvider";const PrivatePage = ({ component: Component, ...rest }) => { const { currentUser } = useContext(AuthContext); return currentUser ? <Component {...rest} /> : <Navigate to="/login" replace />;};export default PrivatePage;So here, weve imported the AuthContext, were accepting the component and any passed props (rest), verifying that the currentUser exists (which means theyre signed in), otherwise redirecting them to the /login page.
Were also going to want to create a Private page, which is only accessible to a logged in user. Lets create ./pages/Dashboard.jsx
// Dashboard.jsximport React, { useContext } from "react";import { Box, Typography } from "@mui/material";import { AuthContext } from "../contexts/AuthProvider";const Dashboard = () => { const { currentUser } = useContext(AuthContext); return ( <Box display="flex" flexDirection="column" alignItems="center" > <Typography variant="h3" mb={3}> Welcome to the Dashboard! </Typography> <Typography variant="h5" mb={2}> {currentUser ? `Logged in as ${currentUser.email}` : ""} </Typography> </Box> );};export default Dashboard;This component will display the logged in Users email address with a very basic welcome message. Since we want this to be a Private Page, only accessible to signed in users, were going to have to specify it in our App.jsx file.
//App.jsximport PrivatePage from './contexts/PrivatePage';//...useEffect (() => { function loadPages () { const context = import.meta.globEager ('./pages/*.jsx'); const routeList = []; for (const path in context) { const module = context[path]; const pageName = path.replace ('./pages/', '').replace ('.jsx', ''); const routePath = pageName === 'Home' ? '/' : `/${pageName.toLowerCase ()}`; const isPrivate = pageName === 'Dashboard'; // Set isPrivate to true for Dashboard or other private pages const route = { path: routePath, component: module.default, pageName, isPrivate, }; routeList.push (route); } setRoutes (routeList); } loadPages (); }, []);//...<Routes> {routes.map ( (route, index) => route.isPrivate ? <Route key={index} path={route.path} element={<PrivatePage component={route.component} />} /> : <Route key={index} path={route.path} element={<route.component />} /> )}</Routes>//...Now, if we try to navigate to /dashboard without a user logged in, it will redirect us back to the homepage. We have a great way of knowing if were successfully logged in!
Lets update our Login and Sign Up forms to redirect us there after successful login or sign up.
//LoginForm.jsxconst handleSignIn = async (e) => { e.preventDefault(); try { await currentUser.signInWithEmailAndPassword(email, password); navigate("/dashboard"); //Updated with new location } catch (error) { console.error("Error signing in", error); } };//SignUpForm.jsxconst handleSignUp = async (e) => { e.preventDefault(); try { await currentUser.createUserWithEmailAndPassword(email, password); navigate("/dashboard"); //Updated with new location } catch (error) { console.error("Error signing up", error); } };Once you have those completed, go sign up, and try it out! If youre logged in and everything is set up correctly, you should see something like this!

Now, right away, youll notice we forgot to include a way to sign out. Lets create that function right now. Update the AuthProvider.jsx to include:
import { useNavigate } from "react-router-dom";export const AuthProvider = ({ children }) => { const navigate = useNavigate(); //... const signOut = () => { auth.signOut(); navigate("/login"); } return ( <AuthContext.Provider value={{ currentUser, signOut }}> {children} </AuthContext.Provider> );};Now, we can call signOut from any of our elements or pages within the provider. A natural place to add this is in the NavBar Menu.
Update the NavBar to import the Auth Context, and add the Sign Out menu item:
// NavBar.jsximport {useState, useContext} from 'react';//...import { AuthContext } from '../contexts/AuthProvider';const Navbar = ({routes}) => { const {signOut} = useContext(AuthContext); //...Handlersreturn ( <AppBar position="static"> <Toolbar> <Typography variant="h6" component={Link} to="/" sx={{textDecoration: 'none', color: 'white'}} > My App </Typography> <IconButton edge="end" onClick={handleMenuClick} sx={{ml: 'auto'}}> <MenuIcon /> </IconButton> <Menu anchorEl={navMenuAnchorEl} open={!!navMenuAnchorEl} MenuListProps={{ onMouseLeave: handleMenuClose, }} > {routes.map ((route, index) => { if (route.path === '/') return; return ( <MenuItem key={index} component={Link} to={route.path} onClick={handleMenuClose} > {route.pageName} </MenuItem> ); })} <MenuItem onClick={signOut} /> </Menu> </Toolbar> </AppBar> );Something you might have noticed now, our Menu is getting a little bit cluttered. Were displaying Login even when a user is signed in, and we have a Sign Out even if a user isnt signed in. Lets clean up this Menu a bit. We really want to be able to Navigate to the About page, the Login Page if not logged in and the Sign Out should be available if logged in. Well include the Dashboard link in there as well. Its a nice, consistent way to navigate around.
//NavBar.jsximport {useState, useContext} from 'react';import { AppBar, Toolbar, Typography, Menu, MenuItem, IconButton,} from '@mui/material';import MenuIcon from '@mui/icons-material/Menu';import {Link} from 'react-router-dom';import {AuthContext} from '../contexts/AuthProvider';const Navbar = () => { const {signOut, currentUser} = useContext (AuthContext); const [navMenuAnchorEl, setNavMenuAnchorEl] = useState (null); const handleMenuClick = e => { setNavMenuAnchorEl (e.currentTarget); }; const handleMenuClose = () => { setNavMenuAnchorEl (null); }; return ( <AppBar position="static"> <Toolbar> <Typography variant="h6" component={Link} to="/" sx={{textDecoration: 'none', color: 'white'}} > My App </Typography> <IconButton edge="end" onClick={handleMenuClick} sx={{ml: 'auto'}}> <MenuIcon /> </IconButton> <Menu anchorEl={navMenuAnchorEl} open={!!navMenuAnchorEl} MenuListProps={{ onMouseLeave: handleMenuClose, }} > <MenuItem component={Link} to={'/about'}>About</MenuItem> <MenuItem component={Link} to={'/dashboard'}>Dashboard</MenuItem> {currentUser ? <MenuItem onClick={signOut}>Sign out</MenuItem> : <MenuItem component={Link} to={'/login'}>Log In</MenuItem>} </Menu> </Toolbar> </AppBar> );};export default Navbar;
Now, weve neatly defined the Menu Items, and our NavBar is tidy, consistent, and contextual. We have a Dashboard for our customers, and we have our Auth all set up.
Now. Lets get some data entry and manipulation in here!
Setting up the Database
Weve spent a good amount of time working in React, now. It seems like a great time to navigate back up a level, and head into our server.
Last we left it, it looked like this:
//index.jsimport express, {json} from 'express';import * as dotenv from 'dotenv'import cors from 'cors';dotenv.config();const app = express();const port = process.env.PORT || 3000;app.use(cors());app.use(json());app.get('/', (req, res) => res.send(`Hello World!`));app.listen(port, () => console.log(`Express app listening on ${port}`))Were going to now set this up act as our API for our front end. Were going to create endpoints to send and retrieve data, as well as validate our user request is authentic.
Just as we did in the React front end, were going to set up our Firebase instance.
In the root of your app, create firebase.js,
//firebase.jsimport {initializeApp} from 'firebase/app';import {getDatabase} from 'firebase/database';import {getAuth} from 'firebase/auth';const firebaseConfig = { apiKey: "YOUR-API-KEY", authDomain: "YOUR-PROJECT.firebaseapp.com", projectId: "YOUR-PROJECT", storageBucket: "YOUR-PROJECT.appspot.com", messagingSenderId: "YOURID", appId: "YOURAPPID", databaseURL: "https://DATABASENAME.firebaseio.com",};const firebase = initializeApp (firebaseConfig);const auth = getAuth(firebase);const db = getDatabase(firebase);export {firebase, auth, db};Youll notice that we named this instance firebase instead of app. Thats to avoid collisions with our express app in index.js, where we will import our app, ensuring its initialized as soon as the app starts.
Were going also going to define two routes one GET, one POST, both to /data. Well start by defining the routes. In your root directory, create userRoutes.js.
import express from 'express';const router = express.Router ();import {db} from './firebase.js';import {ref, set, get, child} from 'firebase/database';router.get ('/data', async (req, res, next) => { const {userId} = req.body; try { get (ref (db, 'users', + userId)).then (snapshot => { if (snapshot.exists ()) { console.log (snapshot.val ()); res.status (200).json (snapshot.val ()); } else { console.log ('No data available'); res.sendStatus (204); } }); } catch (error) { next (new Error (error.message)); }});router.post ('/data', async (req, res, next) => { const {userId, userData} = req.body; try { await set (ref (db, 'users/' + userId + '/' + userData.id), userData) .then (() => { res.status (200).json ({...userData}); }) .catch (e => { throw e; }); } catch (error) { next (new Error (error.message)); }});export default router;Here, we are defining our /data routes. In our GET route, we are checking the body for the userId, and then returning a snapshot of the data in the database under that user ID.
For the POST route, we are extracting userId and userData in similar fashion, then setting the data. We also return the userData object for validation on the client side.
You will see here we are also passing the errors to next(). Were going to set up central error handling in our index.js. This helps us keep our code clean, performant, and readable.
//index.jsimport express, {json} from 'express';import * as dotenv from 'dotenv';import cors from 'cors';import {firebase} from './firebase.js';import userRoutes from './userRoutes.js';dotenv.config ();const app = express ();const port = process.env.PORT || 3000;app.use (cors ());app.use (json ());app.use (userRoutes);app.use ('*', (req, res, next) => { console.log (req.baseUrl, req.method); next ();});app.use ((error, req, res, next) => { res.status (500).json ({error: error.message});});app.listen (port, () => console.log (`Express app listening on ${port}`));Now, if you head to Postman, you should be able to post to localhost:3000/data with a data structured like this:
And youll be able to set some test data to read.
Send a GET and it will retrieve each post
But wait! I hear you calling out I dont want to use a userId every call. And this isnt very secure!
Youre right, voice of public opinion! You cant set a body on a post route, and query params are lame!
{ "userId":"testUser1", "userData": { "foo": "bar", "id": 1234, "key": "item" }}{ "testUser1": { "1234": { "foo": "bar", "id": 1234, "key": "item" } }}Verify Token Middleware
We need a way to consistently validate that the user is who they say they are, and to access their userId in an easy, uniform fashion. First, were going to need to get our Firebase Admin credentials. In the Firebase console, navigate to Project settings, Service accounts, and click Generate Key. Create a new serviceAccount.json at your project root (make sure to add this to your .gitignore) and copy the contents of the download into that file.
Now that we have our service account credentials, we can initialize our Admin app, and create our middleware. Make a new directory called /middlewares/ and create a file called verifyToken.js.
The verifyToken.js is fairly straightforward:
import admin from 'firebase-admin';import serviceAccount from '../serviceAccount.json' assert { type: "json" };admin.initializeApp ({ credential: admin.credential.cert (serviceAccount), });const verifyToken = async (req, res, next) => { const token = req.headers.authorization.split('Bearer ')[1]; if (!token) { return res.status(401).send('Unauthorized'); } try { const decodedToken = await admin.auth() .verifyIdToken(token) req.body.user = decodedToken; req.body.userId = decodedToken.uid; next(); } catch (error) { console.error(error); res.status(403).send('Forbidden'); }};export default verifyToken;We import the service account, initialize our Admin app, then use it to decode the Bearer token that we will pass in with our front end API call. This also extracts the decodedToken, and sets the req.user with the decodedToken object. We can then access the whole token object at req.body.user, and the userId at req.body.userId.
Now we have somewhere that will store data, a way to read that data, and a way verify that the user requesting the data is who they say they are.
Lets head back to the Front End, and build out our requests!
Connecting the Front-end and Back-end
Alright, we have our Back end ready to go, now we need to input and display our data entries. ive been thinking about building a better grocery app for a while now, so Ill start here. Because we were so ambiguous in how we defined our back-end, its incredibly flexible on the front end. The only mandatory field we must pass is an ID.
With that in mind, lets get to work.
Earlier, we very briefly mentioned React Query. Lets talk a bit more about why its so great. The big ones for me: 1. It handles caching and background updates - some of the biggest headaches in development, solved. 2. It works with *****any***** promise. As a result, its an exceptional state manager. You dont need to write repetitive and annoying reducers, you just tell React Query where to get the data, and it gets it.
You might not see why those are so powerful right away, but as your projects grow, youll want a good way to share stateful data between components. React Query helps with that a lot.
First, were going to update our App.jsx to include our Query Client Provider.
// App.jsx//... other importsimport { QueryClient, QueryClientProvider } from 'react-query';const App = () => { {/*Other code here*/} const queryClient = new QueryClient(); return ( <Router> <QueryClientProvider client={queryClient}> <AuthProvider> <PageLayout routes={routes}> <Suspense fallback={<div>Loading...</div>}> <Routes> {routes.map( (route, index) => route.isPrivate ? <Route key={index} path={route.path} element={<PrivatePage component={route.component} />} /> : <Route key={index} path={route.path} element={<route.component />} /> )} </Routes> </Suspense> </PageLayout> </AuthProvider> </QueryClientProvider> </Router> );}Now, were setting up our queryClient with no options, but you can customize this to suit your needs. You can define cacheTimes, staleTimes, and even throw universal errors from your QueryProvider or on a per useQuery or per useMutation instance. Now that we have that set up, lets start building our Queries and Mutations.
Since were building a grocery list App, were going to need to add our items. Lets start by defining our fetch function. Create a new folder /src/api/`, and make a file called addGroceryItem.js
jsx/data
export const addGroceryItem = async (groceryItem, token) => {
const response = await fetch(, {Bearer ${token}`,
method: 'POST',
headers: {
'Content-Type': 'application/json',
'Authorization':
},
body: JSON.stringify({userData: groceryItem}),
});
if (!response.ok) { throw new Error(`Error adding grocery item: ${response.statusText}`);}const data = await response.json();return data;};
`
Here, we have defined a a function which accepts a passed in groceryItem and token, which we are then sending to our back-end for retention.
Now, we want to use this with our React Query Provider, so were going to build a custom Hook to handle this mutation. Lets create /src/hooks, and create useAddGroceryItem.js
`jsx
//useAddGroceryItem.js
import { useMutation } from 'react-query';
import { addGroceryItem } from '../api/addGroceryItem';
export const useAddGroceryItem = (token) => {
const mutation = useMutation((groceryItem) => addGroceryItem(groceryItem, token), {
onError: (error) => {
console.log('An error occurred while adding the grocery item:', error);
},
onSuccess: (data) => {
console.log('Grocery item added successfully:', data);
},
});
return mutation;
};
`
Now that we have everything set up to post a grocery item, lets build our logic to fetch our grocery items! Much like the above, well create fetchGroceryItems.js
jsx/data
// api/fetchGroceryItems.js
export const fetchGroceryItems = async (token) => {
const response = await fetch(, {Bearer ${token}`,
method: 'GET',
headers: {
'Content-Type': 'application/json',
'Authorization':
},
});
if (!response.ok) {
throw new Error(Error fetching grocery items: ${response.statusText});
}
const data = await response.json();
return data;
};
`
And, again, like the above, we will create our useFetchGroceryItems.js hook
`jsx
// hooks/useFetchGroceryItems.js
import { useQuery } from 'react-query';
import { fetchGroceryItems } from '../api/grocery';
export const useFetchGroceryItems = (token) => {
return useQuery('groceryItems', () => fetchGroceryItems(token));
};
`
I want to take a second to pause here and reflect on whats happening here. We have defined 2 functions, 1 which mutates data and 1 which returns it. React Query doesnt care what this data is, where it comes from or how we choose to display it. It just needs to receive a Promise and optionally an Error. In this case, we are polling our /data route, which we set up earlier, but you can (and likely will) use it for all kinds of state and data management.
Next up, were going to build our input form, and display it in our Dashboard. Im going to create a new component called GroceryItemInputForm.jsx
`jsx
import React, {useState} from 'react';
import TextField from '@mui/material/TextField';
import MenuItem from '@mui/material/MenuItem';
import Button from '@mui/material/Button';
import Grid from '@mui/material/Grid';
const commonMeasurements = [
'piece',
'fluid ounce',
'cup',
'pint',
'quart',
'gallon',
'milliliter',
'liter',
'ounce',
'pound',
'gram',
'kilogram',
];
const GroceryItemInputForm = ({token}) => {
const [name, setName] = useState ('');
const [quantity, setQuantity] = useState ('');
const [measurement, setMeasurement] = useState ('');
const handleSubmit = e => {
e.preventDefault ();
console.log ({name, quantity, measurement});
};
return (
component="form"
onSubmit={handleSubmit}
noValidate
autoComplete="off"
container
justifyContent={'space-between'}
rowGap={1}
>
item
component={TextField}
label="Item Name"
value={name}
onChange={e => setName (e.target.value)}
xs={8}
sm={4}
fullWidth
/>
item
component={TextField}
label="Quantity"
value={quantity}
onChange={e => setQuantity (e.target.value)}
fullWidth
xs={3}
/>
item
component={TextField}
select
label="Measurement"
value={measurement}
onChange={e => setMeasurement (e.target.value)}
sm={2}
xs={8}
fullWidth
>
{commonMeasurements.map (unit => (
{unit}{quantity > 1 ? 's' : ''}
))}
component={Button}
type="submit"
variant="contained"
color="primary"
item
xs={3}
sm={2}
>
Add
);
};
export default GroceryItemInputForm;
`
Here, weve used MUIs Grid to build a nice, responsive form, which includes a dropdown menu for various common measurements. Right away, this just logs the entry for us, but its a great start. Well import this into our Dashboard.jsx for use, where well also pass in the user token. To make sure were using the most recent token, were going to get it from the firebase/auth library, using the getAuth() method.
`jsx
// Dashboard.jsx
import React, {useContext} from 'react';
import {Box, Typography} from '@mui/material';
import {getAuth} from 'firebase/auth';
import GroceryItemInputForm from '../components/GroceryItemInputForm';
const Dashboard = () => {
const {currentUser} = getAuth ();return (<Box display="flex" flexDirection="column" alignItems="center"> <Typography variant="h3" mb={3}> Welcome to the Dashboard! </Typography> <Typography variant="h5" mb={2}> {currentUser ? `Logged in as ${currentUser.email}` : ''} </Typography> <GroceryItemInputForm token={currentUser.accessToken}/></Box>);
};
export default Dashboard;
`
Perfect, its now imported into the dashboard, which should look like this:

Now, lets hook it up to our API! Head back into the GroceryItemInputForm.jsx, lets import our custom useAddGroceryItem hook.
`jsx
import { useAddGroceryItem } from '../hooks/useAddGroceryItem';
`
Then, inside the GroceryItemInputForm component, were going to accept the passed token, and create our authenticated mutation instance.
`jsx
// /components/GroceryItemInputForm.jsx
//...Other Code
const GroceryItemInputForm = ({token}) => {
const [name, setName] = useState ('');
const [quantity, setQuantity] = useState ('');
const [measurement, setMeasurement] = useState ('');
const addGroceryItemMutation = useAddGroceryItem(token);
const handleSubmit = e => {
e.preventDefault ();
const newItem = {name, quantity, measurement, id: Date.now ()};
addGroceryItemMutation.mutate (newItem, {
onSuccess: () => {
setName ('');
setQuantity ('');
setMeasurement ('');
},
});
};
//...Other Code
`
Awesome! Now we can update our grocery list using our form. Notice that weve also included the onSuccess handler, which in this case resets the form back to default. You can use this to display a success message, navigate users as needed, and others. You also have available the onError which which can offer error handling on a per-mutation instance, and onSettled, which runs regardless of Success or Error. Read more about Mutations and side effects here.
Now that we have a way to set our grocery list, we need a way to display our Grocery items! Lets create the GroceryList.jsx component
`jsx
// GroceryList.jsx
import React from 'react';
import {useFetchGroceryItems} from '../hooks/useFetchGroceryItems';
import {
CircularProgress,
ListItem,
ListItemText,
Typography,
Grid,
List,
} from '@mui/material';
const GroceryList = ({token}) => {
const {data: groceryItems, error, isLoading} = useFetchGroceryItems (token);
if (isLoading) {
return (
);
}
if (error) {
return (
Error: {error.message}
);
}
return (
{Object.values (groceryItems).map (item => (
primary={item.name}
secondary={`${item.quantity} ${item.measurement}`}
/>
))}
);
};
export default GroceryList;
`
Alright, thats a big component! with a lot going on. Lets break it down.
As usual, were importing out necessary dependancies, as well as our useFetchGroceryItems custom hook. Were taking in the token which we will pass in from the Dashboard, then we have this:
Now, if you havent taken the opportunity to head over to the React Query docs, now would be another great time to do so.
What we have here is a destructured Array, which we are pulling from the useFetchGroceryItems hook we built earlier.
jsx
const {
    data: groceryItems,
    error,
    isLoading
} = useFetchGroceryItems (token);
This allows us to check and handle our Loading status, check and handle any errors, and finally display the data. Awesome. Hit save, and well head to the browser to add a couple of items to our list.

That looks alright, but did you notice how long it took to update? Isnt it called Real Time Database? What gives?
Well, remember how we talked about how React Query manages caching and state? Well now its time to learn about another awesome feature. Optimistic updates! Optimistic updates arent a new idea, nor are they overly complex. Essentially, you push the data to your state while pushing the data to the server you synchronize with. But what if your mutation fails, or the user cancels the mutation mid-process? Thats where React Query comes in handy. Lets head back into our useAddGroceryItem.js file.
`jsx
//useAddGroceryItem.js
import {useMutation} from 'react-query';
import {addGroceryItem} from '../api/addGroceryItem';
export const useAddGroceryItem = (token, queryClient) => {
const mutation = useMutation ({
mutationFn: groceryItem => addGroceryItem (groceryItem, token),
onMutate: async (groceryItem) => {
await queryClient.cancelQueries({queryKey : ['groceryItems']});
const prevItems = queryClient.getQueryData(['groceryItems']);
queryClient.setQueryData(['groceryItems'], (old) => {old, old[groceryItem.id] = groceryItem});
return {prevItems}
},
onError: (error, groceryItem, context) => {
console.log ('An error occurred while adding the grocery item: ', groceryItem, 'Error: ', error);
queryClient.setQueryData(['groceryItems'], context.prevItems)
return context.prevItems
},
onSuccess: (data, context) => {
console.log ('Grocery item added successfully:', data);
},onSettled: () => { queryClient.invalidateQueries({queryKey: ['groceryItems']})}});
return mutation;
};
`
Remember the side effects we talked about? Now were showing off their real power! Lets break down what were doing here: First, we define the mutationFn, what we actually want the function to DO. In this case, were calling our addGroceryItem function and passing in the new groceryItem with our token. Next, were calling the onMutate side effect. This is where we are performing our optimistic updates. When the mutation is called, we cancel any current occurrences of the groceryItems query, we then get a snapshot of the current state, and push our new item into that state. We then return the previous items, passing them into our error handler.
Here, if we run into an issue, we are able to quickly log the problem, and roll back to our previous state. We could also display an error message, or redirect the user as is necessary.
Then, when the Error and Success handling have completed, we invalidate the groceryItems query, and refetch from the back-end.
Now, one thing youll notice here, weve added in the queryClient variable. That needs to be retrieved and passed in from the dashboard.
`jsx
// Dashboard.jsx
import React, {useContext} from 'react';
import {Box, Typography} from '@mui/material';
import GroceryItemInputForm from '../components/GroceryItemInputForm';
import GroceryList from '../components/GroceryList';
import {getAuth} from 'firebase/auth';
import { useQueryClient } from 'react-query';
const Dashboard = () => {
const {currentUser} = getAuth ();
const queryClient = useQueryClient()
const token = currentUser.accessToken;
return !currentUser
? ''
:
Welcome to the Dashboard!
{currentUser ? Logged in as ${currentUser.email} : ''}
;
};
export default Dashboard;
`
Here, weve imported the useQueryClient hook from React Query, which we use to call our contextual Query Client. Remember, since were calling this within a single context, the cache is shared, and the mutations and queries are all interconnected. Take another look at useFetchGroceryItems:
`jsx
import { useQuery } from 'react-query';
import {fetchGroceryItems} from "../api/fetchGroceryItems"
export const useFetchGroceryItems = (token) => {
return useQuery('groceryItems', () => fetchGroceryItems(token));
};
`
The groceryItems key that were using is unique to this hook, and it can be used to invalidate the items in this specific call, simply by using the string key and the QueryClient. Now, because were invalidated the query, were going to run into some scenarios where groceryItems === null and we didnt set up our GroceryList to handle that scenario.
`jsx
//GroceryList.jsx
const GroceryList = ({token}) => {
const {data: groceryItems, error, isLoading} = useFetchGroceryItems (token);
if (isLoading || !groceryItems) { //Loading handler}if (error) { //Error handling}if (groceryItems) return ( {/*Grocery List component*/})};
export default GroceryList;
`
There you have it. Weve added some elegant handling for adding items and automatically refreshing our list on update!

Wrapping Up
By no means are we done, here. But were off to a great start. In this walkthrough, together we hooked up our Firebase Auth and Realtime Database, we created our Express server with our back-end API routes, we developed our React Front End to display and add our grocery items!
Also it runs on the Node Engine. Yay FERN!
Our next steps are going to include:
- Adding a check mark to mark as completed
- Edit items
- Remove items
- Removing completed items after a set period of time
- Building the Front-end for Production
- Containerizing
- Hosting!
I really hope you enjoyed this walk-through, its my first time ever putting one together. Please let me know your thoughts and if you have any questions or comments!
Original Link: https://dev.to/wra-sol/ferntastic-web-development-a-starters-walkthrough-of-the-fern-stack-700
Dev To
More About this Source Visit Dev To