
An Interest In:
Web News this Week
- April 2, 2024
- April 1, 2024
- March 31, 2024
- March 30, 2024
- March 29, 2024
- March 28, 2024
- March 27, 2024
Some of Our Sources
- Slashdot
- Engadget
- Spoon Graphics
- Vandelay Design
- Web Designer Depot
- Naldz Graphics
- CSS Tricks
- Spyre Studios
- Web Resource Source
- Android Dissected
Help Webnuz
Referal links:
Automated Frontend Workflow
In a world where robots have not yet taken our place, we still have to deal with repetitive tasks. We are constantly trying to find the easiest and laziest way to accomplish something, some people call it efficiency. By letting the machine do the tedious part, it could give us more time to work or spend on interesting stuff.
An automated frontend workflow is a set of processes and tools that are used to manage and streamline the development of a website or application. This typically involves tasks such as code linting (e.g. Prettier, ESLint), building, testing (e.g. Jest), and deployment, and is designed to make it easier for developers to work on the front end without having to worry about these details. Automated frontend workflows can be created using a variety of tools, such as build tools (e.g. Webpack, Vite), and continuous integration platforms (e.g. Jenkins, GitHub Actions).
In short, automation for software development means reducing complexity to something that anyone could use and understand.
In this article, you will learn how to create, add and automate common frontend tools within your workflow.
If you are interested in learning about some of these tools you can check my other article about Testing in JavaScript
Table of Contents
- Project
- Setup
- Prettier
- Sass
- TypeScript
- Vite
- Vitest
- VitePress
- Storybook
- ESLint
- StyleLint
- Git
- Git setup
- Git hooks
- Lefthook
- GitHub Actions
- Code Analysis
- Linters
- Testing
- Branch Protection
- Docs
- Conclusion
Project
The goal is to build a modern monorepo project using the following stack:
- Vue: An approachable, performant, and versatile framework for building web user interfaces.
- Sass: CSS with superpowers.
- TypeScript: A strongly typed programming language that builds on JavaScript.
- Vite: Fast bundler to create web projects
- Vitest: A Vite-native fast unit test framework.
- VitePress: Modern SSG framework built on top of Vite.
- Storybook: Storybook is a frontend workshop for building UI components and pages in isolation.
- Prettier: An opinionated code formatter.
- ESLint: Statically analyzes your code to quickly find problems.
- Stylelint: A modern linter that helps you avoid errors and enforce conventions in your styles.
Most steps can be manually adjusted to your preferred JS library or framework, like React, Svelte or Angular. You can check the final result at the following link: https://github.com/helmuthdu/automated-frontend-workflow
Setup
To start, let's create a new project. Open the terminal, create a new folder and initialize the project.
mkdir automated-frontend-workflowcd automated-frontend-workflownpm initAfter completion. Open the newly created package.json file and add the workspaces config to set it as a monorepo.
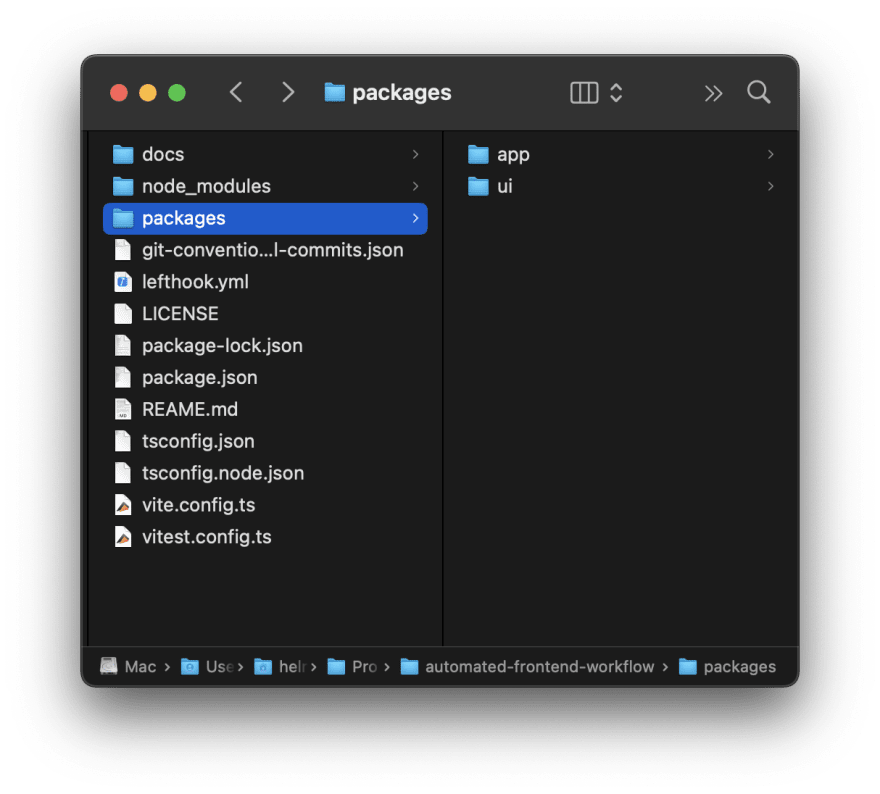
..."workspaces": [ "packages/*"]A monorepo is a single repository that contains multiple projects. The main reason for it is to streamline work within a dev team that maintains multiple apps using shared pieces of code, for example, a User Interface library.
Next, you have to install and configure the common tools which will be used during the development.
Prettier
Install Prettier:
npm i -D prettierCreate a .prettierrc file.
{ "arrowParens": "avoid", "bracketSameLine": true, "bracketSpacing": true, "htmlWhitespaceSensitivity": "ignore", "printWidth": 120, "semi": true, "singleQuote": true, "tabWidth": 2, "trailingComma": "none", "useTabs": false, "vueIndentScriptAndStyle": false}You can find more information about these options in the official documentation.
Sass
Install Sass:
npm i -D sassTypeScript
Install TypeScript:
npm i -D typescriptCreate a tsconfig.json file.
{ "compilerOptions": { "target": "ESNext", "useDefineForClassFields": true, "module": "ESNext", "moduleResolution": "Node", "strict": true, "jsx": "preserve", "resolveJsonModule": true, "isolatedModules": true, "esModuleInterop": true, "lib": ["ESNext", "DOM"], "skipLibCheck": true, "noEmit": true, "types": ["vitest/globals"] }, "ts-node": { "compilerOptions": { "module": "ESNext" } }}Vite
Install Vite:
npm i -D vite @vitejs/plugin-vue vue vue-tscCreate a vite.config.ts file.
import { defineConfig } from 'vite';import vue from '@vitejs/plugin-vue';// https://vitejs.dev/config/export default defineConfig({ plugins: [vue()]});Vitest
Install Vitest:
npm i -D vitest jsdom @vue/test-utilsCreate a vitest.config.ts file.
/// <reference types="vitest" />import { defineConfig } from 'vite';import Vue from '@vitejs/plugin-vue';export default defineConfig({ plugins: [Vue()], test: { globals: true, environment: 'jsdom' }});Update the scripts in the package.json file by adding a new command:
"scripts": { ... "test": "vitest",},VitePress
Install VitePress:
npm i -D vitepressCreate a docs/.vitepress/config.ts file.
export default { title: 'Automated Frontend Workflow', description: 'Frontend Tooling made Easy', base: 'https://helmuthdu.github.io/automated-frontend-workflow/'};The
baseproperty should reflect your git project.
Create a docs/index.md file.
# Hello VitePress[Go to Storybook](https://helmuthdu.github.io/automated-frontend-workflow/storybook)Update the scripts in the package.json file by adding these new commands:
"scripts": { ... "docs:dev": "vitepress dev docs", "docs:build": "vitepress build docs", "docs:preview": "vitepress preview docs"},Storybook
Install Storybook:
npx sb init --builder @storybook/builder-viteOpen the .storybook/.main.js file and configure it as follows.
module.exports = { stories: ['../packages/**/*.stories.mdx', '../packages/**/*.stories.@(js|jsx|ts|tsx)'], addons: ['@storybook/addon-links', '@storybook/addon-essentials', '@storybook/addon-interactions'], framework: '@storybook/vue3', core: { builder: '@storybook/builder-vite' }, features: { storyStoreV7: true }, async viteFinal(config, options) { config.base = './'; return config; }, env: config => ({ ...config, STORYBOOK_BASE_URL: process.env.NODE_ENV === 'production' ? 'https://helmuthdu.github.io/automated-frontend-workflow/storybook/' : '' })};The
STORYBOOK_BASE_URLproperty should reflect your git project.
Create a .storybook/manager-head.html file.
<!-- .storybook/manager-head.html --><base href="%STORYBOOK_BASE_URL%" target="_blank" /><meta name="description" content="Components for my awesome project" key="desc" />Update the package.json file to output the build result to the docs/public/storybook folder, this will be important to deploy our docs and the storybook on the same GitHub page.
"scripts": { ... "storybook": "start-storybook -p 6006", "storybook:build": "build-storybook -o docs/public/storybook"},ESLint
Install ESLint with Prettier, TypeScript and Vue support, and add a package to output the result as sarif format which will be used later for the GitHub integration.
npm i -D eslint @typescript-eslint/eslint-plugin @typescript-eslint/parser @microsoft/eslint-formatter-sarif eslint-config-prettier eslint-plugin-prettier eslint-plugin-vue vue-eslint-parser @vue/eslint-config-typescriptCreate a .eslintrc.cjs file.
module.exports = { root: true, env: { browser: true, es2021: true, node: true }, parser: '@typescript-eslint/parser', parserOptions: { parser: '@typescript-eslint/parser', ecmaVersion: 2021 }, plugins: ['@typescript-eslint', 'prettier'], extends: [ 'eslint:recommended', 'plugin:@typescript-eslint/recommended', 'plugin:prettier/recommended', 'plugin:storybook/recommended' ], rules: { 'no-console': process.env.NODE_ENV === 'production' ? 'warn' : 'off', 'no-debugger': process.env.NODE_ENV === 'production' ? 'warn' : 'off', '@typescript-eslint/no-unused-vars': [ 'off', { argsIgnorePattern: '^_' } ], 'prettier/prettier': 'error' }, overrides: [ { files: ['*.ts', '*.tsx'], rules: { // The core 'no-unused-vars' rules (in the eslint:recommeded ruleset) // does not work with type definitions 'no-unused-vars': 'off' } }, { files: ['**/__tests__/*.{j,t}s?(x)', 'packages/**/src/**/*.spec.{j,t}s?(x)'], env: { jest: true } }, { files: ['packages/**/src/**/*.vue'], parser: 'vue-eslint-parser', parserOptions: { extraFileExtensions: ['.vue'], ecmaFeatures: { jsx: true }, ecmaVersion: 2021 }, extends: ['plugin:vue/vue3-recommended', '@vue/typescript/recommended', 'plugin:prettier/recommended'] } ]};Update the scripts in the package.json file by adding these new commands:
"scripts": { ... "lint": "npm run lint -ws", "lint:report": "eslint --ext .jsx,.js,.ts,.tsx,.vue --fix --format @microsoft/eslint-formatter-sarif --output-file eslint-results.sarif packages/**/src",},Stylelint
Install Stylelint along with the standard configs, Prettier, Sass, and Vue support.
npm i -D postcss postcss-html stylelint stylelint-config-prettier stylelint-config-recommended-vue stylelint-config-standard-scssCreate a .stylelintrc file extending these configs. It is included an optional rule to check if the CSS selector follows the BEM Name Convention.
{ "extends": ["stylelint-config-standard-scss", "stylelint-config-recommended-vue/scss", "stylelint-config-prettier"], "rules": { "selector-class-pattern": [ "^.([a-z0-9-]+)?(__([a-z0-9]+-?)+)?(--([a-z0-9]+-?)+){0,2}$", { "resolveNestedSelectors": true } ] }}Git
Git is a distributed version control system for tracking changes in files and can be used for collaboratively developing source code during software development.
Git setup
Create a new repository in GitHub, open the terminal inside the project, initialize git, add a commit and a remote, then push the changes.
git initgit add README.mdgit commit -m "feat: project setup"git branch -M maingit remote add origin https://github.com/$GITHUB_USER/$REPO_NAME.gitgit push -u origin mainReplace the
$GITHUB_USERand the$REPO_NAMEvariables with your GitHub user and repository name.
Git hooks
Git has a way to fire off custom scripts when certain actions occur, such as commit and push. There is a variety of hooks available, but you can start with these:
commit-msg: Check the commit message format or spelling errors.pre-commit: Check for errors and enforce project coding standards.pre-push: Run tests to ensure working software
You can create them manually, or use Lefthook to simplify the process.
Lefthook
Lefthook is a fast and powerful Git hooks manager for Node.js and any other type of project written in Go.
To install, open the terminal in your project:
npm install -D lefthookAfter installation, it will generate a lefthook.yml file which can be customized to perform a static code analysis before committing the code. For example, it can ensure that the git commit follows the git-conventional-commits, and use Prettier, ESLint, and Stylelint to check, format, and fix any file which will be committed and run any test related with Vitest depending on the filetype and run each in parallel.
- For
.html,.json, and.ymlfiles, reformat with Prettier - For
.cssand.scssfiles, check the styles with Stylelint and Prettier after. - For
.jsand.tsfiles, excluding tests, run ESLint and check related tests with Vitest after. - For
.spec.jsand.spec.tstests files, run ESLint, and the tests with Vitest after.
To start, initialize the git-conventional-commits by running the npx git-conventional-commits init command, and then update the lefthook.yml as follows:
commit-msg: commands: validate: run: > npx git-conventional-commits commit-msg-hook {1}pre-commit: parallel: true commands: lint:misc: glob: '*.{html,json,yml}' run: npx prettier --write {staged_files} lint:css: glob: '*.{css,scss}' run: > npx stylelint --fix {staged_files} && npx prettier --write {staged_files} lint:js: glob: '*[!.{spec,test}].{[tj]s,[tj]sx}' run: > npx eslint --fix {staged_files} && npx vitest related {staged_files} --passWithNoTests --run --environment jsdom test:unit: glob: '*.{spec,test}.{[tj]s,[tj]sx}' run: > npx eslint --fix {staged_files} && npx vitest {staged_files} --run --environment jsdomThat's it, now every time you commit your code these commands will run automatically
GitHub Actions
GitHub Actions is a continuous integration and continuous delivery (CI/CD) platform that allows you to automate your build, test, and deployment pipeline. You can create workflows that build and test every pull request to your repository, or deploy merged pull requests to production.
The GitHub Actions workflows are located in the .github/workflows folder and are composed of:
- Workflow: A workflow is a configurable-automated process that will run one or more jobs.
- Events: An event is a specific activity in a repository that triggers a workflow run.
- Jobs: A job is a set of steps in a workflow that executes on the same runner. Each step is either a shell script that will be executed or an action that will be run.
- Runners: A runner is a server that runs your workflows when they're triggered. Each runner can run a single job at a time.
- Actions: An action is a custom application for the GitHub Actions platform that performs a complex but frequently repeated task.
Do not worry, you will understand better those processes with the examples below showing common cases.
Code Analysis
To ensure code quality, the code should be checked, tested, and reported.
- Start by creating a new file in your GitHub repository called
.github/workflows/code-analysis.yml. This file will define the workflow that your GitHub Action will follow. - In the
.github/workflows/code-analysis.ymlfile, you can use theonkeyword to specify when the workflow should be triggered. For example, you might want to trigger the workflow when a new code is pushed to the repository with the option to trigger it manually. You can do this by adding the following lines to the file:
on: push: branches: - 'main' # set this property to enable manual trigger option in GitHub workflow_dispatch:- You can set the
concurrencyproperty to run only one instance, so if it is running while a new commit is pushed it will be canceled and restarted. You can use the contexts to define a proper key.
# github.workflow context to determine the current workflow name # github.ref context to determine the current branch name concurrency: group: ${{ github.workflow }}-${{ github.ref }} cancel-in-progress: true- Furthermore, it is required to set some permissions to read and write content. You can check all available permissions by clicking here.
permissions: # required for all workflows security-events: write # only required for workflows in private repositories actions: read contents: read- Actions can be cached to accelerate the process. For example, in the Node.js setup action, it is possible to cache the NPM packages, so it won't have to fetch everything every time the job is running.
- name: Setup Node.js uses: actions/setup-node@v3 with: node-version: 16 cache: 'npm'- To complete, in the job section, specify the steps that the GitHub Action should perform. For example, you might want to first check out the code from the repository, generate a code analysis report and upload it to GitHub:
# code-scanning.yml name: Code scanning on: push: branches: - 'main' workflow_dispatch: concurrency: group: ${{ github.workflow }}-${{ github.ref }} cancel-in-progress: true jobs: eslint: name: Eslint runs-on: ubuntu-latest permissions: # required for all workflows security-events: write # only required for workflows in private repositories actions: read contents: read steps: - name: Checkout Repository uses: actions/checkout@v3 - name: Setup Node.js uses: actions/setup-node@v3 with: node-version: 16 cache: 'npm' - name: Install dependencies run: npm ci - name: Run linter run: npm run lint:report continue-on-error: true - name: Upload analysis results to GitHub uses: github/codeql-action/upload-sarif@v2 with: sarif_file: eslint-results.sarif wait-for-processing: trueAfter creating the workflow, you can go to your GitHub repo and run it manually to check the results. You can trigger this action by clicking in the Actions Tab -> Code scanning Workflow -> Run workflow Dropdown -> Run workflow Button.
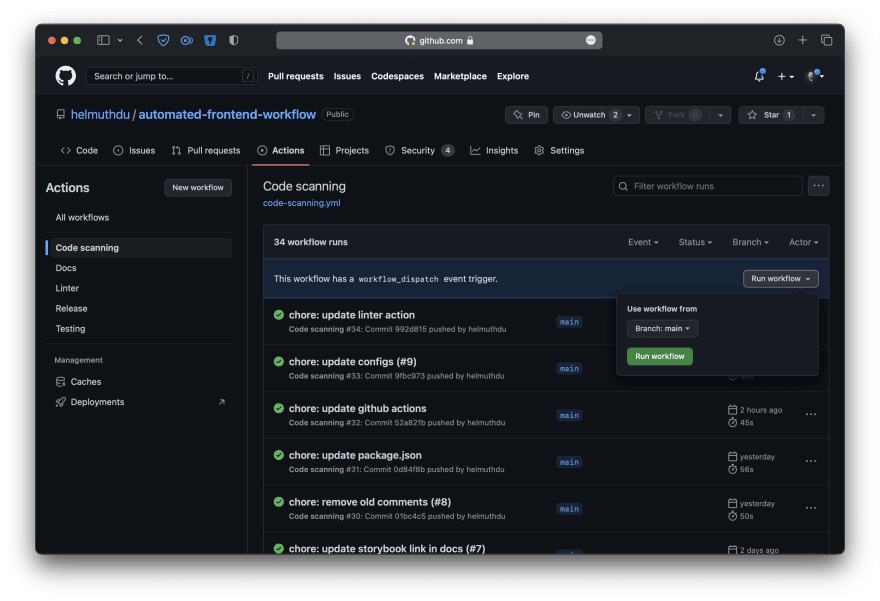
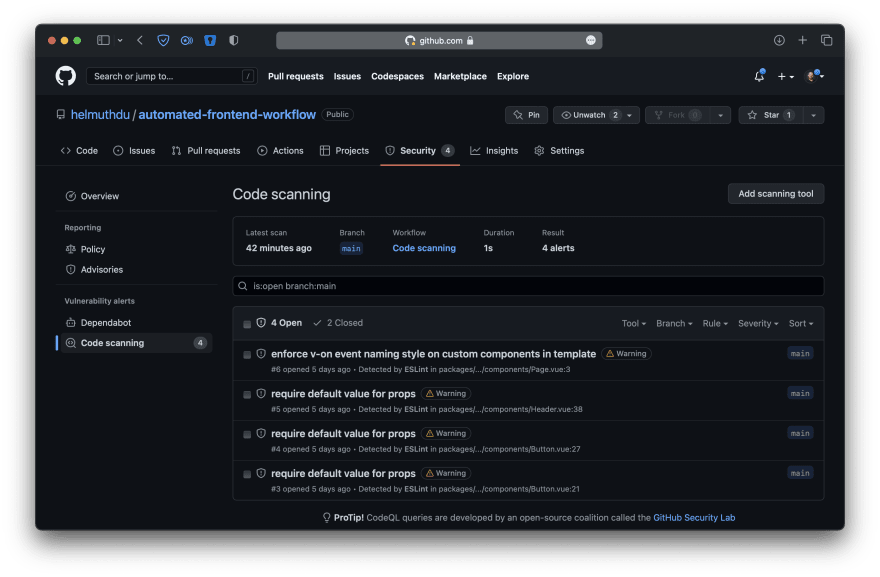
To see the result, go to the Security -> Code scanning section.
The missing part is that these checks should also run on any code which will be submitted through a PR in the project and block any change which does not follow the required rules.
Linters
Linters, in short, are tools to help you improve your code. It can be configured to run on every Pull Request (PR) to guarantee that any new code has the same standards defined.
- Similar to the previous workflow, start by creating a new file in your GitHub repository called
.github/workflows/linter.yml. - In the
onkeyword, set it to run onpull_request.
on: [pull_request]- Configure the
concurrencyto have only one workflow running at a time.
# github.workflow context to determine the current workflow name # github.ref context to determine the current branch name concurrency: ${{ github.workflow }}-${{ github.ref }}- Define the Runner. Usually, the
ubuntu-latestrunner is a safe choice.
jobs: eslint: runs-on: ubuntu-latest- Additionally, add all steps to perform a
checkoutaction to fetch the code, do another action tosetup-nodewith thenode-version16 with thecacheenabled for allnpmpackages, install all dependencies withnpm cicommand and finally run the linters withnpm run lintercommand
# linter.ymlname: Linteron: [pull_request]# github.workflow context to determine the current workflow name# github.ref context to determine the current branch nameconcurrency: ${{ github.workflow }}-${{ github.ref }}jobs: eslint: name: Eslint runs-on: ubuntu-latest steps: - name: Checkout Repository uses: actions/checkout@v3 - name: Setup Node.js uses: actions/setup-node@v3 with: node-version: 16 cache: 'npm' - name: Install dependencies run: npm ci - name: Run linter run: npm run lintTesting
It should run similarly to the Linters workflow but executing the npm run test command instead.
# testing.ymlname: Testingon: [pull_request]# github.workflow context to determine the current workflow name# github.ref context to determine the current branch nameconcurrency: ${{ github.workflow }}-${{ github.ref }}jobs: vitest: name: Vitest runs-on: ubuntu-latest steps: - name: Checkout Repository uses: actions/checkout@v3 - name: Setup Node.js uses: actions/setup-node@v3 with: node-version: 16 cache: 'npm' - name: Install dependencies run: npm ci - name: Run tests run: npm run testBranch Protection
Adding the workflows is just one step, you also need to configure the branch rules. Open your repository in GitHub and go to Settings -> Branches.

Click in the Add rule button, insert the repo name your want this rule to be associated with at the beginning, and make sure the workflows are set as required in the Require branches to be up to date before merging option.
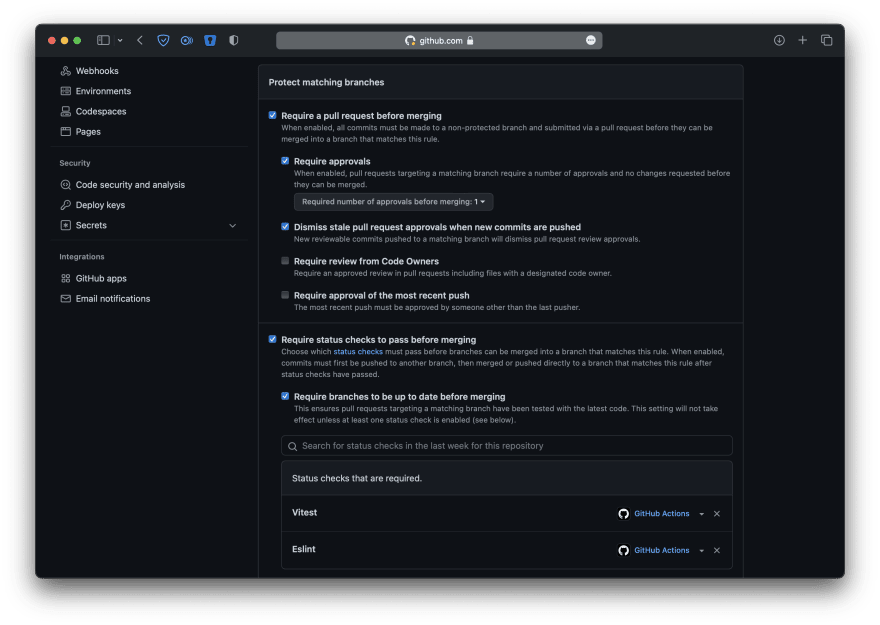
To complete, click on the Create button at the bottom of the page.
Docs
For the documentation, we have a scenario where there is VitePress and Storybook need to publish together. Before creating the workflow, enable the pages in the repo settings.

- Similar to the previous workflow, start by creating a new file in your GitHub repository called
.github/workflows/docs.yml. - In the
onkeyword, set it to run onpushto themainbranch, also add the option to trigger it manually withworkflow_dispatch.
on: # Runs on pushes targeting the default branch push: branches: - 'main' # Allows you to run this workflow manually from the Actions tab workflow_dispatch:- Define the Runner to the
ubuntu-latest.
jobs: eslint: runs-on: ubuntu-latest- Add all actions to perform a
checkoutto fetch the code, do another action tosetup-node, install all dependencies with thenpm cicommand, build storybook with the target to the public folder inside the docs, so when VitePress runs thebuildcommand it will copy the storybook files together and after everything is built trigger an action to setup GitHub Pages and update generated page artifact. - To complete, add another job, grant the permissions to write, and call the deployment action.
# docs.ymlname: Docson: # Runs on pushes targeting the default branch push: branches: - 'main' # Allows you to run this workflow manually from the Actions tab workflow_dispatch:jobs: build: name: Build # Specify runner + deployment step runs-on: ubuntu-latest steps: - name: Checkout Repository uses: actions/checkout@v3 - name: Setup Node.js uses: actions/setup-node@v3 with: node-version: 16 cache: 'npm' - name: Install dependencies run: npm ci - name: Build Storybook run: npm run storybook:build - name: Build VitePress run: npm run docs:build - name: Setup pages uses: actions/configure-pages@v2 - name: Upload artifact uses: actions/upload-pages-artifact@v1 with: path: 'docs/.vitepress/dist' deploy: name: Deploy # Add a dependency to the build job needs: build # Specify runner + deployment step runs-on: ubuntu-latest # Grant GITHUB_TOKEN the permissions required to make a Pages deployment permissions: pages: write # to deploy to Pages id-token: write # to verify the deployment originates from an appropriate source # Deploy to the github-pages environment environment: name: github-pages url: ${{ steps.deployment.outputs.page_url }} steps: - name: Deploy to GitHub Pages id: deployment uses: actions/deploy-pages@v1Conclusion
The tooling used as part of the frontend development process ensures everything is working or is done as expected, and automation is designed to make it easier for developers to work without having to worry about these details.
This is just the tip of the iceberg, to learn more, check the GitHub Actions documentation and take a look at some starter workflows.
Original Link: https://dev.to/helmuthdu/automated-frontend-workflow-4665
Dev To
More About this Source Visit Dev To