
An Interest In:
Web News this Week
- April 26, 2024
- April 25, 2024
- April 24, 2024
- April 23, 2024
- April 22, 2024
- April 21, 2024
- April 20, 2024
Some of Our Sources
- Web Designer Wall
- The Logo Smith
- Naldz Graphics
- My Ink Blog
- Line 25
- Freelance Switch
- Design Modo
- Android Dissected
- Daily Now
- The Verge
Help Webnuz
Referal links:
CD onboarding with Harness using Azure.
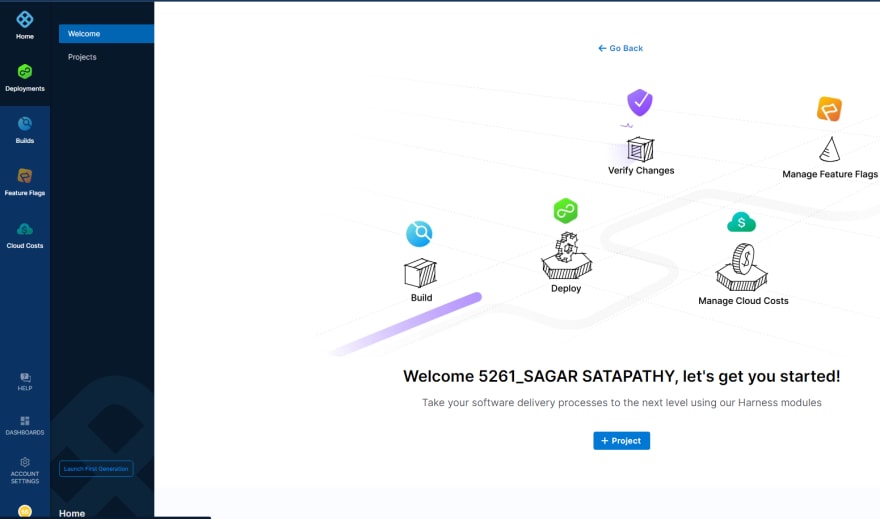
What is Harness?
Harness is the industry's first Software Delivery Platform to use AI to simplify your DevOps processes - CI, CD, Feature Flags, Cloud Costs, and much more.
Why Harness?
Harness is a modern software delivery platform that allows engineers and DevOps to build, test, deploy, and verify software, on-demand.
What is Cloud Delivery Pipeline (CD Pipeline)?
A CD Pipeline is a series of Stages where each Stage deploys a Service to an Environment.A CD Pipeline can perform many additional CD operations, including, but not limited to:
- Propagating Services and their definitions across Stages
- Approvals using integrations like Jira and ServiceNow.
- Synchronizing stage deployments using barriers.
- Notifications.
Aim: Setting up and running the pipeline which can run an Nginx image on your cluster with Harness using Microsoft Azure!

PreFlight Checklist!
- Forking the Repository
- Microsoft Azure Account
- A Docker Hub account
- Kubernetes cluster

Steps to set up Azure-kubernetes cluster
- Log in to Microsoft Azure Portal,using student id gives you free credit.
- Search for Kubernetes Services.
- Click on Create.Then click on Create Kubernetes cluster.
- Fill up all the necessary details like Kubernetes cluster name-demo(example).
- Finally Click Review+Create button then Create and give it some time to Initialize deployment.You will be notified once it's deployed.6.Click connect and get ready for using Harness.

Steps to set up the Harness Delegate
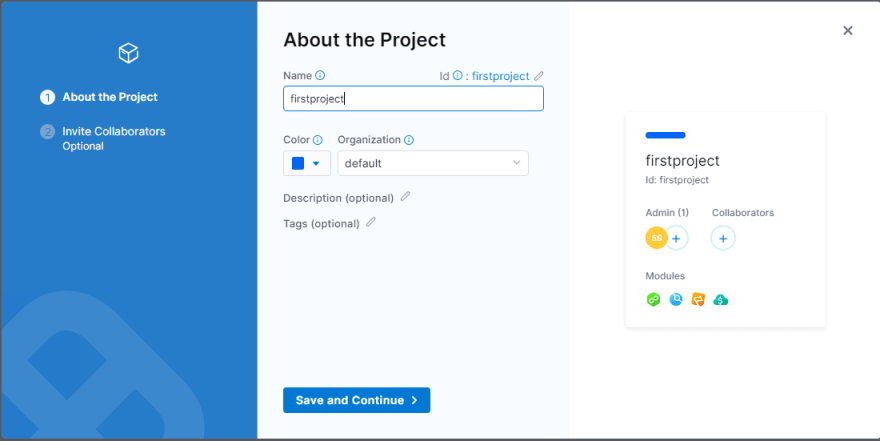
- Log in to your Harness Account.
- In The Project Setup tab choose Delegates and hit + Create a Delegate after setting up project:firstproject.

- Choose Kubernetes and continue. Enter the following details:
- Delegate Name:newdelegate
- Delegate Size:Small
- What installer do you want to use?:Kubernetes
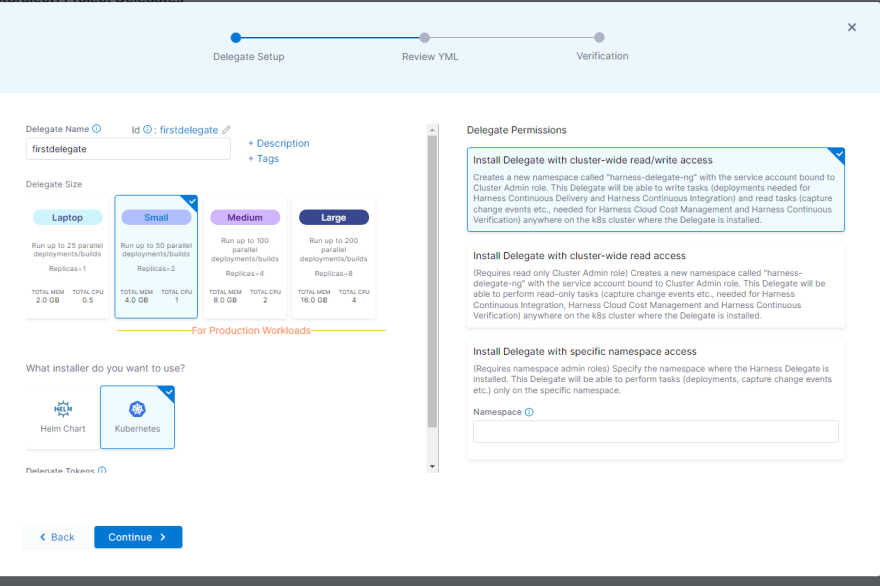
- Press Continue.
- Download YAML file and then Continue
- Open Kubernetes Cluster tab and Press Connect then Open Cloud Shell
- Upload the YAML file in the cli or copy the content of YAML file to cli of Cloud Shell
- Enter the following code
kubectl apply -f harness-delegate.yml
Press Done once you see green check mark in Checking for
Heartbeat section in Harness tab.
Secrets and steps to set them up
GitHub Personal Access Token
Harness needs a Personal Access Token to access GitHub repositories.
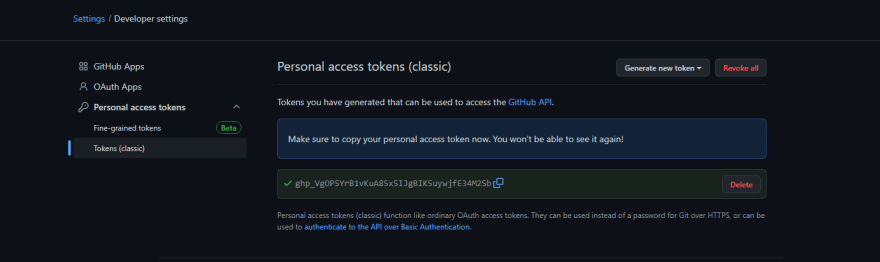
- Login to GitHub and click on Settings from the top-right menu
- Select Developer Settings from the list of Account Settings
- Select Personal access tokens->Token(Classic)->generate new Token
- Click on Generate new token (grant ALL permissions)
- Copy the generated token and save it.
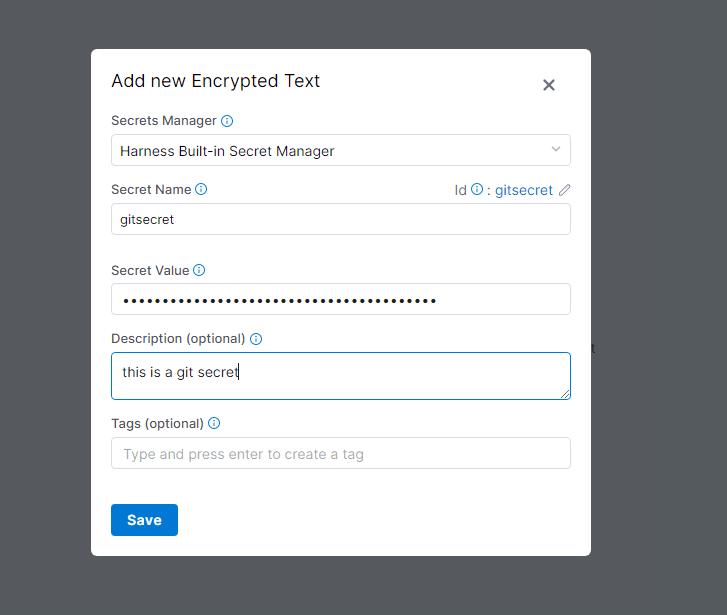
- Now go to Harness Secret Tab
- Click New Secret->Text
- Fill up the details and copy the secret key from github token generated and paste it in harness secret just created.
DockerHub Access Token
Sign-in to Docker Hub
Go to Account Setting then Security and generate New
Access Token and generate.

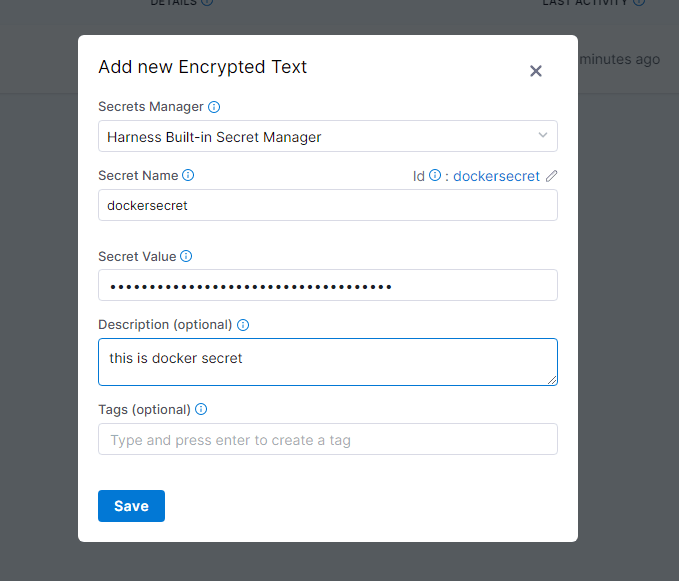
- Now go to Harness Secret Tab and click New Secret->Text
- Fill up details and paste the key generated from docker hub and hit save.
Steps the to set up GitHub Connector
In Harness Dashboard you will notice Connector tab under your
project setup section.
- Click + New Connector and choose Github from Code Repositories
- Name:githubconnector
- GitHub Account URL: YOUR_GITHUB_URL
- Test Repository:cd-pipeline-sample and Continue.
- Username:YOUR_GITHUB_USERNAME
- Personal Access Token:choose your github secret created in harness
- Check the Enable API access (recommended)
- Personal Access Token:choose your github secret created in harness and Continue
- Select how you would like to connect to the provider:Connect through a Harness Delegate
- Choose the Delegate you created-newdelegate then Save and Continue and Finish.
Steps the to set up Docker Connector
In Harness Dashboard you will notice Connector tab under your
project setup section.
- Click + New Connector and choose Docker Repositories from Artifact Repositories.
- Name:dockerconnector
- Docker Registry URL:https://registry.hub.docker.com/v2/
- Username:DOCKER_USERNAME
- Password:Docker secret you created in Harness Secret Tab and Continue.
- Select how you would like to connect to the provider:Connect through a Harness Delegate
- Select the Delegates this Connector will use:Use Delegate you created-newdelegate then Save and Continue and Finish.
Setting up Project
We have already forked the cd-pipeline-sample.
Its time to create Pipeline and see what we have created.
Setting up the Pipeline
Go to cd-pipeline-sample repo which you forked browse
through*.harness folder* and edit Pipeline.yaml file
Name the projectIdentifier:PROJECT_NAME_CREATED_IN_HARNESS
(for eg:my project name is firstproject)
So Pipeline.yaml will be:
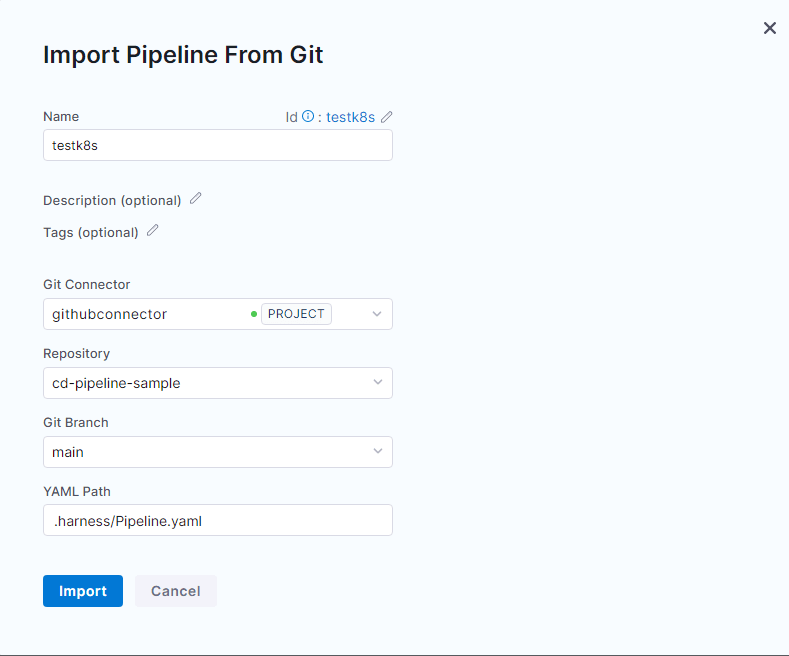
pipeline: name: testk8s identifier: testk8s projectIdentifier: firstproject orgIdentifier: default tags: {} stages: - stage: name: k8deploy identifier: k8deploy description: "" type: Deployment spec: serviceConfig: serviceRef: k8service serviceDefinition: spec: variables: [] manifests: - manifest: identifier: manifest type: K8sManifest spec: store: type: Github spec: connectorRef: testhelp gitFetchType: Branch paths: - default-k8s-manifests/Manifests/Files/templates repoName: harness-docs branch: main skipResourceVersioning: false - manifest: identifier: values type: Values spec: store: type: Github spec: connectorRef: testhelp gitFetchType: Branch paths: - default-k8s-manifests/Manifests/Files/ng_values_dockercfg.yaml repoName: harness-docs branch: main artifacts: primary: spec: connectorRef: harnessdocker imagePath: <+input> tag: <+input> type: DockerRegistry type: Kubernetes infrastructure: environmentRef: K8Env infrastructureDefinition: type: KubernetesDirect spec: connectorRef: test namespace: default releaseName: release-<+INFRA_KEY> allowSimultaneousDeployments: false execution: steps: - step: name: Rollout Deployment identifier: rolloutDeployment type: K8sRollingDeploy timeout: 10m spec: skipDryRun: false rollbackSteps: - step: name: Rollback Rollout Deployment identifier: rollbackRolloutDeployment type: K8sRollingRollback timeout: 10m spec: {} tags: {} failureStrategies: - onFailure: errors: - AllErrors action: type: StageRollback- Choose the Pipeline tab from your project in Harness Dashboard and click on + Import From Git
- Fill the details according to image
- Now open the pipeline you created and click on k8deploy

- Under Services -> Select Service click New Service and name it as nginx then choose it from dropdown
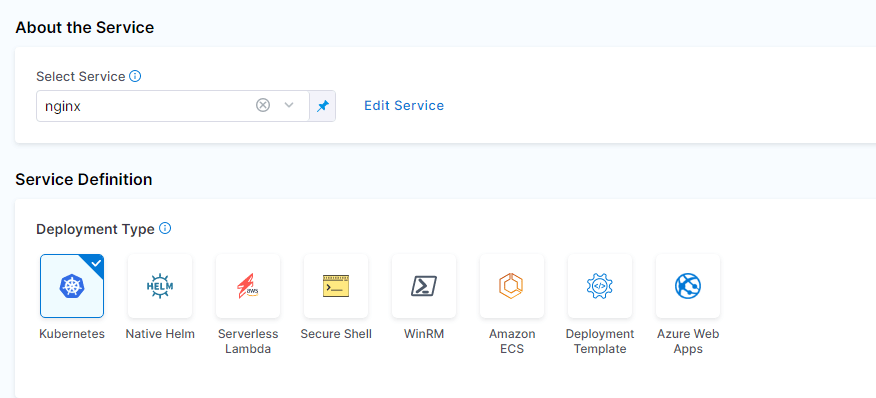
- Lets setup the manifest now

- Click on manifest edit button ->ContinueGitHub Connector:CONNECTOR_CREATED_FOR_GITHUB_IN_HARNESS i.e githubconnector.
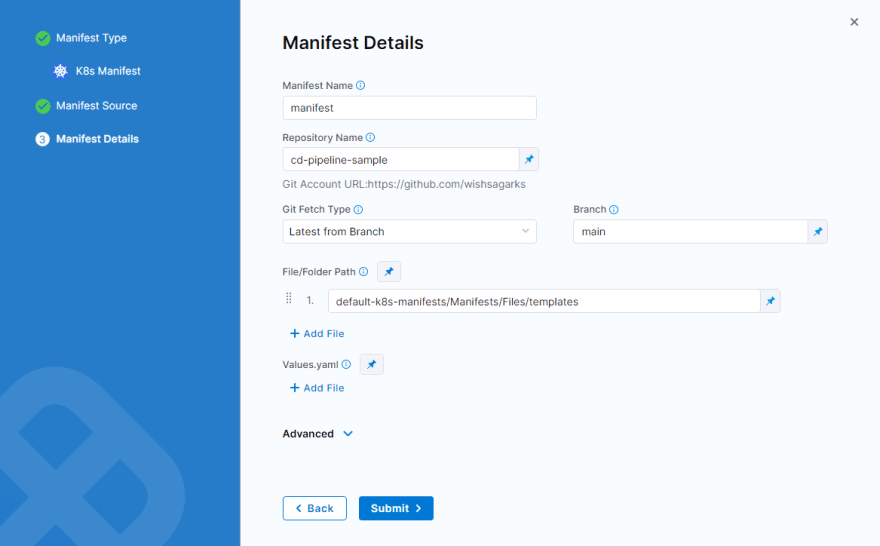
- Edit values by clicking its edit button then Continueand choose the Connector created for Github in Harness Connector and Submit.
- Finally lets edit the Docker Artifact->ContinueChoose the Docker connecter you created in Harness Connector section.
- Click on the button shown in the image and give the path as library/nginx and Submit.

- Continue it will take you to Infrastructure section Specify Environment:+ New Environment .

- Connector: + New Connector
- Name:kubernetesinfraconnector
- Details:Use the credentials of a specific Harness Delegate (IAM role, service account, etc) and Continue
- Delegate:Delegate you created in harness-newdelegate
- Finally Save and Continue and Finish then Continue.
- Now hit Save and Save again then Run.

Give tag:latest and click Run Pipeline
Hoooray we have completed our cd pipeline.

Happy hacking,see you until next time!
About me:freaking_wish
ref:Github repo
vid ref:Harness community
Original Link: https://dev.to/freaking_wish/cd-onboarding-with-harness-using-azure-2k04
Dev To
More About this Source Visit Dev To