
An Interest In:
Web News this Week
- April 27, 2024
- April 26, 2024
- April 25, 2024
- April 24, 2024
- April 23, 2024
- April 22, 2024
- April 21, 2024
Some of Our Sources
- Simplebits
- The Logo Smith
- Smashing Apps
- You The Designer
- CSS Globe
- Wal You
- CSS Tricks
- Android Dissected
- Codrops
- Dev To
Help Webnuz
Referal links:
Request payment anywhere, anytime with Payment Links
Did you know you can request payment from someone with little to no code? Thats what Payment Links are about.
With Payment Links, you can share a link to a generated payment page, with anyone and as many times as youd like.
Lets go through a couple of ways to do this.
No-code solution via the Stripe dashboard
From the Stripe dashboard, navigate to the Payments tab, select Payment Links in the left nav and click on the Create payment link button.
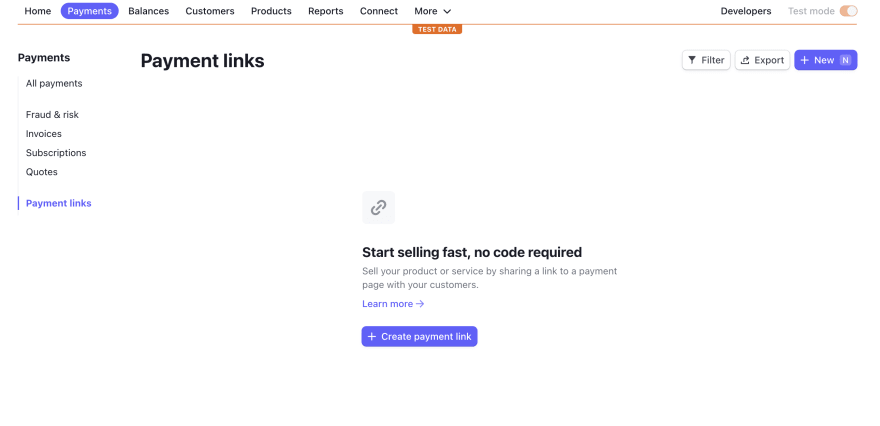
From there, select one or multiple products you'd like to create a Payment Link for, select a quantity or let customers select it. There are additional options if you'd like to allow promotion codes or collect some customers personal details, but that's pretty much it!
In the preview section, you can toggle views between desktop and mobile to see how the payment page would look like on different devices.
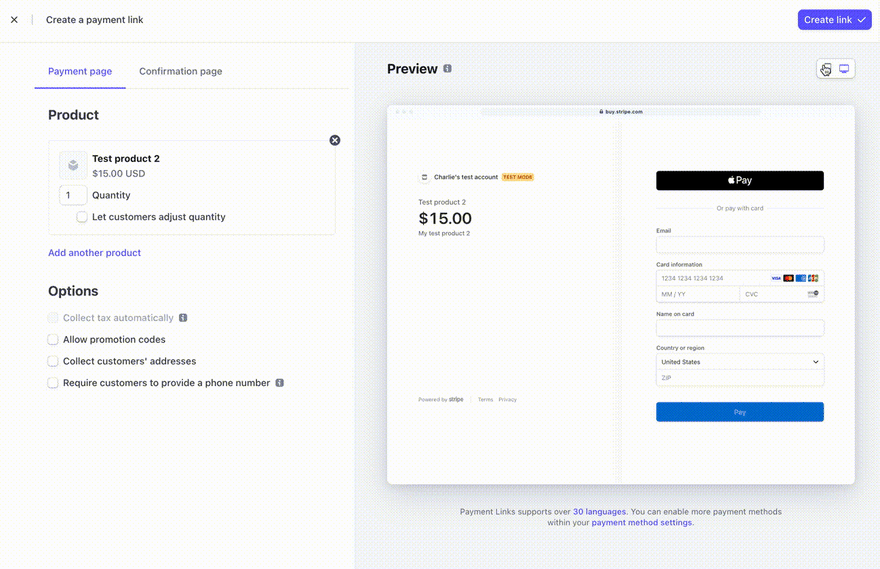
Finally, you can decide if you'd like to show a confirmation page after the payment is confirmed.
Once you're happy with it, click on the "Create link" button and you now have a link you can copy and paste anywhere to request payment for a product or subscription! Additionally, you can also download the image of a QR code so your customers can pay by scanning it.
In less than 5 lines of code
If you'd rather automate the process of creating Payment Links, you can do it with a very small amount of code.
For example, if you're using Node.js, here's the code you will need:
const stripe = require('stripe')('YOUR-STRIPE-SECRET-KEY');const paymentLink = await stripe.paymentLinks.create({ line_items: [{price: '{{PRICE_ID}}', quantity: 1}],});You can find your secret key by visiting the dashboard. Price IDs can be found on product pages, under the Pricing section. A price ID starts with price_.
When running this code sample, the value of the paymentLink variable will be an object of the following shape:
{ id: 'plink_5KhHxFLbMooaWdpX1j0LsyAAA', object: 'payment_link', active: true, after_completion: { hosted_confirmation: { custom_message: null }, type: 'hosted_confirmation' }, allow_promotion_codes: false, application_fee_amount: null, application_fee_percent: null, automatic_tax: { enabled: false }, billing_address_collection: 'auto', livemode: false, metadata: {}, on_behalf_of: null, payment_method_types: null, phone_number_collection: { enabled: false }, shipping_address_collection: null, subscription_data: null, transfer_data: null, url: 'https://buy.stripe.com/test_9PT4gl7RY6ACCCC8wx'}If Node.js isn't the language you're the most familiar with, no problem, we have code samples available in more languages in our docs.
Alternatively, if you'd like to test this functionality quickly, you can also run the following curl command:
curl https://api.stripe.com/v1/payment_links \ -u {{YOUR-STRIPE-API-KEY}} \ -d "line_items[0][price]"="{{PRICE_ID}}" \ -d "line_items[0][quantity]"=1Deactivating a payment link
Finally, an important thing to note is that, after creating a payment link, you cannot delete it but you can deactivate it by updating the status active to false.
You can do this either by doing an API request or directly from the dashboard.
Deactivating via API request
Updating the details of a payment link using the API can be done by calling the update method, passing the payment link ID and the object {active: false}.
const stripe = require('stripe')('YOUR-STRIPE-API-KEY');const paymentLink = await stripe.paymentLinks.update( 'plink_5KhHxFLbMooaWdpX1j0LsyAAA', {active: false});Deactivating via the dashboard
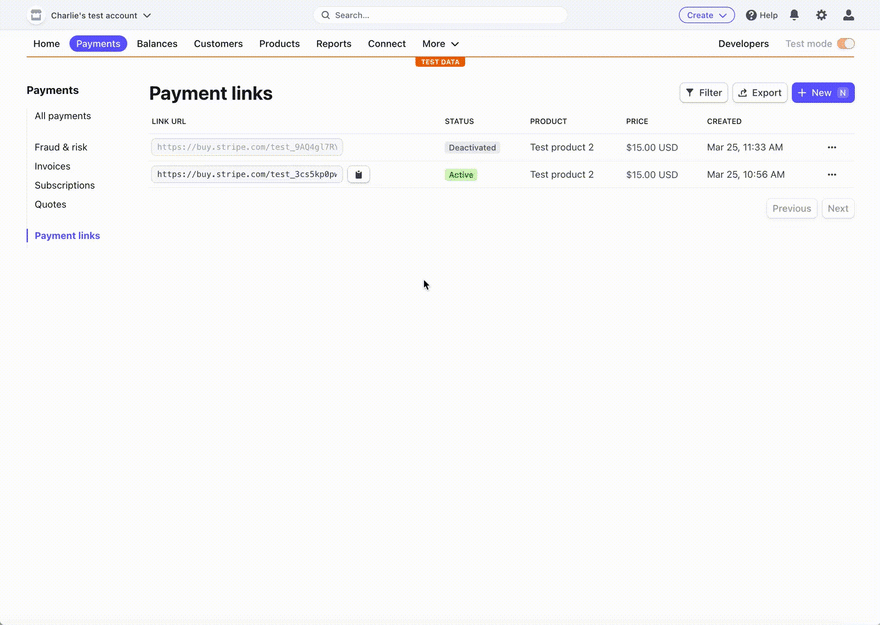
Using the dashboard, navigate to the Payment Links page where you should see a list of your payment links.
On the far right of each row, click on the ellipsis and click on "Deactivate".

After being deactivated, a payment link will redirect to an expiration page so customers will no longer be able to complete a purchase using this link.
This post covered how to create a simple payment link but if you'd like to learn more about the different additional options available, feel free to check our docs!
Stay connected
In addition, you can stay up to date with Stripe in a few ways:
Follow us on Twitter
Join the official Discord server
Subscribe to our Youtube channel
Sign up for the Dev Digest
Original Link: https://dev.to/stripe/request-payment-anywhere-anytime-with-payment-links-3bjf
Dev To
More About this Source Visit Dev To