
An Interest In:
Web News this Week
- April 27, 2024
- April 26, 2024
- April 25, 2024
- April 24, 2024
- April 23, 2024
- April 22, 2024
- April 21, 2024
Some of Our Sources
- Technology Review
- Web Designer Wall
- Team Treehouse
- You The Designer
- CSS Globe
- Specky Boy
- Spyre Studios
- Freelance Switch
- Android Headlines
- Willems Lab
Help Webnuz
Referal links:
How to build your virtual workspace
In this article I will teach how to use
Dockercontainers as a development workspace using a real word example. I will go through multipleDev Opsrelated topics. However, this is still an example that I have had the opportunity to work on during my open-sourcing journey.
What do we want to achieve?
One of the wonderful open source projects that I have got the opportunity to help in is the One Programming language . The goal of this project is to create a programming language named One. To build the project and run tests you must have a list of hard to install and configure dependencies on your machine, e.g. Make, LLVM, etc. Moreover, we wanted to make it easy for developers to get involved and contribute easily in the project. That's why we considered having a docker image to build the code and run tests as priority. Hence, we created this beautiful image for our organization.
In this article I am going to show you how we made it and also how you can make you own development image.
Build the Docker image
First things first, we need to build the image. Indeed there is nothing special in this section, because we will only write a Dockerfile for our image. Yet, what make this image special are the pieces of software that will include. Generally, you ought to setup packages required to run your project and your tests, along side with a version control system like git. As far as I am concerned, I included the following packages in my lightweight alpine base image:
FROM alpine:latestLABEL The One Programming Language# LLVM versionARG LLVM_VERSION=12.0.1# LLVM dependenciesRUN apk --no-cache add \ autoconf \ automake \ cmake \ freetype-dev \ g++ \ gcc \ libxml2-dev \ linux-headers \ make \ musl-dev \ ncurses-dev \ python3 py3-pip \ gitNext I setup the reaming packages, like LLVM and pre-commit. This last is a powerful framework for managing and maintaining multi-language pre-commit hooks. It is an important addition to your open source project. Since Git hook scripts are useful for identifying simple issues before submission to code review. We run our hooks on every commit to automatically point out issues in code such as missing semicolons, trailing whitespace, and debug statements. By pointing these issues out before code review, this allows a code reviewer to focus on the architecture of a change while not wasting time with trivial style nitpicks.
# Build and install LLVMRUN wget "https://github.com/llvm/llvm-project/archive/llvmorg-${LLVM_VERSION}.tar.gz" || { echo 'Error downloading LLVM version ${LLVM_VERSION}' ; exit 1; }RUN tar zxf llvmorg-${LLVM_VERSION}.tar.gz && rm llvmorg-${LLVM_VERSION}.tar.gzRUN cd llvm-project-llvmorg-${LLVM_VERSION} && mkdir buildWORKDIR /llvm-project-llvmorg-${LLVM_VERSION}/buildRUN cmake ../llvm \ -G "Unix Makefiles" -DLLVM_TARGETS_TO_BUILD="X86" \ -DLLVM_ENABLE_PROJECTS="clang;lld" \ -DCMAKE_BUILD_TYPE=MinSizeRel \ || { echo 'Error running CMake for LLVM' ; exit 1; }RUN make -j$(nproc) || { echo 'Error building LLVM' ; exit 1; }RUN make install || { echo 'Error installing LLVM' ; exit 1; }RUN cd ../.. && rm -rf llvm-project-llvmorg-${LLVM_VERSION}ENV CXX=clang++ENV CC=clang# pre-commit installationRUN pip install pre-commitNow as everything is perfectly configured, you can copy your project directory, build the code, and run your tests while showing significant logs:
# Work directory setupCOPY . /OneWORKDIR /One# CMake configuration & buildingRUN mkdir buildRUN cmake --no-warn-unused-cli -DCMAKE_EXPORT_COMPILE_COMMANDS:BOOL=TRUE -DCMAKE_BUILD_TYPE:STRING=Debug -DCMAKE_C_COMPILER:FILEPATH=/usr/bin/gcc -DCMAKE_CXX_COMPILER:FILEPATH=/usr/bin/g++ -H/One -B/One/build -G "Unix Makefiles"RUN cmake --build ./build --config Debug --target all -j 6 --# Change directory to buildWORKDIR /One/build# Running example input.oneRUN ./lexer ../src/input.one logRUN cat log# Running testsRUN ./lexer_testRUN ./parser_testRUN ./argument_test# Tests DashboardCMD ctest --output-on-failure Deploy it to DockerHub
To do so, you will need a DockerHub account. Yet, only your account username and credentials are required. As we are going to deploy it using GitHub Actions. Similarly to pre-commit, using GitHub Actions, or any CI\CD tool is a good Dev Ops practice. Especially that we are going to configure our image to run pre-commit hooks, build the code, run tests, and deploy it the new image to DockerHub. In fact, you will do very minor changes to the following GitHub Workflow to use it in any other project.
Let's begging by configuring the GitHub Workflow that will run on every push or pull request:
name: Dockerize One Programming languageon: push: branches: [master] pull_request: branches: [master]jobs: build-deploy: name: Build and Publish Docker image runs-on: ubuntu-latestNext, we will add steps to configure needed GitHub Actions to deploy to DockerHub. Particularly, you won't need any other GitHub Actions. Because, you already have a Dockerfile with all the prerequisites!
steps: - name: Checkout code uses: actions/checkout@v2 - name: Set up QEMU uses: docker/setup-qemu-action@v1 - name: Set up Docker Buildx uses: docker/setup-buildx-action@v1We shall continue by Sign into our DockerHub account:
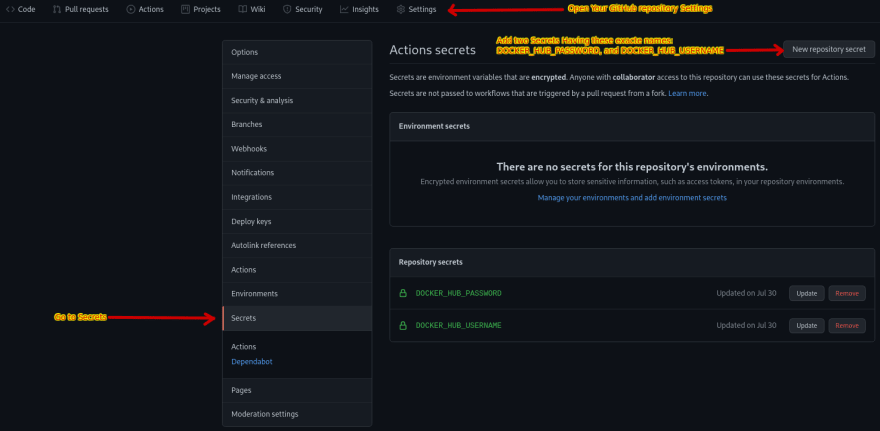
- name: Login to DockerHub uses: docker/login-action@v1 with: username: ${{secrets.DOCKER_HUB_USERNAME}} password: ${{secrets.DOCKER_HUB_PASSWORD}}Before we go to the next step you need to add secrets.DOCKER_HUB_USERNAME and secrets.DOCKER_HUB_PASSWORD to your Github repository:
Finally, publish your new image named onelangorg/one:latest to DockerHub:
- name: Build and Push to DockerHub uses: docker/build-push-action@v2 with: context: . push: true tags: onelangorg/one:latestDon't forget to configure cache so that you won't need to go with all the unnecessary configuration steps everytime. Also, this will decrease the run time dramatically. In my case without cache the run time is about two hours, but with cache it often doesn't surpass one minute and a half!
cache-from: type=registry,ref=onelangorg/one:latest cache-to: type=inlineConsequently, you will cerate a Docker repository in your docker account.
Use it as a Workspace
In this section you will need to pull the docker image form DockerHube have VSCode with Remote-Containers installed:

This awesome extension admit of getting into the Docker container itself, by opening a VSCode window inside it.
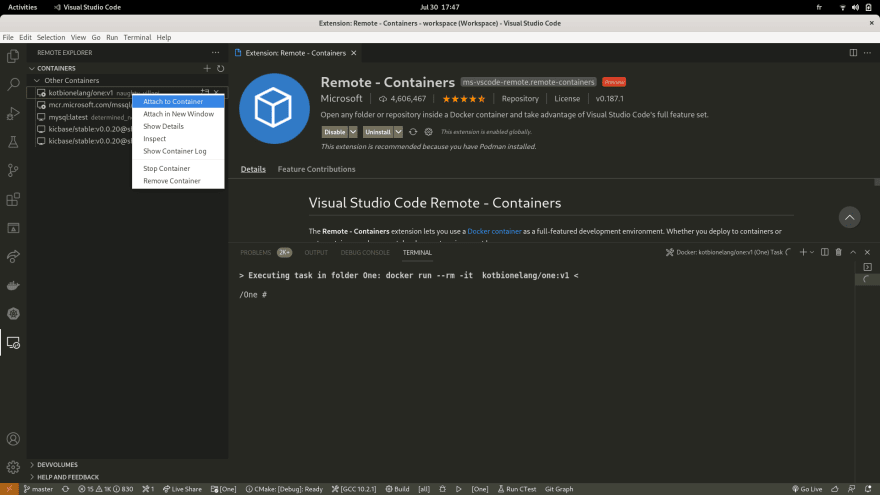
After Opening the new window attached to your container you can open the development directory:

And Here you go you have a workspace configured and ready to use!

Conclusion
Now that you come to the end of this article, you can see how important to use Docker, DockerHub, and GitHub Actions. As well as how easy to use are they. These technologies helps developers to be more productive and not bother with the repetitive configuration of the workspace. On every pull request, we get an updated Docker image with a clean code and successfully run tests thanks to pre-commit, Github Actions, and cache.
Original Link: https://dev.to/abdorah/how-to-build-your-virtual-workspace-84
Dev To
More About this Source Visit Dev To