
An Interest In:
Web News this Week
- April 1, 2024
- March 31, 2024
- March 30, 2024
- March 29, 2024
- March 28, 2024
- March 27, 2024
- March 26, 2024
Some of Our Sources
- Slashdot
- Mashable
- Web Designer Wall
- Team Treehouse
- Inspiredology
- CSS Globe
- Android Dissected
- Willems Lab
- Daily Now
- The Verge
Help Webnuz
Referal links:
A Brief Introduction To Supabase With JavaScript
INTRODUCTION
Supabase is The Open Source Firebase Alternative that makes it easy to create a backend for your project in less than 2 minutes. So today, we will be talking about how to implement supabase auth, and database in your project. We are going to use Vite as our frontend build tool. If you don't know anything about Vite I'll suggest you read my blog about Vite.
What is Supabase
Supabase is an open-source Firebase alternative. Its features are:
- Listen to database changes.
- Query your tables, including filtering, pagination, and deeply nested relationships (like GraphQL).
- Create, update, and delete rows.
- Manage your users and their permissions.
- Interact with your database using a simple UI.
I'm not saying that it is better than firebase or it is an exact copy of firebase. It both has difference like firebase uses NoSQL as its database but supabase uses PostgreSQL. PostgreSQL is an object-relational database system with over 30 years of active development that has earned it a strong reputation for reliability, feature robustness, and performance. Enough about Supabase let's talk about how to setup up and use it in your project.
Setup Vite & Tailwind
We are going to use Vite for building our app and Tailwind CSS for styling our mini project because I believe that making a project with Supabase will make you understand better than talking about it. If you are using VS Code as your code editor then I will suggest you install the Tailwind CSS Intellisense extension from VS Code marketplace.
Copy the below command and paste it into your terminal for creating a Vite app.
npm init @vitejs/appGive the name of your project and choose vanilla js as it is a mini project. And then change your directory to that folder and install all the modules.
cd *your project name*npm installnpm run devThen, install Tailwind CSS by following the steps.
npm install -D tailwindcss@latest postcss@latest autoprefixer@latestAfter installing Tailwind, paste the following command to generate tailwind.config.js & postcss.config.js files automatically.
npx tailwindcss init -pThen add the following commands in style.css file. Tailwind will start working perfectly.
@tailwind base;@tailwind components;@tailwind utilities;I'm not going to talk much about Tailwind as it is a Supabase blog. Maybe in the future, I may create a blog talking about Tailwind.
Setup Supabase Database
In order to set up Supabase Database in your project visit Supabase official page and sign in. Then click on Start Project.

After clicking on Start Project you will redirect to Supabase Dashboard where you can manage your projects. Click on New Project to start a new project.

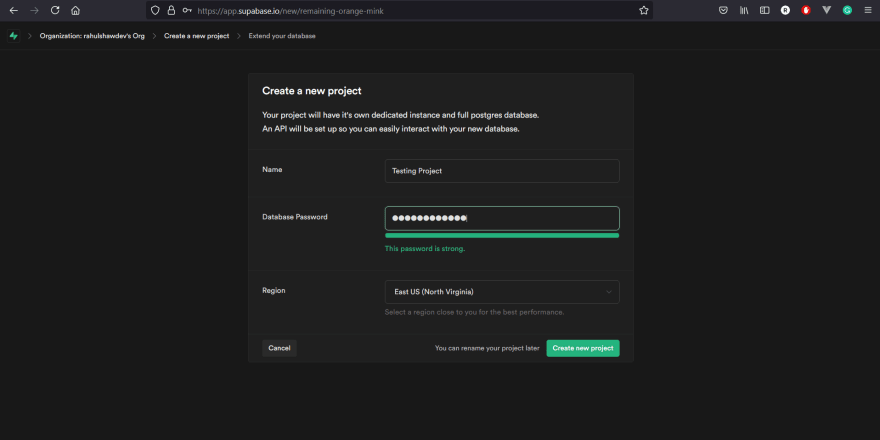
After that give your project a name, and a password. Then, click on Create New Project.
Then, you will be redirected to a page where it will be showing that the database and API are building so, give it some time. After that, you will be redirected to your project's dashboard where you can use the database, auth, and many more features. Then click on Create a new table to start working with the database.

After that, fill up the details of your table as I have done below.

Then Click on New Column and there you can make columns.

Click on Insert Row and then a sidebar will appear to give the details of your blog. In the below image I have filled in with some example blogs for learning purposes.


So, in order to extract this data in your javascript file, we need to install only one extra dependency.
npm install @supabase/supabase-jsNow, create the .env file in your project's directory and copy your anon key and supabase URL and paste it in your .env file as I have done below.

VITE_SUPABASE_URL=YOUR_SUPABASE_URLVITE_SUPABASE_ANON_KEY=YOUR_SUPABASE_ANON_KEYAfter that create a supabase.js file in your project's directory and paste the following commands.
import { createClient } from '@supabase/supabase-js'const supabaseUrl = import.meta.env.VITE_SUPABASE_URLconst supabaseAnonKey = import.meta.env.VITE_SUPABASE_ANON_KEYexport const supabase = createClient(supabaseUrl, supabaseAnonKey)Now, Supabase has been successfully installed in your local machine. Next, we are going to make a mini-project with the database.
Mini Blog Project
In this Mini Blog project, we will be extracting data from Supabase and adding it to our website. Also, we will be seeing how you can data into your database using the form.
Copy the index.html and main.js files and run them on your machine.
<!DOCTYPE html><html lang="en"> <head> <meta charset="UTF-8" /> <link rel="icon" type="image/svg+xml" href="favicon.svg" /> <meta name="viewport" content="width=device-width, initial-scale=1.0" /> <title>Vite App</title> </head> <body> <div class="p-5"> <div id="blogs" class="mb-6"></div> <form id="form"> <input class="border-2 border-black mb-2" type="text" placeholder="Title of the blog" id="title" /> <br /> <textarea class="border-2 border-black mb-2" placeholder="Description of the blog" id="content" ></textarea> <br /> <button class="bg-blue-400 p-1 text-white" type="submit">Submit</button> </form> </div> <script type="module" src="/main.js"></script> </body></html>Here const { data, error } = await supabase.from("blogs").select(); gets all the data from supabase and const { data, error } = await supabase.from("blogs").insert([{ title: title.value,content: content.value },]); insert the data into our table.
import "./style.css";import { supabase } from "./supabase";const blogsContainer = document.getElementById("blogs");const form = document.getElementById("form");const title = document.getElementById("title");const content = document.getElementById("content");const useData = async () => { const { data, error } = await supabase.from("blogs").select(); // gets the data from supabase let html = ""; data.forEach((blog) => { html += ` <div data-id="${blog.id}"> <h1 class="text-2xl">${blog.title}</h1> <p>${blog.content}</p> </div> `; }); blogsContainer.innerHTML = html;};window.addEventListener("DOMContentLoaded", useData);form.addEventListener("submit", async (e) => { e.preventDefault(); const { data, error } = await supabase.from("blogs").insert([ { title: title.value, content: content.value, }, ]); // insert data into supabase useData();});The Code is nothing too fancy and very beginner-friendly. So you can see how easy it is to use Supabase Database. Now, we are going to create a mini authentication project with supabase.
Mini Auth Project
In this Mini Auth project, we will be signing up users. Before jumping on the code we need to do a little setting. So, Supabase automatically allows email confirmations. For Example: If you sign up with supabase, then supabase will send you a confirmation message on your email. But we don't want that in this project so to disable it, go to your supabase project's database and click on the authentication icon and then click on Settings, you can see that there is an option for disabling email confirmations so simply click on it.

Then, just copy the index.html & main.js code and run it on your machine.
<!DOCTYPE html><html lang="en"> <head> <meta charset="UTF-8" /> <link rel="icon" type="image/svg+xml" href="favicon.svg" /> <meta name="viewport" content="width=device-width, initial-scale=1.0" /> <title>Vite App</title> </head> <body> <div class="p-5"> <div> <h1 class="text-3xl text-center mb-4">Sign Up</h1> </div> <form id="form"> <input class="border-2 border-black mb-2 p-1" type="email" placeholder="Email Address" id="email" autocomplete="off" /> <br /> <input type="password" placeholder="Password" id="password" class="border-2 border-black mb-2 p-1" /> <br /> <button class="bg-blue-400 p-1 text-white" type="submit">Submit</button> </form> </div> <script type="module" src="/main.js"></script> </body></html>Here, const { user, session, error } = await supabase.auth.signUp({ email: email.value, password: password.value }); signUp users. NOTE: IF YOU ARE NOT DISABLING EMAIL CONFIRMATION THEN THE SESSION VALUE WILL BE NULL
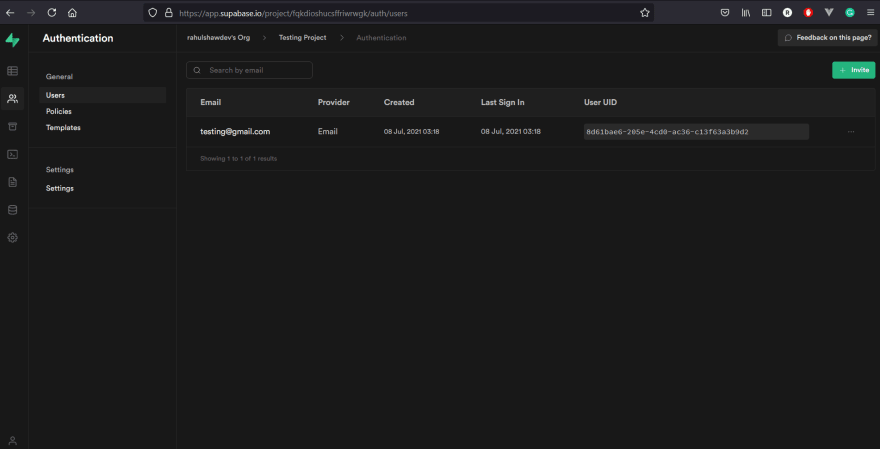
import "./style.css";import { supabase } from "./supabase";const form = document.getElementById("form");const email = document.getElementById("email");const password = document.getElementById("password");form.addEventListener("submit", async (e) => { e.preventDefault(); const { user, session, error } = await supabase.auth.signUp({ email: email.value, password: password.value, }); console.log(user, session, error); form.reset();});After submitting the form, you can see in your project's auth dashboard that the user has been added.
CONCLUSION
So, I'm going to end this pretty lengthy blog by saying that give Supabase a try, I promise you'll not regret it. And also learn many more things like storage, function, etc from Supabase's documentation because that's where you will learn things more than any blog or youtube video will teach you. So that's it for today if you have any problems or if I made any mistake, feel free to comment it down. And also comment on what topic should I write on next.
Original Link: https://dev.to/rahulshawdev/a-brief-introduction-to-supabase-with-javascript-3l19
Dev To
More About this Source Visit Dev To