
An Interest In:
Web News this Week
- April 1, 2024
- March 31, 2024
- March 30, 2024
- March 29, 2024
- March 28, 2024
- March 27, 2024
- March 26, 2024
Some of Our Sources
- Fudge Graphics
- Web Design Ledger
- CSS Tricks
- Freelance Switch
- Design Modo
- Web Resource Source
- Android Dissected
- Codrops
- Willems Lab
- Dev To
Help Webnuz
Referal links:
Taking KubeMQ Build & Deploy for a Test Drive: My Thoughts and Impressions
Introduction
As a full-stack developer who often takes on DevOps and infrastructure responsibilities, the following happens all too frequently.
Problem: I need to set up a backend server for my app!
Solution: Google it!
Google result #1: How to set up tech 1, tech 2, and tech 3 in just five minutes, for free!
(skip the prereqs because who needs those, follow the instructions, hit an error)
Hmm, lets try that again
(install all the prereqs, follow the instructions, hit another error)
Okay, maybe its just this article. Lets try a different one.
Google result #2: Make your own tech 2 and tech 3 server using Docker and Kubernetes.
(follow the instructions, hit an error)
Well...maybe the third times the charm?
(day passes)
Guess Ill try again in the morning
While every tool promises to be simple to set up and use, the reality is that setting up infrastructure can be complex and unforgiving without the necessary experience. As such, I tend to shy away from instructions that consist of long lists of command-line operations, as more often than not they dont work for me.
Ive recently been exploring KubeMQ, a Kubernetes-native message queue. Theyve recently released a new web-based configuration tool called Build and Deploy which promises to make infrastructure setup as simple as filling in a form.
In this article, Ill cover what KubeMQ is, what Build and Deploy adds, and well run through a test scenario with an API gateway and a Redis backend.
What is KubeMQ?
KubeMQ is a Kubernetes-native messaging app that is extremely lightweight and easy to play with. Historically speaking, message queues are large, resource-intensive applications. For example, the latest version of IBM MQ at the time of writing has significant hardware requirements, such as > 1.5 GB disk space and 3 GB of RAM. In contrast, the Docker container for KubeMQ is roughly ~30 MB and installs on my local machine nearly instantly.
Ive already written about how KubeMQ can simplify much of the complexity around connecting microservice architectures as well as communicating between multiple edge and cloud environments, so I wont repeat all of that here. To summarize, because it is lightweight and Kubernetes-native, KubeMQ unlocks new possibilities that simply arent possible with legacy message queues.
So far, however, configuration has been a bit more difficult than I would like. Documentation is somewhat sparse, and configuration happens via either the command line or YML files. There are some examples online, but without context, it can be difficult to modify them to fit my needs. Through my experience with KubeMQ, configuration has been the main point of friction.
Enter KubeMQ Build & Deploy, which promises to make it simple to go from 0 to 100 with KubeMQ. Lets take a look.
What is KubeMQ Build & Deploy?

KubeMQ Build & Deploy is a new web-based tool that generates KubeMQ configuration YML files. These can then be applied to your K8s cluster:
kubectl apply -f <insert URL or filename here>Basically, its a GUI that allows you to skip the command-line configuration process. As an added bonus, the YML files can be saved and applied any number of times. And as your familiarity with the system grows, you can build upon them by editing them on your own.
All of these make KubeMQ Build & Deploy useful for a number of scenarios. Prototyping or trying to evaluate whether KubeMQ is for you? Build & Deploy makes that process significantly simpler, as you dont need to learn YML in order to do so.
Experienced already and need to build a complex production configuration? Create it in Build & Deploy, and then compare it to what you would have built manually to avoid unforeseen gaps in your infrastructure.
Enough talk, lets take it for a spin.
Try it out! A tutorial to connect API gateways and a Redis store
First, make sure that you have a local installation of Kubernetes (Ill be using minikube on Windows) and a free account with KubeMQ. Second, make sure that you can successfully initialize KubeMQ:
kubectl apply -f https://deploy.kubemq.io/initkubectl apply -f https://deploy.kubemq.io/key/<your key>After a minute or two, check your pods; you should see something like the following:

KubeMQ has created a basic three-node cluster for you, and as long as its all running we are ready to continue.
For reference in case you hit any issues, Ive created a GitHub repo with all of my YML files. That said, the whole point is to try out Build & Deploy, lets keep going and do that!
Set up the API Gateway
Next, head on over to KubeMQ Build & Deploy. Since we already have the cluster, we need to configure the source (API gateway) as well as a target (Redis backend). Lets start with the source:

From there, in the top right search API and you should see the HTTP source.
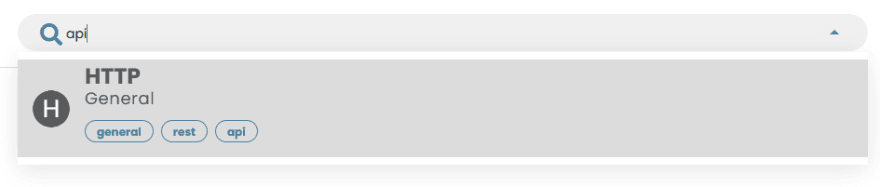
Update the name, and lets make it go from /redis to a KubeMQ Query channel called Redis. Your configuration should look as follows:

Hit Save. Next, hit Deploy at the bottom right. Configure it to expose with a Node Port of 30000, and then hit Get Deploy Manifests.

Click the link to automatically copy it to your clipboard. From there, paste it in your terminal and apply that configuration. If you want to take a look at the YML, simply copy the URL portion of the command and navigate to that URL in your browser. It should look like this:
apiVersion: core.k8s.kubemq.io/v1alpha1kind: KubemqConnectormetadata: name: kubemq-sources namespace: kubemqspec: config: | bindings: - id: 84691jbourwif3uk name: api-source properties: {} source: kind: http properties: methods: post path: /redis target: kind: kubemq.query properties: address: kubemq-cluster-grpc.kubemq:50000 channel: redis node_port: 30000 replicas: 1 service_type: NodePort type: sourcesLets continue and set up the Redis backend.
Set up Redis
Since its not part of KubeMQ, Build & Deploy wont generate the configuration for you. You can go ahead and download this YML file from my GitHub which you can just apply. It should look like this:

Now that this is up, lets wire it all together.
Configure the Redis Target
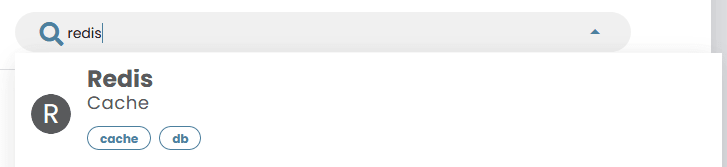
Go back to the Build & Deploy homepage, and go to KubeMQ Targets:

Search and select Redis:
Set the source as the KubeMQ Query Redis channel, and change the target connection string to redis://redis-svc.redis:6379.
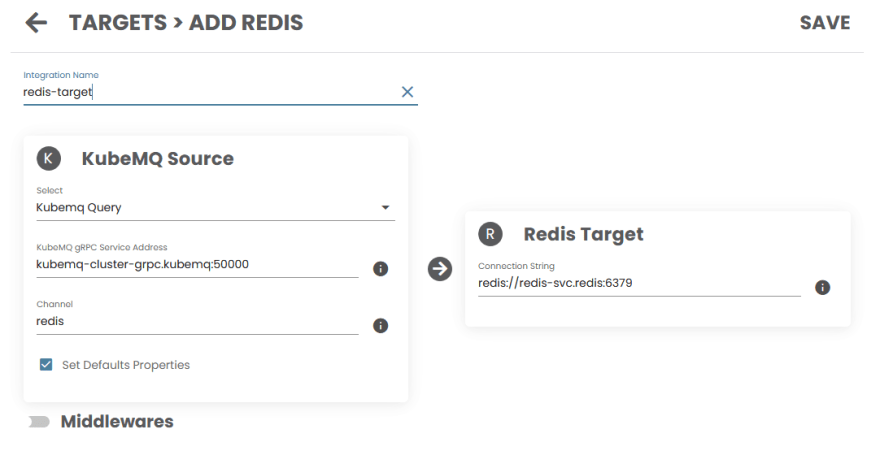
Hit Save and then Deploy. We dont need to change anything else, so just go ahead and hit Get Deploy Manifests, and apply the command.
To test it out, go ahead and run a POST. You can get the URL by running minikube service list:

And then lets do a POST. Ill use Postman, although Ive also provided some sample cURL commands.

And you can do a get (this is a Redis get, not an HTTP GET):

You should get something like the following:

The result is a base64 byte array, which can be decoded at a site such as this one:

And thats it! Via KubeMQ Build and Deploy, youve used KubeMQ and Kubernetes to set up a working link between an API gateway and a Redis backend. The best part is, these YML files can be applied in any Kubernetes cluster, making it easy to turn this prototype into a real production setup.
Below, Ill share my overall impressions of this new product.
Review and Impressions
Overall, my first experience with KubeMQ Build & Deploy has been really positive! Installing KubeMQ was always easy, and using a fully configured cluster was seamless and performant.
Configuration used to be a bit of a black box. Now, Build & Deploy makes it a good bit more transparent and straightforward. Plus, going through the tool allows us to experience just how powerful KubeMQ itself is; the number of sources and targets that can be connected is quite high, and it makes me think of all the possibilities. In many cases, I think I could replace some simpler backend services with KubeMQ, and probably end up with something more performant and stable.
There are several small UI things that could be improved. For example, I wish there was a button to save YML files directly to my computer instead of doing it manually. I also wish there was an option to either save configurations to my account for later editing or even import YML files so that I could add to them via the browser. Right now, without that functionality, the tool is primarily useful for setting up new environments. That said, the tool is quite new and I expect these will be added with time.
For me, Build & Deploy significantly bridges the gap between installation and production, and Im already thinking about how I can use this in my current and future projects. What about you?
Original Link: https://dev.to/mbogan/taking-kubemq-build-deploy-for-a-test-drive-my-thoughts-and-impressions-1djg
Dev To
More About this Source Visit Dev To