
An Interest In:
Web News this Week
- April 26, 2024
- April 25, 2024
- April 24, 2024
- April 23, 2024
- April 22, 2024
- April 21, 2024
- April 20, 2024
Some of Our Sources
- Engadget
- Mashable
- Simplebits
- Six Revisions
- FanExtra - PSD
- Noupe
- Specky Boy
- Android Dissected
- Codrops
- TechPowerUp
Help Webnuz
Referal links:
SaaS Project Setup & Database Creation - Update 2
In this series, I'm building a Software-as-a-Service product for syncing environment variables between team members. Since my background is mostly frontend, I'll be learning about backend technologies on the way. You can read more about my concept and technology selection in my first post here.
Boilerplate
I knew going into this project that I wanted to install tools to keep my code clean and high quality - prettier, ESLint, and Husky for automatically running those tools.
Instead of spending lots of time configuring everything myself, I found this open source project starter on GitHub: Boilerplate and Starter for Next JS 10+, Tailwind CSS 2.0 and TypeScript.
Personalizing the Template
ESLint Config
As soon as I started writing code with this template, I decided the ESLint config was too strict for my taste. I replaced the ESLint config with a simpler version, based on this article with some modifications based on my experience with ESLint:
module.exports = { root: true, env: { node: true, es6: true, }, parserOptions: { ecmaVersion: 8 }, // to enable features such as async/await ignorePatterns: ['node_modules', '.next', '.out', '!.prettierrc.js'], extends: ['eslint:recommended'], overrides: [ // This configuration will apply only to TypeScript files { files: ['**/*.ts', '**/*.tsx'], parser: '@typescript-eslint/parser', settings: { react: { version: 'detect' } }, env: { browser: true, node: true, es6: true, }, extends: [ 'eslint:recommended', 'plugin:@typescript-eslint/recommended', // TypeScript rules 'plugin:react/recommended', // React rules 'plugin:react-hooks/recommended', // React hooks rules 'plugin:jsx-a11y/recommended', // Accessibility rules ], rules: { // We will use TypeScript's types for component props instead 'react/prop-types': 'off', // No need to import React when using Next.js 'react/react-in-jsx-scope': 'off', // This rule is not compatible with Next.js's <Link /> components 'jsx-a11y/anchor-is-valid': 'off', '@typescript-eslint/no-unused-vars': ['warn'], // I suggest this setting for requiring return types on functions only where useful '@typescript-eslint/explicit-function-return-type': [ 'warn', { allowExpressions: true, allowConciseArrowFunctionExpressionsStartingWithVoid: true, }, ], }, }, ],}Next.js Folder Structure
Next.js gives developers the option of keeping their source files in the project root or in a /src directory. Since I'm keeping everything in subfolders anyway, I moved the subfolders from /src to the project root. Personal preference
Database Setup
The juicy part!
I went through the Prisma Start From Scratch guide.
Installing PostgreSQL
I installed PostgreSQL from the official website, and started playing with it locally. After installing it, you can launch PSQL, a Terminal/CMD prompt which lets you interact with your local Postgres server.
I used CREATE DATABASE <project name>; to create a new database. Don't forget the ;, I missed that at first and I was so confused!
You can use \l to list all the databases you have created. Then, you can use \connect <project name> or \c <project name> to connect to the database you just created.
I'll do most of the database setup in Prisma, but for now I created a table for testing, again using PSQL. You can hold down
CREATE TABLE USER( ID INT PRIMARY KEY NOT NULL);You can list the tables in your database using \dt.
Prisma Setup
Next, I went back to my project, and followed the rest of the steps from the Prisma Getting Started Guide. I won't go into that in too much detail since it's all included in the Prisma link above :)
I filled in the schema with a rough version of how I imagine my system working. I'm imagining organizations which pay for the service. Each organization will have projects, and each project can have different environments, each with their own set of variables. Users will be linked to projects so that organizations can control who has access to which variables.
This is a snippet from the schema I created based on this, with explainer comments:
model Project { // Using @default will allow Prisma to create the IDs for us when a new entry is added to the Projects table id Int @id @default(autoincrement()) name String description String environments Environment[]// Each project can only have one organization, so the project has an organizationId organizationId Int// This will allow us to retrieve info from the DB about the organization with organizationId equal to the field above this line organization Organization @relation(fields: [organizationId], references: [id]) usersWithAccess UsersOnProjects[]}// Users can have multiple projects and projects can have multiple users, so we use a many-to-many relationship via this model.model UsersOnProjects { user User @relation(fields: [userId], references: [id]) userId String project Project @relation(fields: [projectId], references: [id]) projectId Int createdAt DateTime @default(now()) @@id([userId, projectId])}Heads up! Prisma has a great VSCode extension for formatting and validating the prisma.schema file!
After running npx prisma migrate and npx prisma generate, Prisma has now set up all of the required database tables for my schema, and also created fully-typed functions in the Prisma client specific to my model.
For example, I can write code like this to write to the database:
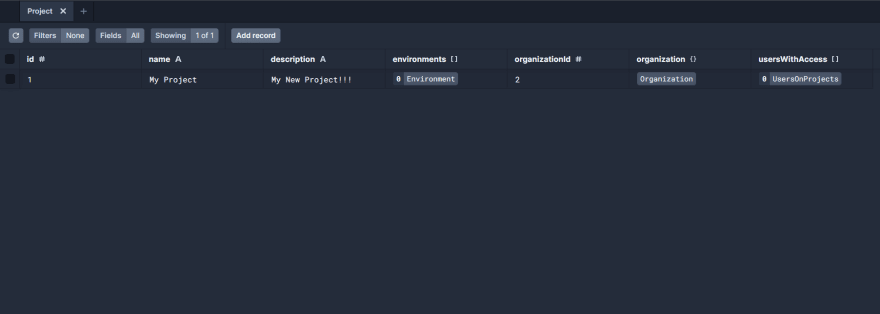
import { PrismaClient } from '@prisma/client';const prisma = new PrismaClient();prisma.project.create({ data: { name: "My Project", description: "My New Project!!!", organizationId: 2 }})Since Prisma generated the project.create function from my schema, it knows the expected types of the inputs, and my IDE will autosuggest the fields that I just put in my schema! I think that's pretty cool.
Finally, you can run npx prisma studio for a web interface where you can view all of your database tables visually. Here's the project I just created:
Thanks for Reading!
In the next part, I'll add some API Routes so that we can see the magic of Prisma, and then we'll add authentication!
Follow me here or on Twitter for more updates and other content. Feel free to DM me for questions!
Original Link: https://dev.to/ajones_codes/saas-project-setup-database-creation-update-2-3cej
Dev To
More About this Source Visit Dev To