
An Interest In:
Web News this Week
- April 30, 2024
- April 29, 2024
- April 28, 2024
- April 27, 2024
- April 26, 2024
- April 25, 2024
- April 24, 2024
Some of Our Sources
- TutsPlus - Code
- The Logo Smith
- Inspiredology
- Naldz Graphics
- Crazy Leaf Design
- Android Dissected
- Codrops
- Android Headlines
- Dev To
- TechPowerUp
Help Webnuz
Referal links:
How to Make a Timeline on Google Slides With Templates
Learn how to select and modify a professional template to create your own Google Slides timeline. We provide step-by-step details in the written instructions. Or, you can jump right into the quick-start video with more condensed instructions:
How to Quickly Make a Timeline on Google Slides (Video)
For a quick look at how to make a timeline with Google Slides using professional templates, watch the screencast below:
Guide to Making Great Presentations (Free eBook Download)
Before continuing on, be sure to first grab the perfect complement to this tutorial. Download our new, free eBook: The Complete Guide to Making Great Presentations. It'll help you master the complete presentation process.

For more detailed instructions, review the written steps in this tutorial:
What Is a Timeline? Why Use a Pro Google Slides Template?
Timelines are useful for project teams or just for informational purposes. A timeline provides an effective visual representation of past or planned events.
If you need to include a timeline in your presentation, then you may want to know how to make a timeline with Google Slides.
You could use Google Slides drawing tools to draw your own timeline. But, unless you're a professional designer, your timeline might come out looking sloppy and unpolished. Even if you're a design professional, creating an attractive timeline takes quite a bit of time.

It makes a lot more sense to base your Google Slides timeline on a professional template. You'll save time and be assured of an attractive outcome. You can find great Google Slides templates on Envato Elements or GraphicRiver, including many that have pre-designed timelines.:
 Google Slides25 Cool Google Slides Themes (To Make Presentations in 2019)
.jpg) Google Slides25 Best Business Presentation Templates for Google Slides (For 2019)
Google Slides25 Best Business Presentation Templates for Google Slides (For 2019)
Now let's jump into this step by step tutorial to learn how to download and customize a Google Slides timeline.
Step 1. Download Your Presentation Template
Your first step is to download a professional template that includes a timeline slide that you like. For detailed instructions on how to download a presentation template or theme, study this helpful Envato Tuts+ tutorial:
.jpg)
For these instructions, I'll be using the popular Marketofy Google Slides template. The Marketofy template includes an impressive number of graphics, including various charts and maps. It also includes several timelines, making it perfect for this project.

Note: If you need to insert a timeline into an existing presentation, you can still use a professional timeline slides template. The helpful tutorial 14+ (Quick) Professional Tips to Using Google Slides Better explains how to quickly copy a slide from one presentation to another.
Step 2. Rename Your Presentation
Once you've downloaded your timeline slide template, copy and rename it. That way, you can return to your original template if you need to.
To copy your template, right-click on it in Google Drive to bring up the drop-down menu:
.jpg)
Click the Make a copy option. You'll see a new file called Copy of [Template Name]. Right-click on the new file to bring up the drop-down menu again. Click the Rename option. The Rename dialog box appears:
.jpg)
At the prompt, type the name of the presentation you're creating. Click the OK button when you're done.
Step 3. Remove Unneeded Slides
Double-click on the presentation name in Google Drive to open the presentation file. Since you're opening it for the first time, you'll be prompted to open it with Google Slides. Click the Open with Google Slides button in the center of the screen.
Your presentation displays:
.jpg)
The title slide displays on the right. On the left you see a panel containing thumbnails of all the various slides available in this timeline slide template. The Marketofy template contains over 190 different slide layouts.
Of course, you probably don't need all these slide layouts. So, you'll delete the ones you don't need.
Deleting a slide is easy. Simply click the thumbnail of the slide you don't need to select it. Then right-click on the selected slide to display the drop-down menu:
.jpg)
Choose the Delete slide option to remove that slide from your presentation.
Tip: Save time by deleting multiple slides at once. Hold down the Shift key to select multiple slides at the same time. When you bring up the drop-down menu, the menu option reads Delete slides. Click on it to remove all the selected slides from your presentation.
In the illustration below, I've removed all the slides in the presentation except for the cover slide, three timeline template slides, and a closing slide:
.jpg)
It's time to choose one of the template slides to base my timeline on.
Step 4. Choose a Timeline Template
To choose the right slide to use as a basis for my timeline, look at each timeline slide template separately. Here's the first timeline slide:
.jpg)
As you can see, it's an attractive layout with text above and below the timeline. There are years to mark each milestone. And the icons in the center of the milestone can be replaced if needed.
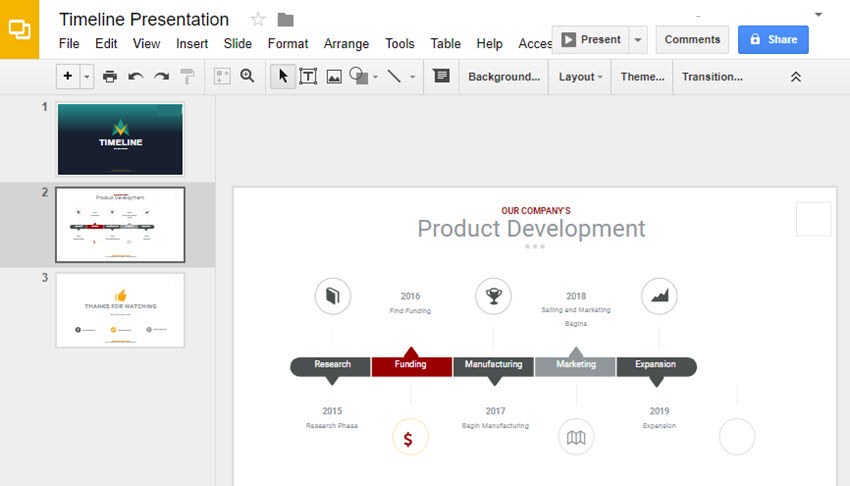
Let's look at the second timeline:
.jpg)
This is another attractive layout that also makes use of icons. This timeline also includes text on the timeline itself.
Here's the final timeline layout we're considering:
.jpg)
This is another attractive timeline option from the Marketofy template. Although it doesn't include years, it makes good use of icons and color.
After some consideration, I decide to use the second timeline for this project. When you've selected the right timeline layout for you, use the instructions in Step 3 to remove the timeline template slides you won't be using.
Now, let's modify the template for this project.
Step 5. Modify the Timeline Template
Once you select a presentation template and chose the slide layouts you want to use, it's now time to make the presentation your own. In this section, you'll learn how to:
Add/Change Text. Replace the template text with your own information.
Change Colors. Change the default template colors to reflect your own corporate color palette.
Change Icons. Replace the default icons with icons more suited to your needs.
Delete Timeline Segments. Add or delete timeline segments, as needed.
Note: If the timeline slide template contains layers with instructions (or other special features), remove those elements before starting.
Let's go through each step separately:
1. Add or Change Text
To add or change text, click on the text box containing the text you want to change. You should see a blue outline. Click in the text box and drag the cursor over the text you want to replace, highlighting it. Here's what text looks like when it's selected:
.jpg)
Once you've selected the text to be replaced, type over it with your new text:
.jpg)
Continue selecting and replacing text on the slide, as needed. You can also delete text you don't need. If you need to resize a text box, drag one of the blue handles on the text box to make it larger or smaller.
Here's what my timeline looks like with all the text replaced to reflect my new timeline:
.jpg)
Now, let's make some adjustments to the colors:
2. Change Colors
This color palette uses yellow as an accent theme. Let's say I wanted to change that to red instead. In Google Slides, it's not difficult to do.
To change the color of the text, click on a text box. Highlight the text you want to change in the timeline. Then, click the A option under More on the Tools menu:
.jpg)
When you click on the A, the color palette displays:
.jpg)
Click on the color you wish to apply to the selected text. In this case, dark red 2.
You can also change the color of a graphic. Start by clicking on it. Then, click the Fill Color tool in the Tools menu to show the color palette:
.jpg)
Click a color on the color palette to apply it to the selected graphic. Be careful. The arrow shaped pointers on this timeline are a separate graphic from the timeline segment. You'll need to change their color separately.
Here's a look at the slide with all the yellow elements changed to red:
.jpg)
3. Change the Icons
Now that we've modified the text and changed the color, it's time to take a look at the icons. Most of the icons match my timeline segments pretty well, but the people icon under funding doesn't fit.
Fortunately, the Marketofy presentation template includes a set of icons. To find them, look for a subfolder in the Marketofy Google Slides Template folder called Icon Set Library:
.jpg)
Double-click on the Icon Set Library folder to open it. Inside you'll find a slideshow file containing hundreds of icons. Once you've opened the slideshow file, click on an icon you like to select it. Use CTRL + C to copy the selected icon to your clipboard.
Note: If the template you selected doesn't include icons, you can copy an icon you created or already own to the clipboard from the location where you store it.
Now, return to your timeline presentation and use CTRL + V to copy the selected icon from your clipboard into your presentation. Use the method described earlier to change the color of the icon if needed. Here's a look at the timeline with the new and old icon:
.jpg)
I'll be replacing the people icon with a dollar sign icon.
Now, we need to delete the old icon. Select the old icon by clicking on it. With the icon selected, right-click to see the drop-down menu:
.jpg)
Click the Cut menu option to remove the old icon. Click on the new icon to select it. Use the cursor to drag the new icon to the proper location (the cursor should look like a crosshair). Be careful not to change the size or shape of the new icon as you drag it.
Here's what our slide looks like so far:
.jpg)
4. Delete a Timeline Segment
We've got one final change to make. The timeline template had a segment that we're not using for this timeline. As you can see in the illustration above, the segment on the right end is blank.
We could delete the blank end segment, but that would leave the timeline looking unfinished. Instead, we'll use the skills we learned above to:
- Delete the segment to the left of the end segment.
- Add the text to the end segment.
- Move the end segment to the left.
- Change the color of the end segment.
Let's take a look at each step in the process. Here I've deleted the segment to the left of the current end segment:
.jpg)
As you select the timeline segment graphic to delete it, remember to also select the arrow graphic.
Now let's add text to the end segment. We already removed the previous text in the earlier step. Click in the end segment text box and type the new text. Here's what the timeline looks like now:
.jpg)
To move the end segment, make sure that all the parts of it are selected. In this case the parts are:
- the arrow graphic
- the segment graphic
- the textbox
Once the entire segment is selected, drag it to the left with your cursor. Be careful not to stretch or distort it.
You'll also want to delete the icon that was beneath the end segment since we no longer need it. Take a look at the result:
.jpg)
The timeline is looking pretty good, but the last two segments are the same color. We'll want to change that. Select the last segment and click the Fill color icon to change the color to the darker gray used in the timeline.
Since the arrow graphic is at the top of the segment, I delete it. I copy the down arrow graphic element from the Manufacturing segment and paste it beneath this segment.
Here's our finished timeline:
.jpg)
You can also add segments to a timeline.
To add a segment to a timeline template, select a segment and use your cursor to move it over to make space for a new segment. Then copy one of the existing segments to clipboard and paste it into the empty space. Finally, adjust the text and color of the new segment and make any other necessary changes.
Now that you've made the timeline slide your own, you're ready to present it.
Step 6. Presenting Your Timeline
By their very nature, timelines are complex. That's why it's important to have good speaker notes available during your presentation.
To add speaker notes to your timeline slide, click in the Speaker Note area of the screen and type your note. The Speaker Note area appears below your slide:
.jpg)
The speaker notes aren't visible to your audience when you give your presentation, but as a presenter you can access them.
5 More Great Google Slides Infographic Templates
GraphicRiver isn't the only outlet to download great Google Slides timeline templates. In fact, there's an "all-you-can-download" option to sample from every imaginable type of creative asset.
That's thanks to Envato Elements, a creative's best friend. This service gives you more than 1,000,000 assets across many categories—including Google Slides timeline templates—to build your next project.

That includes thousands of Google Slides templates that you can use to build your next presentation. In fact, many of those will include infographics (like timelines) that help you create easy explanations.
Let's look at five timeline slides templates and the top infographic slide that's included in them, all courtesy of Envato Elements.
1. A Process Timeline

This slide is featured in the INFOGRAPHIC template available via Envato Elements and is a process-centric timeline. The INFOGRAPHIC template is an aptly-named presentation thanks to its almost 200 slides of pure infographics. The example above is another format for building timelines, with icons marking the key point along the way.
2. The Arrow Diagram

Latitud is a Google Slides template with a wide variety of infographics that you can use to show ideas. I like this arrow diagram as a way of comparing multiple numeric amounts. Size the arrows relatively to provide easy comparisons for your audience.
3. The Venn Triangle

You've probably seen and used Venn diagrams before, but how about a Venn triangle? This diagram from the Business Plan template can help you show common versus separate ideas in a triangular diagram.
4. The Process Wedge

My favorite infographic templates are flexible enough to be used for practically any explanation. This simple Google Slides design from Gemba is the perfect illustration of that concept. Use it to combine steps and assessments with the speed gauges to show an idea's components.
5. The Tree Infographic

The Digital template has this creative and flexible tree infographic that could be used to illustrate a variety of ideas. The Tree Infographic included with Digital is a reminder of why I always start off on Envato Elements when I'm brainstorming. I certainly wouldn't have thought of showing an idea with a tree diagram like this one, but it just works. Just like a tree with its roots, you could use this infographic to show a root cause analysis for a business idea.
For even more Google Slides template selections, check out the round-up below:
Make Great Presentations (Free eBook Download)
We've got the perfect complement to this tutorial, which will walk you through the complete presentation process. Learn how to write your presentation, design it like a pro, and prepare it to present powerfully.
Download our new eBook: The Complete Guide to Making Great Presentations. It's available for FREE with a subscription to the Tuts+ Business Newsletter.

Build a Timeline in Google Slides Easily
You've heard the saying, "a picture is worth a thousand words." Well, when it comes to describing a sequence of events, the saying is especially relevant. It's much easier and more effective to show your audience a sequence of events using a timeline than it is to try and describe it using only words.
In this tutorial, we've taken you through the process of modifying a Google Slides presentation template timeline to make it your own. You've learned how to change the text, colors, and icons. You've even learned how to add or delete timeline segments.
Most importantly, you learned that it's easier to build timelines when you've got a starting point in the form of a Google Slides timeline template. Jump to Envato Elements or GraphicRiver to download a template that features a timeline you can use!
Also, take your Google Slides learning further with our multi-part How to Use Google Slides (Ultimate Tutorial Guide).
Editorial Note: This tutorial was originally published in August of 2017. It's been comprehensively revised to include new information—with special assistance from Andrew Childress.
Original Link: https://business.tutsplus.com/tutorials/google-slides-timeline--cms-29331
Freelance Switch
More About this Source Visit Freelance Switch