An Interest In:
Web News this Week
- May 1, 2024
- April 30, 2024
- April 29, 2024
- April 28, 2024
- April 27, 2024
- April 26, 2024
- April 25, 2024
How to Make a Club Flyer Template in InDesign

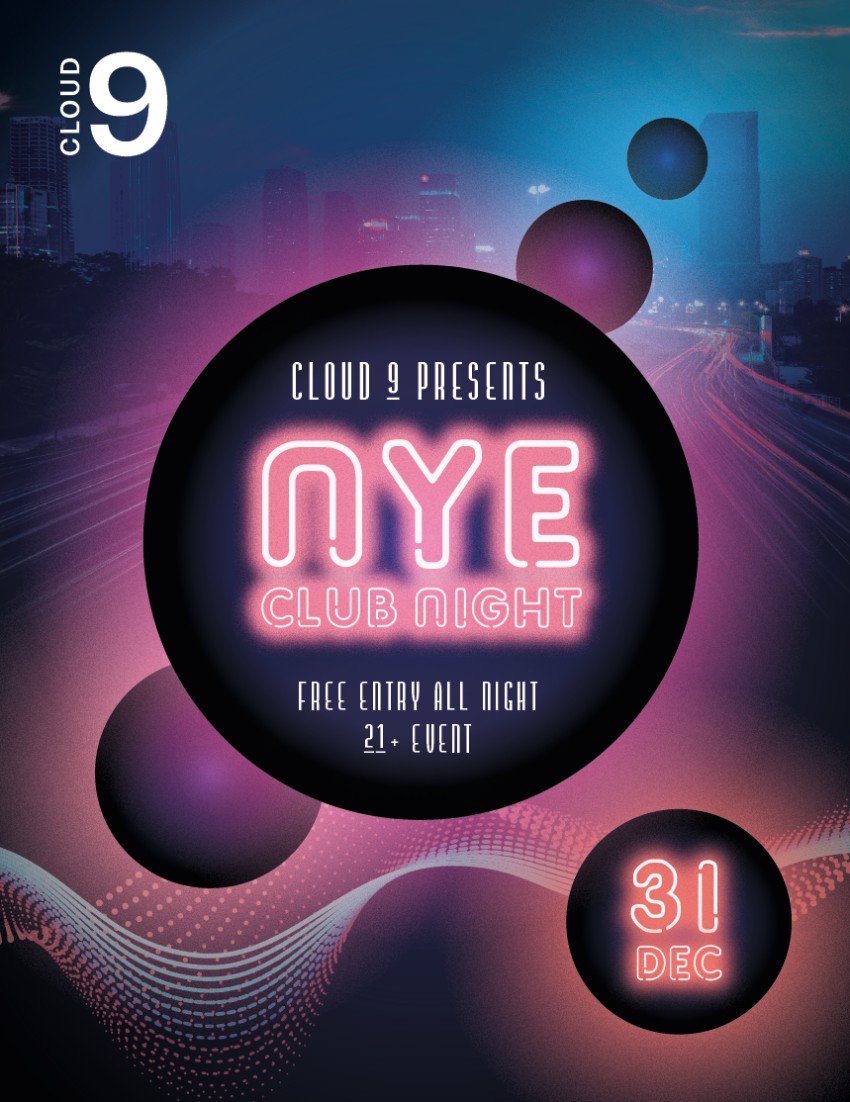
In this tutorial, you’ll learn how to create a flyer template in InDesign for a club night or party. If you’re looking to promote a night-time event, this striking flyer design has a lit-up neon design which is glamorous and atmospheric.
In this tutorial suitable for beginners to InDesign, you’ll learn how to build up the design in layers, creating an immersive, 3D effect for your event flyer.
Looking for more easy-to-edit club flyers? These flyer templates on GraphicRiver and Envato Elements come in a huge range of customisable styles.

24 Cool Event Flyer Templates Using a Flyer Maker (Without Photoshop)

27 Best Flyer Design Ideas Using a Flyer Maker (With Photo)
What You’ll Need to Create Your Flyer
We’ll be putting the main layout together in Adobe InDesign, and dipping into Adobe Illustrator briefly to edit a vector graphic for the design.
You’ll also need to download the following images and fonts from Envato Elements:
You’ll also need to download the provided set of ASE color swatches. We’ll look at how to install these a little later.
Once you’ve installed the fonts on your computer and downloaded the ASE file, you’re ready to start creating your club flyer.

How to Create a Summer Club Flyer in Adobe InDesign

Your Guide to Standard US and International Flyer and Poster Sizes
1. How to Set Up Your Flyer Template in InDesign
Step 1
Open InDesign and go to File > New > Document.
Click on Print at the top of the window, and choose Letter for the page size.
With the orientation set to Portrait and number of Pages to 1, deselect Facing Pages.
Add Margins of 0.75 in and a Bleed of 0.25 in, before clicking Create.

Step 2
Expand the Layers panel (Window > Layers), and double-click on Layer 1, renaming it Background.
Create four more new layers in this order—City, Sound Waves, Circles, and finally Type.

Then lock all the layers except Background.

Step 3
Expand the Swatches panel (Window > Color > Swatches) and choose Load Swatches from the panel’s main menu.

Navigate to the ASE file you downloaded earlier, and Open it. The swatches will load into the panel, ready for you to use.

2. How to Create a Night-Time Backdrop for Your Flyer
Step 1
Click on New Gradient Swatch in the Swatches panel’s main menu.

Name the swatch Blue Gradient and set the Type to Radial.
Click on the left-hand stop on the Gradient Ramp at the bottom of the window and set the Stop Color to C=96 M=87 Y=0 K=0, from the list of Swatches.
For the right-hand stop, choose your dark swatch, C=92 M=80 Y=60 K=95.
Click about two-thirds of the way along the ramp to add a third stop, and set this to C=100 M=93 Y=40 K=44.

Click Add and then Done.

Step 2
Working on the Background layer, select the Rectangle Tool (M) from the Tools panel and drag across the whole page, extending the edge up to the bleed.
From the Swatches panel, set the Fill to Blue Gradient. You can adjust the strength of the gradient from the Gradient panel (Window > Type & Tables > Gradient).

Step 3
Lock the Background layer and unlock the City layer above.
Use the Rectangle Frame Tool (F) to create an image frame across the top half of the page.
File > Place, navigate to the urban traffic photo you downloaded earlier, and click Open.

With the image frame selected, go to Object on the top main menu and choose Effects > Transparency. Switch the Mode to Color Dodge and bring the Opacity down to 50%.

Click on Gradient Feather at the bottom of the panel’s left-hand menu. Set the Angle to -90 Degrees, and pull the left-hand stop to just over halfway along the ramp at the top to strengthen the gradient.

Then click OK to exit the window.

Step 4
Open one of the EPS files in the waves abstract backgrounds folder in Illustrator.
Isolate one of the waves and Edit > Copy it.

Head back over to your InDesign document. Lock the City layer and unlock the Sound Waves layer above. Edit > Paste the vector onto the page, and position it along the bottom, as shown below.

With the wave selected, go to Object > Effects > Transparency, and bring the Opacity down to 60%. Then click OK.

3. How to Create a Planetary Effect on Your Flyer
Step 1
Lock the Sound Wave layer and unlock the Circles layer above.
Use the Ellipse Tool (L) to create a large circle in the center of the page, holding down Shift to create a perfect circle.

Set the Fill of the circle to Blue Gradient.

With the circle selected, go to Object > Effects > Outer Glow.
Click on the colored square next to the Mode menu to open the Effect Color window. From the list of Swatches, choose the pink swatch, C=6 M=84 Y=0 K=0, and click OK.
Set the Opacity to about 85%, the Technique to Precise, Size to around 1.24 in, Noise to 6%, and Spread to 35%. Then click OK.

Step 2
Select the circle and Edit > Copy, Edit > Paste it.

Scale the copy down and position it in the bottom-right corner of the page.
You can return to Object > Effects > Outer Glow and switch the Effect Color to the coral swatch, C=0 M=66 Y=50 K=0.

Step 3
Select this smaller circle and Copy and Paste it, moving the copy over the bottom-left corner of the large circle.
Paste two more times, and reduce the size of each, positioning them in a diagonal line at the top right of the page.

Select the two circles which are overlapping the large circle, and Right-Click > Arrange > Send to Back.


4. How to Format Typography for Your Flyer
Step 1
Lock the Circles layer and unlock the top layer, Type.
Use the Type Tool (T) to create a large text frame over the top of the central circle. Type in the first part of the title of your event (here, ‘NYE’), and from either the top Controls panel or the Character panel (Window > Type & Tables > Character), set the Font to God’s Own Junkyard, Size 113 pt.
Increase the Tracking (letter-spacing) to 80, and from the Swatches panel set the Font Color to [Paper].

Step 2
Add a subtitle below the main heading (here, ‘CLUB NIGHT’), set in Gods Own Junkyard, Size 35 pt.
Set the Font Color to [Paper].

Add two text frames listing the date over the top of the small circle at bottom-right, and set these in Gods Own Junkyard and a [Paper] Font Color too.

Step 3
Select all the text frames on the page with the Selection Tool (V, Escape) and go to Object > Effects > Outer Glow.
Set the Mode to Normal, and switch the Effect Color to coral, C=0 M=66 Y=50 K=0.
Increase the Opacity of the glow effect to 100%, the Size to 0.5 in, Noise to around 7%, and Spread to about 30%.
Then click OK.

Step 4
Add text frames above and below the main heading, set in Tinsel Title and a [Paper] Font Color.

You can also add a logo or business name to the top-left corner of the flyer on the Type layer. Set it in a [Paper] color for contrast.

5. How to Export Your Flyer for Printing
Step 1
When you’ve finished working on your flyer design, you'll need to export it as a print-ready PDF.
Go to File > Export. Choose Adobe PDF (Print) from the Format drop-down menu, name the file, and click Save.
In the Export Adobe PDF window that opens, choose [Press Quality] from the Preset menu at the top.

Step 2
Click on Marks and Bleeds in the window’s left-hand menu.
Check both All Printer’s Marks and Use Document Bleed Settings, before clicking Export at the bottom.

InDesign will generate a press-ready PDF you can send straight off to be professionally printed. Great job!
Conclusion: Your Finished Event Flyer
Your club flyer is finished and printed, and ready for sending out to promote your event. Awesome work!
In this tutorial, you’ve picked up some handy skills for applying to InDesign and other print projects in the future. You now know how to:
- Create stylish flyer designs in Adobe InDesign.
- Build up color and gradients on your design to create a 3D effect.
- Format typography and graphics to a high standard.
- Export your artwork for professional printing.
Looking for more club flyer designs? These easy-to-edit templates on GraphicRiver and Envato Elements come in a huge range of styles and customisable designs.

Original Link: https://design.tutsplus.com/tutorials/how-to-make-a-club-flyer-in-adobe-indesign--cms-32432
TutsPlus - Design
 TutsPlus+ is a blog/Photoshop site made to house and showcase some of the best Photoshop tutorials around.
More About this Source Visit TutsPlus - Design

