
Some of Our Sources
- Simplebits
- You The Designer
- My Ink Blog
- Fudge Graphics
- CSS Globe
- Line 25
- Stylized Web
- Wal You
- Android Dissected
- Codrops
Help Webnuz
Referal links:
How to Make an Isometric Christmas Tree SVG in Affinity Designer

In this tutorial we’ll be getting into the season’s cheer by creating an SVG Christmas tree illustration you can use in any website. We’re going to create the illustration in Affinity Designer then take advantage of the program’s web specific SVG export functionality.
Note: the steps below assume you have a basic level of familiarity with Affinity Designer. If not, you can get the ball rolling with our course Affinity Designer Quick Start.
Creating SVG graphics in Affinity Designer is a fairly straight forward matter, with just a couple of “gotchas” to avoid. One in particular is to be sure you don’t use blending modes other than “Normal” anywhere in your document. If you do, your image will be partially rasterized, defeating the whole purpose of SVG graphics, (the “S” stands for “Scalable”). That said, while you can’t use different blending modes you can use different opacity settings.
Another thing to be aware of is trying to keep your shapes as simple as possible so file size is minimized. For example, using fancy stroke types or texturing will lead to an enormous file size. We’ll be keeping our illustration techniques basic throughout this tutorial to be as SVG friendly as we can.
Let’s begin!
1. Setup the Document and Isometric Grid
Create a new document and select Web from the Type dropdown in the document creation dialogue box. Set both the Page Width and Page Height to be 1024px.

Next let’s go ahead and setup our isometric grid. In the menu along the top of Affinity Designer go to View > Grid and Axis Manager and you’ll see a grid settings box appear. Change these settings:
- Check show grid
- Uncheck Use automatic grid
- Switch the grid Mode from Basic to Advanced
- From the Grid type dropdown select Isometric
- Leave the Spacing setting at
64px - Change the Divisions to
8

How We’ll Describe the Isometric Grid
Throughout this tutorial we’ll be placing path nodes on the isometric grid in order to create and adjust the shapes that will form our Christmas tree. As such, we’ll define some terminology to describe our grid so when I specify the size a shape should be, or the distance a node has to move on the grid, you’ll know what I’m talking about.
When you look at the grid you’ll see it has several thicker lines that form large diamonds, and within those diamonds there are thinner lines that form smaller diamonds. We’ll refer to the diamonds formed by thicker lines on the grid as large grid diamonds, and their smaller counterparts as small grid diamonds. When referring to a single side of one of these large diamonds we’ll use the phrasing large grid unit or large grid line. We’ll use small grid unit or small grid line for the smallest grid measurement.

Note that while you’re working with the isometric grid, in order to accurately place nodes on it you’ll need to ensure snapping is active by depressing the magnet icon found on Affinity Designer’s top toolbar.
2. Create the First Tree Section
As you can see in the preview image of our completed tree at the beginning of this tutorial, the leaf area is going to be comprised of four distinct sections of green. We’ll start by drawing the top most section of the tree, which is also the smallest.
Use the Rectangle tool, (shortcut key M), to draw out a rectangle of about the size you see in the image below. This can be done quite roughly as we’re going to be modifying the shape node by node. To allow you to modify the rectangle’s nodes, select the rectangle and click the Convert to Curve button you’ll see on the context toolbar above your canvas.
Make sure the rectangle has no border and set the fill color to #2F5628.
In order to be able to paste in hex color codes you’ll need to have the RGB Hex color picker active in the Color studio panel. This panel should be open and on the right side of
the interface by default, but if not you can open it by going to View > Studio > Color. Click the small dropdown at the top right of the Color panel, choose sliders, then in the dropdown list inside the panel select RGB Hex.

Note that while you’re manipulating shapes you might find it easier to work in outline view so you can more clearly see your nodes and paths. To activate this go to View > View Mode > Outline. To go back to the regular view choose Vector under the same menu.
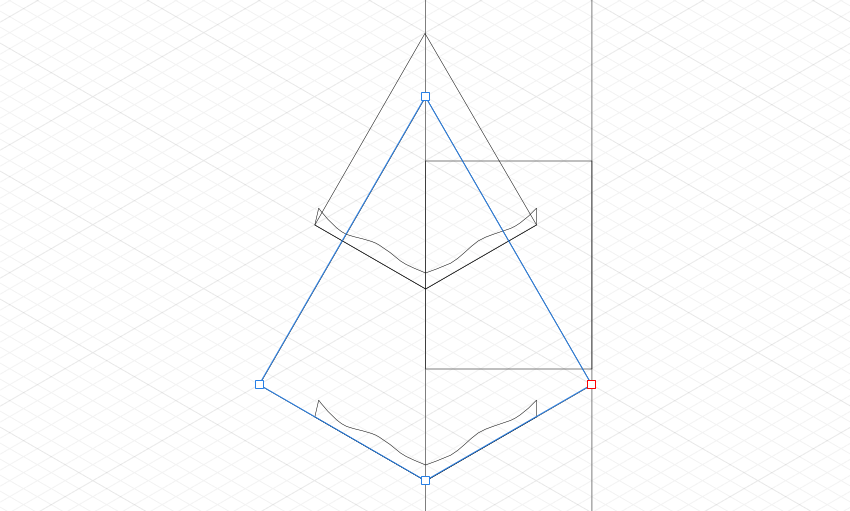
With the node tool, (shortcut key A), select one of the top two nodes of the rectangle. This node is going to become the top node of our first tree section. Drag it to an intersection point between large grid diamonds about halfway across the canvas, and three and a half large grid diamonds from the top of the canvas.
Next, select the opposite node to the one you just moved–this will become the tree section’s bottom node. Drag the selected node so it’s directly below the top node vertically, but two large grid diamonds lower.
Now look at that bottom node and follow the large grid line it’s on up and to the left by one large grid unit. Move the left node to that point. Do the same thing on the right side for the right node. You should end up with the shape pictured below. Pay attention to where the nodes fall on the grid and make sure your shape looks the same.

And check that it’s positioned relative to the document’s top left corner as seen here:

Now we’re going to add a highlight color on the right side of this tree section to make it look like light is hitting it. Select your existing shape and activate the Insert inside the selection button at the right of the top toolbar. Then draw out a rectangle with no border at a size that covers the right half of the tree section and set the fill color to #386925. The rectangle should be nested inside the tree section shape, as you can see in the Layers panel of the image below:

To finish this tree section we’re going to add a little snow trim to the bottom. Use the pen tool to draw out a shape that is a single small grid unit high, and runs along the bottom left side of the section. It should be nested inside the tree section so any overflow is clipped off. Fill it with the color #A8BCA7.

Note we’re making this snow trim light green, not full white, so it doesn’t merge with any white background it might be placed on.
Add some extra nodes to the top line of the snow trim shape and drag them up or down slightly to add some curves like so. You’ll probably need to disable snapping temporarily while you do this, by clicking the magnet icon on Affinity Designer’s top toolbar.

Now duplicate this snow trim shape and flip it horizontally, which you can do by clicking the Flip Horizontal button on the top toolbar. Position it in a mirrored position on the right side of the three. Then select both shapes and hit the Add button on the top toolbar to combine them into a single shape.

3. Create the Other Tree Sections
The top tree section is now finished so we can duplicate it and make some small changes to create the other three sections. Duplicate the section and move it down by one and a half large grid diamonds. Make sure it’s behind the top section in the layers panel.

Now we’ll manipulate this second tree section’s nodes to make it larger than the first section. First, drag its top node up so it’s half a large grid unit below the first tree section’s uppermost node. Then drag the left node up and to the left, along the grid line it’s already on, until you hit the nearest intersecting large grid line. Do the same thing for the right node as well.
The edges of the second tree section should run at the same angle as the first section. You can check to make sure this is the case by confirming the line goes through a grid intersection point every two small grid diamonds.

Check and make sure your lighter colored nested rectangle still fully covers the right side - if not you may need to enlarge it a little. Adjust the snow trim to cover the bottom of the second tree section by dragging the outer most nodes out to the edges of the shape, then adding some more nodes to the shape to insert extra curves.

Repeat the process twice more to create the third and fourth tree sections. Each time you should:
- Move the section down by one and a half large grid diamonds
- Drag the top node up to be a half large grid diamond lower than the previous section’s top node
- Drag the left and right nodes along their grid lines until you hit the nearest intersecting large grid line
- Make sure the light rectangle is covering the whole right side of the tree section
- Adjust the snow trim to cover the bottom of the tree section on both sides

4. Create the Trunk
The main form of our tree’s leaf section is now done so we can move onto creating the trunk. Using the pen tool, draw out a rectangle that’s half a large grid diamond wide, about one and a half large grid diamonds high, centered horizontally relative to the tree, and positioned behind all the other existing shapes.
Add an extra node on the lowest edge you can use to create a pointed bottom. This bottom node should be placed one large grid diamond below the lowest point of the tree, and the trunk shape’s two bottom edges should run along grid lines. Set the trunk’s fill color to #322B1E. Finally, nested inside the trunk shape, create a rectangle to cover its right half with a fill color of #41351E.
Your end result should look like this:

5. Add Shadows
Next up we’re going to create shadows that are cast on each tree section, as well as on the trunk, by the tree section above it.
On the left side of the tree, use the pen tool to draw out three slanted rectangles, one below each of the top three tree sections. These rectangles should be two small grid diamonds high along their length and filled with the color #203F1A. Duplicate the shapes, flip them horizontally and position them in a mirror position on the right side. Change the fill color of these shapes to #12510E.
This should give you shadows below each tree section like so:

Using the same approach, create two slanted rectangle shapes on the trunk, each one and a half small grid units high. The left most shape should be colored #231D13 and the right most shape #302511.

Note I originally determined the colors that would look right as shadows here by setting the shapes
to the same fill color as the side of the tree they were on, then
setting them to blending mode Multiply. However, as mentioned earlier we can’t use Multiply in an SVG image. To get around this I used the color picker to sample the color the shadows appeared to be. I then changed the shadow shapes’
fill color to this sampled color, and set the blending
mode back to Normal, achieving the same look in the end but in an
SVG friendly way.
Now for the shadow cast on the ground by the tree. Below all the other shapes, create a diamond the same width as the bottom most tree section. Its edges should all follow along grid lines, and it should be centered both horizontally and vertically relative to the trunk. Make its color black and set it to 20% opacity. Again, while we can’t use Multiply to create shadows in our SVG illustration, we can safely use opacity.

6. Decorative Globe
Our overall tree form is now finished and we’re ready to decorate it. To do that we’re going to create a globe shape we can resize to use for the top of the tree decoration, and for smaller decorations around the tree. We’ll initially be creating it at double size so it will be easier to use the grid to align all the shapes that will make up the globe.
Pay close attention to where the nodes fall on the grid as you create the following shapes.
First, create a diamond shape a quarter the size of a large grid diamond, with the fill color #FFEF00. This will form the flat top of the globe.

Add these two shapes to create the curve below the top of the globe - the left shape’s color is #F1C906 and the right shape’s color is #FFE300.

Create the sides of the globe with these shapes - the left side is colored #E9BE1F and the right side is colored #FFDB1F.

Add the bottom curves with these two shapes, colored #DCAF2E on the left and #ECCA3C on the right.

Finally, use the pen tool to draw out a single shape matching the shape of the entire globe. Give it the fill color #FFDB1F then set it behind all the other shapes. This ensures you won’t see any background colors showing in any tiny gaps between the shapes that comprise the globe.

7. Tree Top Decoration
Now your globe is finished you can resize it ready for placement on top of your tree. Select all the shapes and group them for easy resizing. You can make a duplicate of this group before resizing if you want to keep it as a backup.
We want to reduce the globe to half the size, so select the group you just made and locate the Transform panel on the right side of the Affinity Designer interface. If it’s not already open go to View > Studio > Transform. In the Transform panel’s W (width) field type /2 at the end of the current value then press ENTER. This will halve the current width.

Do the same thing in the H (height) field to halve the height.

Your half-sized globe is ready for use, so center it on the top of the tree like so.

8. Smaller Globe Decorations
Duplicate the decoration you just placed on the tree top and halve its size again using the same method of adding /2 to the end of the Transform panel’s H and W fields. Now we have a smaller yellow globe we can put on our tree’s main body, and all we need is a few extra colors to make our decorations more lively. Make three extra duplicates of the smaller globe so we can turn them into blue, purple and red versions.
Change up the colors of three new globes so you get the following:

The blue globe uses these colors:
- Top:
#23BEDA - Left top curve:
#0099B4 - Right top curve:
#22AED3 - Left side:
#18809C - Right side:
#1E98B0 - Left bottom curve:
#1A6883 - Right bottom curve:
#0D8197 - Backing:
#18809C
The purple globe uses these colors:
- Top:
#9B23DA - Left top curve:
#7100B4 - Right top curve:
#8B22D3 - Left side:
#52189C - Right side:
#721EB0 - Left bottom curve:
#401A83 - Right bottom curve:
#670D97 - Backing:
#33189C
The red globe uses these colors:
- Top:
#DA3623 - Left top curve:
#B4001B - Right top curve:
#D33522 - Left side:
#9C1B18 - Right side:
#B01E1F - Left bottom curve: #831C1A
- Right bottom curve: #97250D
- Backing:
#9C1B18
With these smaller globes now done you can place them around your tree to decorate like this:

9. Little Square Decorations
Now we’re going to add some final smaller decorations to bring in some extra detail. Use the pen tool to draw out this shape with the fill color #FFDB1F:

Note its edges follow the same angle as the outer edges of the tree sections.
As we did with our globe, this shape is actually drawn at double size, again making it easier to place nodes on the grid. Use the Transform panel to halve its size as we did earlier by adding /2 to the end of the H and W fields. The shape’s top and bottom edges should now be one small grid unit long.

Make three duplicates of the shape and color them #1E98B0 for blue, #721EB0 for purple and #831C1A for red. Duplicate all four shapes and flip them horizontally. You should now have eight shapes total.

Take these shapes and scatter them around your tree. Use shapes whose angles match the outer edge of the side of the tree your placing them on.

And that’s it! Our Christmas tree image is all done.
10. Export as SVG
Now our design is finished we’re going to get it ready for use on the web as an SVG.
First up, we need to change the document to the same dimensions as our tree so our SVG’s viewbox parameter will be set to the correct size. If we exported right now the viewbox would be set to 1024x1024, meaning anywhere you used the Christmas tree SVG it would have large gaps either size just as our document does now.
Make sure you have nothing on the canvas selected, then look at the context toolbar along the top of the Affinity Designer interface and you should see the Document Setup button. Click it and a box will pop up where you can change your document dimensions. Set 280px for the width and 568px for the height. As long as you have placed your shapes down carefully these document dimensions should work for you. Make sure you have Anchor to Page selected and not Rescale, then press OK.

Immediately after rescaling your tree probably won’t be centered. To fix this select everything in the document with CTRL + A, group it with CTRL + G, select that group, then drag it into a centered position.

Now go to File > Export and in the box that pops up select the SVG tab. Make sure the preset SVG (for web) is selected.
Also ensure you see the message (Nothing will be rasterized). If instead the message tells you something will be rasterized, go through your work and make sure you haven’t accidentally set any shapes to a blending mode other than Normal.
When you’re ready, click Export and save out your SVG.

11. Using Your SVG
Now you have your SVG file ready let’s look at a couple of ways you can use it.
The easiest way is just to load it into your HTML as you would any other image, with code like this:
<img width="500" src="xmastree.svg" alt="Christmas Tree">
However, the beauty of SVG is you can also take the contents of the SVG file and paste it directly into your HTML to use the image inline.
To do this, open your SVG file in a text editor and copy everything starting from <svg... through to the end of the file. Paste that code anywhere in the body section of an HTML document and the image will appear there. Note you may also wish to wrap the SVG with a div you can style to control the image’s size and position.
To see this approach in action check out this example on CodePen:
Wrapping Up
So that’s how you can make an SVG illustration using Affinity Designer! The process is not too different from any other type of design done in Affinity Designer, with the caveats you just have to watch out for non-default blending modes and overly complex shapes. The need for flat colors and preference for simple shapes makes isometric illustrations particularly well suited to SVG.
To learn more about using Affinity Designer check out our tutorials and courses, and while you’re at it check out our SVG tutorials and courses as well.
Related Links:
Original Link:
TutsPlus - Design
More About this Source Visit TutsPlus - Design