
An Interest In:
Web News this Week
- April 29, 2024
- April 28, 2024
- April 27, 2024
- April 26, 2024
- April 25, 2024
- April 24, 2024
- April 23, 2024
Some of Our Sources
- Engadget
- Mashable
- Fuel Your Creativity
- Web Designer Depot
- Noupe
- Line 25
- Wal You
- Design Modo
- Willems Lab
- The Verge
Help Webnuz
Referal links:
How to Find and Remove Duplicates in Excel Quickly
If you're a Microsoft Excel user, you've likely been asked to work with messy data in a spreadsheet before. Your data might contain duplicate records that repeat. You certainly don't have time to go line by line in a large spreadsheet and manually find and remove the duplicate records.
The good news is that Microsoft anticipated this exact need in Excel. The Remove Duplicates feature helps you quickly find and remove the duplicate records in your spreadsheet.

In this tutorial, I'll teach you to use Remove Duplicates. You'll learn to use the function to clean up a spreadsheet with duplicate rows. I'll teach you tips on how to use the feature correctly so that only true duplicate rows are removed.
To follow along with this tutorial, I recommend downloading the example spreadsheet. You can find the blue Download Attachment link to the right of this tutorial or download the free spreadsheet workbook here.
Get Started With Remove Duplicates in Excel
If you're following along with the example workbook, use the spreadsheet tab titled Order List for this portion of the tutorial.
Let's start off with a simple example on how to remove duplicates in Excel. In the spreadsheet below, you can see that there are several lines that are duplicated. We need to remove the duplicate orders to make the ingredient list simpler.

1. Highlight Your Data
To remove the duplicate rows, the first thing you should do is highlight your data. If your sheet doesn't have data above your table, you can highlight the entire columns at the top of the spreadsheet. In this case, I'm going to highlight the data table to remove duplicates.

2. Find the Excel Remove Duplicates Feature
The Remove Duplicates feature lives on Excel's ribbon on the Data tab. Specifically, you'll find the Remove Duplicates feature in the Data Tools section of the ribbon. Once you find it, simply click on it to launch the wizard.

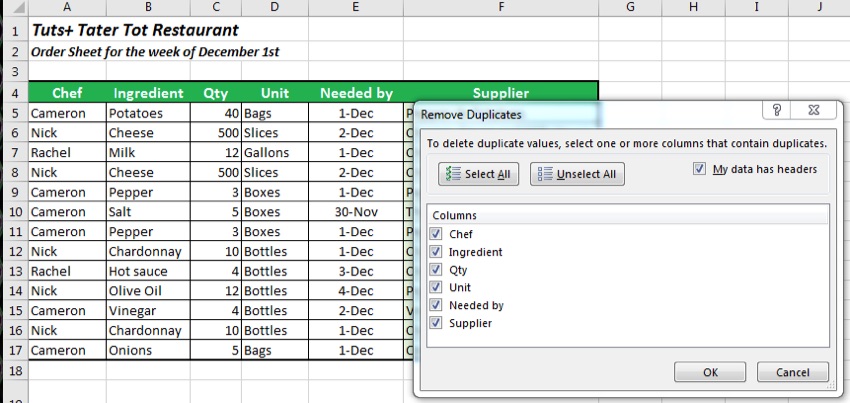
3. Select Your Duplicate Criteria
After you click on the Remove Duplicates option, a new window will pop up with some checkboxes. This list of options asks you to define which fields need to be checked for duplicates. The default behavior is to keep all of them checked.
For our simple example, don't make any changes on this window. Press "OK" to remove the duplicates from our table.
4. Review the Results
Once you press OK, Excel will remove the duplicates in the table and provide feedback on what was removed. When working with any dataset, I urge you to review the results.
The purpose of Remove Duplicates is to delete the repetitive rows, but it requires care in how you use it. You can always undo the last step if you applied it incorrectly.

Quick Remove Duplicates - Video Tutorial
Check out the screencast below for a walkthrough on how to use Remove Duplicates in Excel. Keep reading the tutorial below for a written, in-depth guide to the Remove Duplicates feature and some additional techniques to find and delete duplicates to get the most from it.
Remove Duplicates on Multiple Criteria
Let's return to the seemingly simple menu that popped up when we highlighted our data. The list on this window represents each of the columns in our Excel spreadsheet. You'll notice that each column in our Excel table has a checkbox next to it.
What does this menu mean? Basically, this box is asking you how specific Excel should be when removing duplicates. Let's look at an example:

In the screenshot above, I started off by highlighting my data in the table again and launched the Remove Duplicates feature. Then, I unchecked all boxes except for "Chef" in the Remove Duplicates window. The result is shown in the bottom half of the image. Notice that our table has been reduced to just three rows, with each chef's name appearing once.
When we left only the "Chef" box checked, we asked Excel to only check the Chef column for any duplicates. The first time it saw a repeated chef's name, it deleted the entire row; it didn't matter that the other columns differed.
Take Care With Excel's Remove Duplicates
This is why it's important to be careful when using the "Remove Duplicates" feature. If you just leave it set to remove a single factor, you may accidentally remove data that you want to keep.
Tip: The boxes you leave checked in the Remove Duplicates window are the combination Excel checks for duplicates. Leave multiple boxes checked for precise duplicate removal.
Often, a single column of data won't be enough to judge Duplicates by. If you maintain an online shop and have a database of customers, chances are that you'll have more than one "Mike Smith" for example in your data. You need to check multiple columns - such as the customer name, plus the customer's address or registration date to check for duplicates. This is exactly why we check multiple columns when removing duplicates.
If you want a precise way to remove duplicates, leave multiple boxes (columns) checked when running the Remove Duplicates feature. And of course, always double-check your data after running Remove Duplicates.
When to Be Selective
If you're following along with the example workbook, use the spreadsheet tab titled Duplicate Shifts for this portion of the tutorial.
You might be wondering: is there a situation where you would uncheck some of the boxes? Absolutely. Let's take a look at an example.
In the spreadsheet below, I've got employee shift data, and I've accidentally downloaded the report two different times. I have each employee's time in and time out, plus a column with the date that I downloaded the report. Two of each row exists, with the only unique factor being column F, the Report Download date.

Let's think about this: if I check all columns for duplicates, Excel won't find any duplicates. But, I actually want to remove the duplicate employee shift data. I don't really care about what day that I downloaded the report, so I need to exclude column F when removing duplicates.

These rows aren't exact duplicates—they don't share all fields—but I need to remove Duplicates based on columns A-E.
To do this, I'll highlight the table again and run Remove Duplicates again. This time, I'll leave all boxes checked except for the Report Download Date.

Think of it like this: the boxes that you leave checked are the columns that Excel includes in its duplicate check step. If there are extra columns that shouldn't be checked for duplicates, uncheck them from the Remove Duplicates window.
Use Remove Duplicates for Blank Rows
One of my favorite uses for Remove Duplicates is to get rid of multiple blank rows in my data.

To remove blank rows, highlight the data in your table. Then, Remove Duplicates and leave all boxes checked. Excel will remove all of the blank rows - except the first one! Since the first blank row technically isn't a duplicate, Excel leaves it untouched. You'll just need to manually delete that row.
Bear in mind that this will remove all duplicate rows, not just duplicate blank rows.
Recap and Keep Learning
Removing duplicates from an Excel spreadsheet is an essential data cleanup skill. When you're working with a set of data, you hardly have time to manually find and remove duplicate records. That's why Excel's built-in "Remove Duplicates" function is worth learning.
Here are two other spreadsheet tutorials to continue mastering Excel data cleanup:
- Microsoft's official documentation on Remove Duplicates is a helpful, second source for learning the feature.
- Bob Flisser's tutorial 12 Techniques for Power Users contains a brief summary of the Remove Duplicates function, and other key techniques for data management.
How are you using Remove Duplicates to manage your Excel spreadsheets? If you run into any problems, make sure and leave a comment for help.
Original Link:
Freelance Switch
More About this Source Visit Freelance Switch