
An Interest In:
Web News this Week
- April 21, 2024
- April 20, 2024
- April 19, 2024
- April 18, 2024
- April 17, 2024
- April 16, 2024
- April 15, 2024
Some of Our Sources
- Web Designer Wall
- Smashing Apps
- TutsPlus - Design
- Inspiredology
- FanExtra - PSD
- 24 Ways
- Freelance Switch
- Android Dissected
- Daily Now
- The Verge
Help Webnuz
Referal links:
How to Combine All Your Email Accounts Into One Gmail Account
I’ve collected a pretty long list of email addresses over the years. There are the two or three I created as a teenager, with usernames like [email protected] and the other accounts I created as I outgrew my old usernames or found a new email service to try.
While I’m happy to let most of those go, I still get important messages that I don’t want to miss in some of my less-used accounts. I’m just not up to checking four or five email addresses throughout the day, though. It’s not the work of keeping up with so many logins, it’s that I’ll forget to check them at all for days on end.
The solution, then, is to create a single, unified inbox that collects all of my emails in one place. All of my emails flow into one inbox, and I can respond using any email address. Creating a unified inbox that collects all of your emails isn’t as complicated as it sounds, and I’ll show you how to make it happen.

In this guide, learn how to merge all your Gmail accounts into one. First let's look more into why combining Gmail accounts saves you time.
How
Merging Your Email Saves Time
As a
small business person, you don't have a lot of extra time to spend handling
your email. You have other things to do.
Yet,
many studies show that email takes a large part of the day for many business people.
And, the more email accounts you have, the more time it may take you to manage
your email each day.
Combining your email accounts using Gmail can save you time. Here's how:
- Log into one account (your Gmail account) one time and get all your
email messages at once. No need to log in and out of various accounts. - Eliminate time spent looking for lost passwords. You only have to keep
track of one password--the password for your Gmail account. - Even if you want to send a message from another email account, you
don't have to log out. Gmail lets you choose which email account you send each message
from. - Keep your different mailboxes organized in Gmail. With a Gmail filter,
you can quickly see which messages go with which email.
Envato Tuts+
offers many tutorials on productivity. Here's one that will you save time when working in Gmail:

Now let's walk through how to forward your email and merge your Gmail accounts.
1. Use Gmail to Forward Email
To merge Gmail accounts, the first step is to set up email forwards.
Log into the Gmail account from which you’d like to forward email. In practice, this would be a secondary email account that you use less. All of the email from this account will be funneled into another email account, likely your primary account checked much more frequently.
Note: In this tutorial, I’m forwarding email from one Gmail account to another, but Gmail can forward to any email service. You'll learn the workflow of how to merge two gmail accounts into one inbox.
Step 1
In the secondary Gmail account, click the gear icon to the right and select Settings.Locate Gmail's settings.

Step 2
Click the Forwarding and POP/IMAP tab and locate the Forwarding settings.

Step 3
Click Add a Forwarding Address. The Add a Forwarding Address popup displays:

Step 4
Enter the email address that will receive your forwarded email. Click Next to continue. The Confirm forwarding address popup displays:

Step 5
A popup displays reminding you that Gmail is verifying your forwarding Gmail address.

Click OK. Gmail sends a verification email to the primary email address entered.
Tip: If your primary email address is also a Gmail account, log in by clicking the user image in the top right of the Gmail window and choosing Add Account. Connecting the two accounts in this way will allow you to quickly switch back and forth between accounts during the confirmation process without logging in or out.

Step 6
In the confirmation email, you’ll find a confirmation code and confirmation link.
.jpg)
Step 7
Enter the confirmation code in the Forwarding and POP/IMAP tab in the secondary Gmail account, or click the confirmation link in the email.
Gmail prompts you to confirm that mail will be forwarded.

Click Confirm. And then you'll get a final confirmation success email that follows, letting you know the forwarding is now properly setup. The secondary Gmail account is now forwarding to the primary email address.
2. Send Email as Another Account
Setting up a forwarding address is great, but what would make this really run smoothly is if email sent from a Gmail address could appear as if it’s coming from another email account. I’ll show you how to send email from other email providers in Gmail.
Step 1
In Gmail, click the gear icon to the right and select Settings. Choose the Accounts and Import tab.

Step 2
Within Send Mail As, click Add Another Email Address You Own.
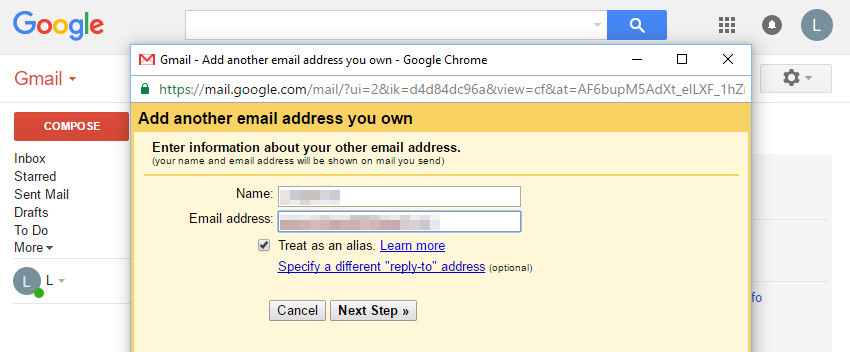
Step 3
Enter the secondary email address. You may also edit the displayed name and specify a different reply-to address. Gmail prompts you to verify the secondary email address.

When prompted by Gmail, send the verification message to the secondary email address.
Step 4
In the verification email, you’ll find a confirmation code and confirmation link.
Enter the confirmation code in the Verification window in Gmail, or click the confirmation link in the email. Gmail displays another popup confirmation.

Click Confirm to continue the process. You will see a confirmation success popup display.
The Gmail account may now send email as the secondary email account. Repeat the process for all of the email addresses you’d like to use in Gmail.
Step 5
When complete, there will be a new From drop-down in the Compose New Message window.

Select the address from which you would like to send email from the drop-down menu.
3. Set a Default Send Mail As Address
While you can select from which address you’d like to send email in the Compose New Message window, it may happen that you more often want to send email from your Outlook or other email addresses than from your Gmail email address.
In that case, it makes sense to set another email address as the default Send Mail As address in Gmail. Here's how to do that.
Step 1
Again, click the gear icon to the right of the Gmail window and select Settings. Choose the Accounts and Import tab. Displayed here are all of the email addresses with which you can send email within Gmail.
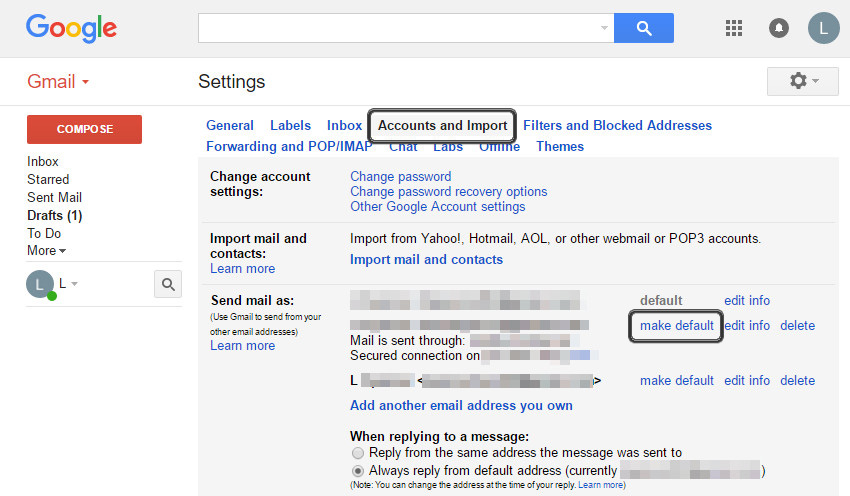
Click Make Default next to the email address you will use most often to send email.
Step 2
Next time you compose a new email, the default Send Mail As address will be automatically selected in the From field.
.jpg)
4. Organize Email Sent to Different Addresses
In an inbox of thirty messages, it may not be obvious what’s important and what isn’t, which emails were sent to each address. Gmail filters and labels can help keep all of those different email addresses straight in your inbox.
Step 1
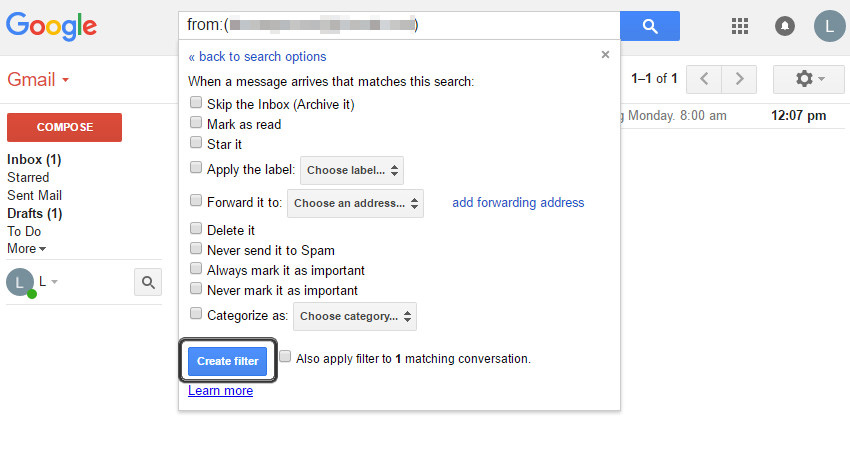
Click the gear icon to the right of the Gmail window and select Settings. This time, select the Filters and Blocked Addresses tab.

Select Create a New Filter at the bottom of the window.
Step 2
There are many options for your filter, but for this tutorial, you only need to complete one of the fields. In the To field, enter a secondary email address that is being forwarded to your primary Gmail account. Click Create Filter with this search.
Step 3
Gmail can do a lot with a filtered message, and it’s best if you decide how you want to receive your forwarded messages yourself. Would you like them all marked as read and archived, or should they be starred as important?
I’m going to allow Gmail to handle the forwarded messages as usual, but I want to add a label so I know to which account the message was sent. Click the Apply the Label checkbox. Click the up and down arrows next to Choose label.
If you haven’t created a label to handle forwarded messages from the secondary email address yet, select New Label. The new label popup displays.

Enter a name for your label and click Create.
If any previously received messages meet the filter’s criteria, you may also apply the filter to those messages, too.
Click Create Filter when you’re done. All messages addressed to the secondary email address will receive the new label.
Conclusion
While it may seem like you have to abandon old email accounts or schedule time to check various accounts still in use, with a little effort, you can get all of your email merged in one Gmail inbox. If you have any trouble combining your email accounts in Gmail, be sure to leave a comment below and we'll help you figure out how to get it working.
If you need help managing email, you may want to check out some of the email-related apps, plugins and add-ons available on Envato Market. Or if you're sending a lot of important emails, try the email design services on Envato Studio.

Editorial Note: This post was originally published
in 2014. It has been comprehensively revised to make current, accurate, and up
to date by our staff—with special assistance from Laura Spencer.
Original Link:
Freelance Switch
More About this Source Visit Freelance Switch