
Some of Our Sources
- BoingBoing
- Mashable
- TutsPlus - Code
- Web Designer Wall
- Joshua Blankenship
- The Logo Smith
- Vandelay Design
- Fudge Graphics
- CSS Globe
- Android Dissected
Help Webnuz
Referal links:
How to Create Origami Birds Using One Dollar Bills in Adobe Photoshop

Origami is the ancient art of paper folding which creates beautiful crafts of animals, flowers, and more. And If you've ever folded money into fun shapes before then you're in for this nostalgic treat!
In this tutorial, learn how to create your own Japanese origami bird in Adobe Photoshop using a mixture of free sources and an awesome origami reference from Envato Market.
Tutorial Assets
The following assets were used in the production of this tutorial:
1. Create the Background
Create a square-shaped document in Photoshop. Here I'll create a New Document that is 850 x 850 px. Right-click the white Background layer, go to Blending Options,and create a white to light gray #a4a4a4 Radial Gradient with the following settings:


2. Create the Origami Shape
Step 1
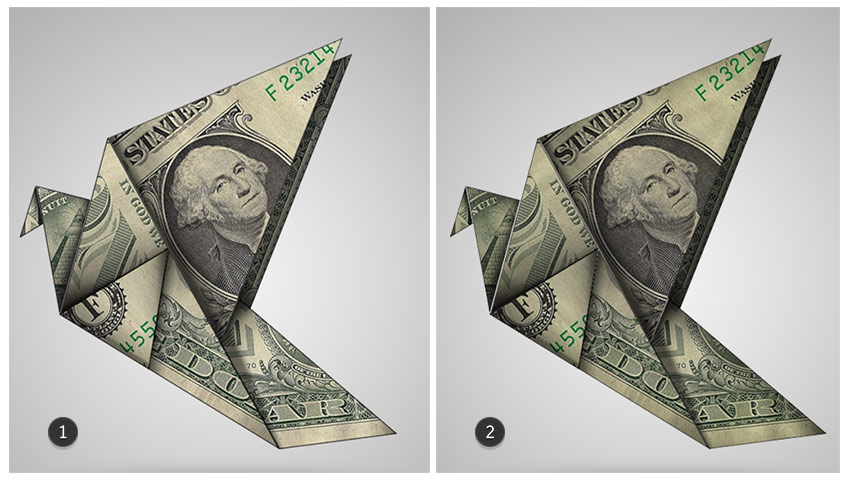
Copy and Paste your origami reference onto the canvas. Resize it to make it larger with the Free Transform Tool (Control-T). It's important that you have a pre-folded stock like this Origami Pigeon from Envato Market in order to understand the construction of this look.

Step 2
Create a New Group for the origami layers. Select the Pen Tool (P), making sure that the Pen Mode is set to Shape with the following settings:
- Fill: White
- Stroke: 1 px Black
Use the Pen Tool (P) to trace over your stock.

Make sure each section of the pigeon becomes its own separate shape. If you're using this stock, you can break down each part of the bird into eight different shapes.

When you're finished, Hide the Visibility of your stock layer to reveal the original gradient background underneath.

3. Apply the Dollar Bill Paper Effect
Step 1
Feel free to apply any paper or pattern you'd like to this effect. But for nostalgic purposes, I'll be using a one dollar bill like the good old days of paper folding when I was a kid.
Create a New Layer above Shape 1 and Right-click to set it as a Clipping Mask to the shape. Repeat this process for each shape layer.

Step 2
On each clipped layer, Copy and Paste either the front or back side of the dollar bill onto the layer. Because the layers are clipped to the shapes, each bill will be confined to the borders of its own shape.
Use the Free Transform Tool (Control-T) to rotate the bills and position them into place. Start with the first layer clipped to Shape 1.

Continue doing this with each layer that's clipped to the rest of the shape layers. Experiment with the placement of each dollar bill until it works well
together.

Try to figure out which side of the paper might actually show
up by using real origami photos for reference, or just go with your gut. When you're finished, the bird will look like this.

4. Add Realism to the Money
Step 1
To make this origami look real, we'll need to add some realistic shadows. Select the Gradient Tool (G) with the following settings:
- Gradient: Linear
- Color: Black to Transparent
- Opacity: 30%
Create New Layers above each dollar bill, making sure that each new layer is set as a Clipping Mask to the original shape. Feel free to set the color of the layer to blue to distinguish it from the rest of the layers, and rename each shadow layer "Shadow".

Now use the Gradient Tool (G) to add black shadow to each shape, paying attention to the original origami stock for reference. Continue adding more shadow for depth and curvature while trying not to overdo thisstep.
Here's a side-by-side comparison of what the shadows should look like with the dollar layers temporarily hidden and visible.

Step 2
Next, let's move on to the final touches to make this origami come alive! Select all your layers (except for the background layer) and Merge them together. Now the origami should be by itself on its own layer.
Control-T to Free Transform the origami, resizing it to make it slightly smaller on the canvas.

Step 3
On a New Layer underneath the origami, use the Elliptical Marquee Tool (M) to create an oval and Fill it with a dark green #7d8073 color.

Step 4
Now go to Filter > Blur > Motion Blur. Set the Angle to 0 Degrees and the Distance to 155 px.To blur the circle even further, go to Filter > Blur > Gaussian Blur, and set the Radius to 7 px. Lower the layer Opacity to 28% for a nice subtle shadow.

5.Add the Finishing Touches
Step 1
To finish this effect, let's go into Blending Options to add more realism. Right-click the origami layer and select Blending Options.Add an Inner Shadow, Inner Glow, Gradient Overlay, and Satin effect with the following settings:

Here's a before and after comparison after these settings are applied.
Step 2
Now create two New Layers above the origami and set them as Clipping Masks to the bird. Use the first layer to add additional shadow by using the Gradient Tool (G) to apply a black to transparent Linear Gradient on the left side of the paper.
Set the second clipped layer to Soft Light, and use the Brush Tool (B) to paint a soft yellow color #fff3c8 all around the paper to tint it slightly.

Create a third clipped layer above the other two for highlights. These were partially created before with the Inner Glow, but you may need to also add them manually. Use the Polygonal Lasso Tool (L) to create sharp selections on the edges of the paper. Fill them with a light gray color to represent quick highlights.

Step 3
Let's bump up the intensity! Set a New Adjustment Layer of Levels as a Clipping Mask to the origami. Adjust the settings as follows for the RGB and Blue Channels:

Step 4
Finish this look with a quick vignette. First, add a New Layer above all the other layers and fill it with the same dark green color from before,#7d8073. Use the Elliptical Marquee Tool (M) to create a circle in the center, and then hit the Delete key to remove it. Go to Filter > Blur > Gaussian Blur, and set the Radius to 60 px. Lower the layer Opacity to 12% for a subtle vignette.
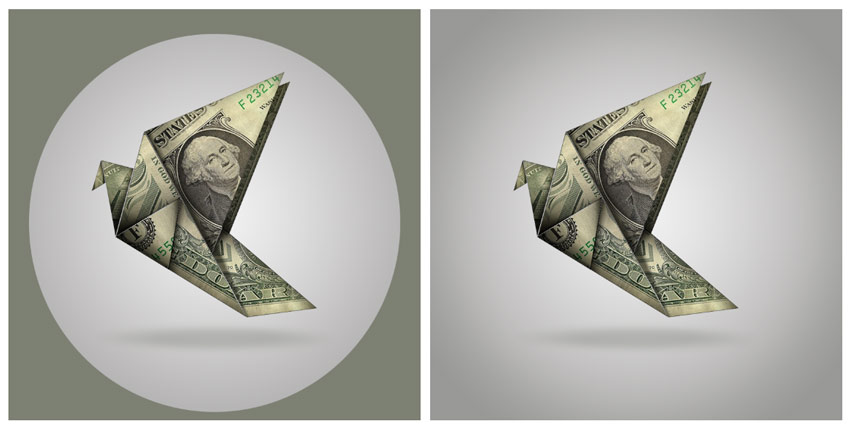
Check out the final result below!
Good Luck!
Now you can take the old-world technique of paper folding and create your own modern interpretation! Feel free to apply this method to different origami shapes and experiment with vibrant colors and patterns!
I hope you've enjoyed this tutorial, and feel free to leave any questions in the comments below. For more photo manipulations like this, check these tutorials out:
- Create a Double Exposure Illustration in Adobe Photoshop
- How to Create a Dory-Inspired Photo Manipulation in Adobe Photoshop
- Create an Apocalypse-Inspired Photo Manipulation in Adobe Photoshop

Original Link:
TutsPlus - Design
More About this Source Visit TutsPlus - Design