
An Interest In:
Web News this Week
- April 22, 2024
- April 21, 2024
- April 20, 2024
- April 19, 2024
- April 18, 2024
- April 17, 2024
- April 16, 2024
Some of Our Sources
- BoingBoing
- Simplebits
- Abduzeedo
- FanExtra - PSD
- CSS Globe
- Stylized Web
- Wal You
- Freelance Switch
- Design Modo
- Dev To
Help Webnuz
Referal links:
How to Use Gestures to Draw Creatures From Imagination

After you finally learn how to use a pencil properly, your next step is to learn more about the topic you want to portray. In the case of creatures, whether real or imagined, this "more" is all about anatomy—the skeleton creates a pose, and the muscles create the body. You can't draw a realistic animal from imagination without this knowledge.
However, the problem with anatomy is that it doesn't create a live animal on its own. The shape of skin is based on the muscles underneath, the shape of muscles is based on the position of the individual bones, and the position of bones is based on the action of an animal. The latter is not a part of anatomy.
Anatomy is like vocabulary, and the action is like grammar. You can't have one without the other. Grammar will not help you if you don't know the words, and a perfect vocabulary will grant you a very clumsy communication at best. So, you need to know both. But where to start?
You can get around this problem by replicating "rhythm lines" created by an animal's body. This is called gesture drawing, and it's indeed very useful. However, what if you wanted to draw from imagination? Where do you get these lines from? This is what I'd like to show you in this tutorial.
1. Gesture Analysis
If you have read my article Why Is It So Hard to Draw From Imagination? Here's How to Do It!, you know that active analysis is necessary to draw anything from imagination. Basically, if you want to draw without a reference, you must actively memorize the reference first.
The catch here is you shouldn't try to memorize a certain set of lines, but rather theessence of them. You need to understand the mechanism that created these lines in the first place. Once you get a grasp of that mechanism, you can use it to create every pose!
Let's assume you want to be able to draw big cats. A typical anatomy diagram of a lion, a popular model for big cats, would look like this:

That's a lot of muscles to remember! However, a real lion's body looks more like this:

And this is the point. We don't want to draw what the lion is, but what it looks like. We don't need the muscles, but only the shapes they create. Let's find the absolute minimum set of lines necessary to draw a lion.
Step 1
The spine should be your first guess. Its flexibility (or lack thereof) influences the range of possible poses, and its shape creates the shape of the torso. Be careful about the neck, though—it's better to choose only one line of its shape, and imagine the other by complementation.

Step 2
The head, or rather its size, is also very important. The body-head ratio defines a basic proportion of the body that, if incorrect, is very easily caught by our brains. Establish this proportion early on so that you avoid wasting your time if it turns out wrong.
It's also good to add a "T" shape to show the location of the nose and eyes. It will define the pose of the head.

Step 3
Limbs are complex, but their rhythm can be easily simplified. You don't need to draw the joints to know where they are; you just need to know how they work.


Step 4
To be a bit more specific, we can include the muscle masses. Both the thigh and the shoulder create quite distinctive shapes that can be drawn quickly and intuitively.

Step 5
You could go even further—analyze all the muscles to convert them into simpler lines. But we don't need it so early—let's see how to use our analysis to draw a few lions!

2. Create a Pose for a Creature Using Gesture Lines
Disclaimer: there are no perfect gesture lines that work for everyone. I will show you my way, but you shouldn't copy me step by step. Rather, analyze and understand what I'm doing, and modify my methods to create your own. You can also use any other animal to learn even more efficiently!
Also, keep in mind that these are loose sketches meant as a base for more refined artwork. They're not supposed to be overly clear—if you can see what you're drawing, and the lines don't get in the way of each other, that's all you need.
Step 1
Let's use our simplest set of lines. Draw a few poses quickly, but don't force yourself to draw only smooth, continuous lines. If you're drawing traditionally, keep these lines subtle, so that you can easily cover them later.

Step 2
Once you have the basic poses, you need to find out if their perspective is correct. Scary as it sounds, it's absolutely necessary. Fortunately, perspective isn't as horrific as you may think. The basic rule is simple:

You can learn more about this kind of perspective here: Think With Forms, Not Lines: Take Your Drawing to the Next Level.

Step 3
Let's make the sketch a bit more detailed. Add the thigh mass, adjusting it to the action.


Step 4
Add the shoulder mass, too.


Step 5
The snout can be pictured as a teardrop or sack shape attached to the "T" shape on the head.


Step 6
Define the width and the exact pose of the paws. No details necessary!


3. Create a Simplified Anatomy
Step 1
The basic "skeleton" is finished. You can see it's some kind of creature, and you can see its pose. It should be more than enough to start serious drawing! However, we don't need to stop here when it comes to gesture lines. The muscles masses can be simplified as well, and if you memorize them, you'll be able to add the muscles right in the sketching phase.
To create a simplified lion anatomy, I have used a muscle diagram from How to Draw Animals: Big Cats, Their Anatomy and Patterns.
Let's start with the basic landmarks of the limbs: the kneecap and the elbow.


Step 2
Close the shape of the calf and arm. They shouldn't be too even—compare them to the part of your own body to remember the shape.


Step 3
Add the Achilles tendon, a very important part of the forelimb. It lies on the line between the knee and the heel. There should be a small, but noticeable triangular area between it and the rest of the shin.


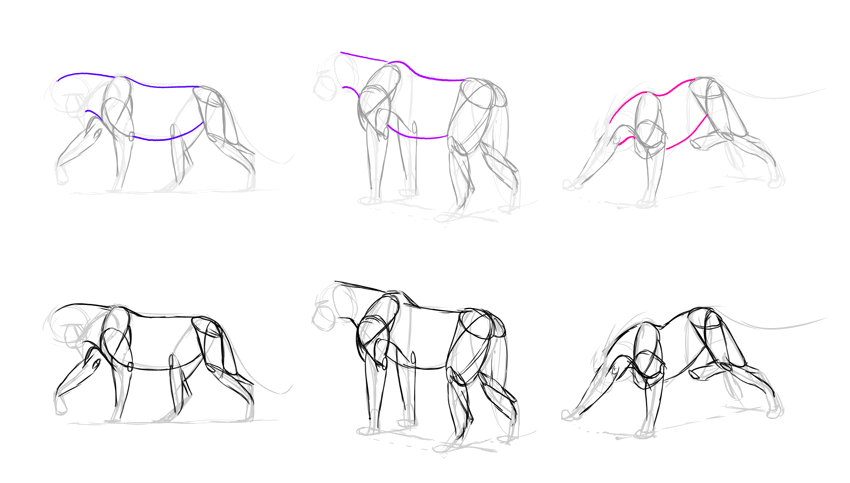
Step 4
The chest of cats can be drawn with a simple arch linking both forelimbs. This arch will stretch if needed.


Step 5
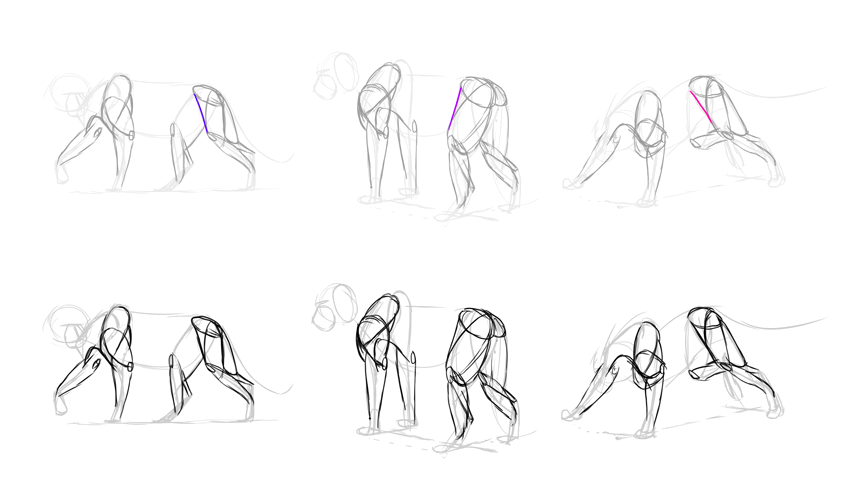
Time to build the shoulder. First, create a big bulge taking around a half of the "shoulder blade" area.


Step 6
Add an arch that will separate the shoulder from the arm.


Step 7
Draw the shape of the shoulder blade to separate it from the triceps.


Step 8
If the shoulder looks too "sharp", you can smoothen its shape with one more bulge between the shoulder blade and the triceps.


Step 9
Add the muscles between the back of the hip and the shin.


Step 10
Cover the top of the shin with an oval.


Step 11
Finally, add a tendon between the front of the hip and the knee.

4. Finish the Body
Step 1
The final lines of the body should come directly from the elements you have sketched. Notice how the line on the back adjusts to the top of the shoulder blades.

Step 2
These muscles may seem complicated, but they're easy to remember, and you can draw them very quickly. A lot of popular species follow this scheme!


Step 3
The details of the head are the hardest to remember, so you should use a reference here.


Step 4
The body is fully defined, and you can now decide what you want to do with it. You don't need to follow the anatomy strictly—a lion's body can create a great base for other big cats, or various imagined creatures.
To finish the drawing, it's good to use a few references for the details.

That's All!
This method of starting a picture is simple, yet very powerful. Because various types of animals share a similar anatomy, you can use one set of gesture lines for many species, modifying certain aspects to your needs. In the picture below, I have used the same "anatomy" for big cats, dogs, and even a dragon!
Keep in mind that being able to draw interesting poses is a separate skill from being able to draw poses. You need to practice a lot to gain the kind of intuition necessary for it! To create interesting, realistic poses, you shouldn't only create simple gesture lines—you have to practice them as well, using as many different references as possible. This way you'll test your lines and teach your hand the proper movement.
If you want to learn more about gestures, especially for the human body, make sure to check these out:
- Dynamic Gesture Drawing
- Human Anatomy Fundamentals: Learning to See and Draw Energy
- Quick Tip: Create Dynamic Poses Using Gesture Drawing
- Design How to Start a Drawing: 5 Methods for Beginners

Original Link:
TutsPlus - Design
More About this Source Visit TutsPlus - Design