
An Interest In:
Web News this Week
- April 30, 2024
- April 29, 2024
- April 28, 2024
- April 27, 2024
- April 26, 2024
- April 25, 2024
- April 24, 2024
Some of Our Sources
- Slashdot
- Engadget
- TutsPlus - Code
- Web Designer Wall
- Pearsonified
- Creative Curio
- Fuel Your Creativity
- CSS Globe
- Design Modo
- Willems Lab
Help Webnuz
Referal links:
How to Paint Realistic Skin in Adobe Photoshop

Skin is beautiful. It comes in all different shades, colors, and textures. If you've ever wondered how to paint skin then this is a great place to start. Learn how to digitally paint a realistic skin texture using Adobe Photoshop and a graphics tablet.
How Do I Paint Skin?
The single most important detail when it comes to painting portraits is the skin. Skin has this incredible ability to stretch and change colors depending on your subject's mood and general characteristics.
To paint skin in Photoshop, you'll need to know a variety of tools and settings. Although knowing the Brush Tool is a good place to start, we'll also be taking a look at the Color Picker, Layer Blend Modes, and Adjustment Layers.
Colors That Make Up Skin
Skin is not just one monotonous shade of color, so in order to understand how to paint it,
let's take a look at the different colors that make up skin.
Shades of Brown

Generally speaking, skin tone is on a sliding scale of brown. From fair to olive and ebony shades, you can't go wrong picking brown as a starting point.
Red & Yellow Undertones
The difference between these shades usually starts with their undertones. Because of the blood underneath our skin, red is the first color you'll see showing through. This is especially prevalent in fair skin, where you can easily see someone blush or "turn red".

For deeper shades, yellow is the more prominent undertone. To see this in action, do a quick search on YouTube for beauty gurus with a variety of skin tones. Knowing your undertone is important in choosing the right makeup foundation color, so notice how this changes from person to person.
Blue & Green Undertones
Blue and green also have a habit of popping up. Take a look at your hand. Notice anything strange? Underneath the skin you can just barely see hints of green and blue showing up from your veins as they get closer to the surface.

Adding these colors to your portraits is purely optional. But if you want a more realistic effect then paint touches of blue and green onto the skin.
Environmental Light
Did you know that skin reflects color? Take any colorful object and bring it up to your cheek. When you look in the mirror, notice how the object's color reflects onto your skin.

Understanding environmental light becomes a huge factor in painting realistic portraits. Incorporate neighboring colors as a way to add more realism to your work.
1. Study the Picture
For this tutorial I'll be using this photo of a lovely woman with a deep caramel complexion.

Study the picture to understand everything you need to know about your subject. Notice the different areas where there are more red or yellow values. Create a simple map to outline which colors are more prevalent in certain areas.
She's also got some areas of hyper-pigmentation. This means that the skin is much darker in those areas, so to effectively translate this, pay attention to the darker values around her mouth and forehead.

How to Pick Skin Colors
You can pick skin colors by using swatches, picking directly from the reference with the Eyedropper Tool (I), or picking colors as you go. But swatches can be very limiting and since photos are made up of so many pixels, you may pick unfit colors from the reference.

To get a better handle of color theory, learn to pick the colors yourself. Practice picking base tones for your painting using different references to guide you. Try to match them by sight without picking from the photo.
Using the Color Picker
Open the Color Picker and set it to the Brightness setting.

Pick a
medium brown color. Adjust the slider up and down to see its full color
range. I'll be using this method later on to show you how easy it is to pick the
shadows and highlights for this painting.

2. Create the Sketch
Now that we have a basic understanding of skin colors, let's move on to the sketch.
I'll
keep the composition simple by eliminating any extra details like the
flower and hair accessory. Draw a basic sketch for the face using a Small Round Brush.Then begin adding more details like the eyes, nose, and mouth. When you're finished, the sketch should look like this:

3. Paint the Base Tones
Step 1
Consider the base tones your foundation. First use any color to fill in the sketch with a Solid Round Brush. I'll use the color blue. Then go to Image > Adjustments > Hue & Saturation.

Adjust the sliders for Hue, Saturation, or Lightness to change the color to a medium brown. In this case, all I have to do is change the Hue to -180.
Step 2
Blend the sketch into the base color by setting the Blend Mode to Overlay. Adjust the Opacity to 33%.

4. Paint the Shadows
Now let's paint some quick shadow. Add a New Layer and set it as a Clipping Mask to the base. Set the Blend Mode to Multiply and begin painting shadows using the same brown color from before.

Use a Soft Round Brush with 0% Hardness to concentrate shadow underneath the neck and on each side of the face.
5. Establish Structure With Highlights
Step 1
Select the Color Picker and move the slider upwards to grab a highlight color. This color will help us establish the facial bone structure by concentrating on areas where light is hitting the face.
Every time you paint with a different color, paint on a New Layer. This time keep the Blend Mode on Normal and begin painting with the highlight color you just chose. Carve out the nose, cheekbones, chin, and forehead with some light. You'll need stiffer brush strokes for this step, so adjust the Hardness to 50-100%.

Step 2
Change the color again by moving the slider back down. Begin blending the highlight with a more muted brown. Keep checking back with your reference to make sure you're on the right track.

6. Set the Skin Undertones
Step 1
If the colors don't look right just yet, remember you can always add warmth with undertones. Set a New Layer to Overlay. Use the same exact color from before to add red tones to the skin.

Step 2
Continue using layers set to Overlay to experiment with the undertones. Add tones that are more reddish around the eyes, forehead, and mouth. If you need to change the colors at any time, simply adjust them using Hue & Saturation to find the perfect shade.

Step 3
Now add some deeper colors to emulate those areas of hyper-pigmentation and deeper shadows. You can also use this step to carve out some details. When you're finished, Merge all the layers set to Overlay together.

7. Smooth the Skin With Soft Brushes
Step 1
Already the painting is beginning to look like a real person! Begin blending these colors using a Soft Round Brush. Use the Eyedropper Tool (I) to pick neighboring colors and overlap them with one another. Adjust the Opacity constantly until you get to a seamlessly smooth blend.
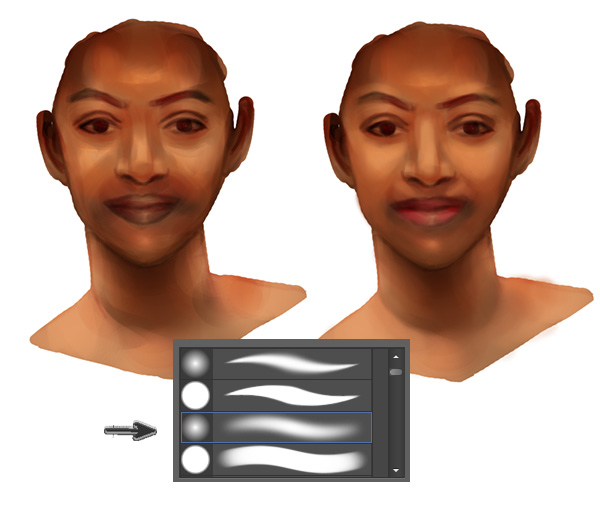
Step 2
Since some areas look a little blotchy, we'll balance things out. Set a New Layer to Hard Light and fill the skin in with solid color. Make the tones more even before moving on to highlights.

8. Highlights and Environmental Light
Step 1
The first highlights we'll tackle are the warm highlights for the skin. Change the Foreground Color to white and begin painting highlights on a layer set to Overlay.Concentrate the highlights again on the cheeks, forehead, nose, and chin just like before. Highlighted areas always protrude forward, so keep this in mind when painting this step.

Step 2
Because the woman is out in the open with natural light all around her, some of the environmental light is slightly blue. Paying attention to this can truly transform the realism of your painting. On the same layer, begin incorporating blue highlights where the light is being reflected onto her skin.

Instantly her face appears more lifelike!
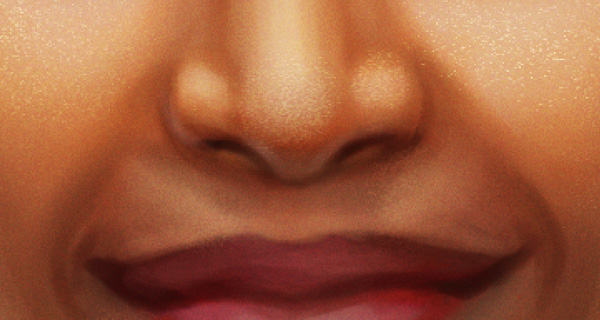
9. Paint the Skin Texture
Step 1
Before you add texture, try to get the skin as smooth as possible. Use a stiffer brush with a Hardness of 50-100%,making sure that you're painting with a high Opacity. Once the skin is all smooth, begin incorporating texture.

Step 2
The first way we'll add texture is by using a Texture Brush. Here I'll be using a simple Airbrush Soft Low Density Brush from the Brush Presets. Brushes that are great for skin produce tiny dots that are similar to pores. This Grunge Brush Set is also a good alternative for achieving skin texture.

Keep the texture minimal so that you don't mess up all the work you put into blending. Set a New Layer to Overlay and begin painting pores across the face using color from the cheek area.
Step 3
Nothing in nature is smooth, so that's why digital paintings often look so unnatural. A faster way to add texture is by incorporating a little noise. Add a New Layer and fill it with a solid gray using the Paint Bucket Tool (G).

Now go to Filter > Noise > Add Noise, and set the Amount to 12%. To apply the noise, set the layer to Overlay and bring down the Opacity to 38%.
10.Add the Final Details
Hey, you're almost at the finish line so don't give up yet! Your painting can really transform in the final steps, so it's important to pay attention to the reference to figure out what details you still need.

Paint the eyebrows with fine strokes, deepen smile lines, and clean up any edges with a Solid Round Brush. Soft brushes make your paintings look fuzzy and out of focus, so make sure the Hardness is set to 100% to add a sense of crispness to this portrait.
As you get more confident, incorporate other details like the hair and background. For the last step, blend the skin into the hairline.

You don't have to copy every hair stroke—just follow the general direction of the hair as it grows out of the skin. Finish the portrait by quickly adjusting the color harmony for bluer hues with Color Balance.
Here is the final painting.

And That's It!
Achieving beautiful skin is all about training yourself. Learn to see all the different colors in your references by paying attention to the way light affects your subject.
Explore different skin types and colors. Keep practicing until you master the art of painting skin.
I hope this tutorial has helped you gain a little more confidence in painting digitally. If you have any questions, feel free to leave them in the comments below. And for more tips on digital painting, check out these tutorials:
- How to Digitally Paint Faces With Incredible Likeness
- How to Paint Realistic Hair in Adobe Photoshop: Short Hair & Beards
- How to Fix Color Errors in Digital Painting With Adobe Photoshop
Original Link:
TutsPlus - Design
More About this Source Visit TutsPlus - Design