
Some of Our Sources
- Engadget
- TutsPlus - Code
- Web Designer Wall
- Team Treehouse
- Noupe
- Web Design Ledger
- Specky Boy
- Freelance Switch
- Dev To
- TechPowerUp
Help Webnuz
Referal links:
How to Age a Photo in Adobe Photoshop

Digital photos are amazing technology. They are superior to working with old film in a number of very real ways. But for all their digital perfection, they often lack the character of old film. Film, being a physical medium, was susceptible to the ravages of time and would show signs of wear, tear and deterioration. This often produced a very attractive effect that we just don't get with our digital photos.
But we could... with a little help from Photoshop and some great textures. In this quick tutorial we will use some textures and some filter know-how to produce a convincing aged film photo effect.
1. Digital Resources
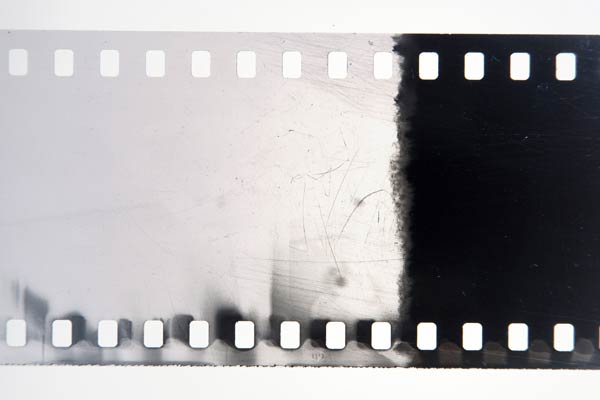
The key to a convincing aged effect is using high-quality textures. There are severaltexture packs available onEnvato Market. For this tutorial we are usingOld Film Cuttings - Scratches & Dust Textures Vol2.

For the base image, just about any photo will work, but the effect is more convincing if the subject of the photo is also old enough to have an antique photo taken of it. For example, this photo of the Brooklyn Bridge.

2. Simple Effects
Step 1
Begin by opening the bridge photo in Photoshop. Then use the Crop Tool (C) to crop the image down to isolate the bridge. The intent here is to remove the modern-looking vehicles from the shot.

Step 2
Unzip the film texture package and open the two files, Pack_2_Film_07.jpg and Pack_2_Film_10.jpg, in Photoshop.

Step 3
On the Pack_2_Film_07.jpg file, go to Select > All (Control-A)and then Edit > Copy (Control-V). Switch over to the bridge photo and go to Edit > Paste (Control-V) to deposit the texture as a new layer over the photo.
Change the blending mode to Multiply and use Edit > Free Transform (Control-T) to scale the texture down to fit over the photo. Use the Enter key to apply the transformation.

Step 4
Use the same technique to bring in the second texture layer. When transforming the new texture layer, try to align the film holes as best you can. If the combined effect is too strong, reduce the layer's Opacity.

Step 5
The scratches of the second texture seem to be too distracting around the center of the image. Add a layer mask with Layer > Layer Mask > Reveal All. Then use theBrush Tool (B) with the Soft Round Brush tip and black paint on the mask to hide the scratches in the center of the frame.

Step 6
The original photo appears way too sharp to be on such an old piece of film. Go to the background bridge photo layer and go to Layer > Smart Objects > Convert to Smart Object. Then go to Filter > Blur > Gaussian Blur and use a Radius of 2.

Step 7
Use the Polygonal Lasso Tool (L) to create a roughly rectangular outline around the background photo. Then use the Add Layer Mask button at the base of the Layers panel to use the selection as a layer mask.

Step 8
Use the Brush Tool (B) again with the Soft Round Brush to soften the edges of the mask and gently paint out a few areas of the sky so the photo appears to be fading.

At this point the image is looking sufficiently aged, all through the use of some nice textures.

3. Going Further
The image looks sufficiently aged at this point, and it would be fine to stop right here. But truly aged photographs usually feature some discoloration and even some light leaks as a byproduct of the technology at that time. If you want to push this effect even further, carry on with these steps to add these effects.
Step 1
Add a Photo Filter Adjustment Layer just over the background photo layer. Set the filter to Sepia and the Density to 54%. This will give the photo an antique tint.

Step 2
As photos fade, they tend to get lighter. To simulate that effect, add a Curves Adjustment Layer and move the left curve point up about half a grid space. Then add a center point to the curve and move it upwards slightly.

Step 3
Now let's create a grain effect. Add a new layer with Layer > New > Layer (Shift-Control-N) and name the layer Grain. Set theforeground color to black and the background color to a pale yellow (#ece88c), and then go to Filter > Render > Clouds.

Step 4
Go to Filter > Noise > Add Noise and use an amount of 50%. Then go to Filter > Blur > Gaussian Blur and set the Radius to 6.4. Finish the grain effect by setting the layer's blending mode to Overlay and the Opacity to 60%.

Step 5
Light leaks were prominent flaws in old film exposures and can be easily simulated with a color gradient. Create a new layer for the Light Leak with Layer > New > Layer (Shift-Control-N). Grab the Gradient Tool (G) and open the Gradient Editor. Then set the gradient colors as seen here.

Use the Linear gradient to draw out a gradient starting at the top left and ending at the right, and just slightly down.

Then finish the effect by setting the blending mode to Soft Light.

Step 6
Add a layer mask to the Light Leak layer and use the Gradient Tool (G) with the Black to White preset. Keep the gradient on Linear and start from the bottom of the frame and pull it about half way up. This will fade the light leak effect out at the bottom of the image.

Step 7
To keep the photo effects contained to just the photo area (and not the film frame), clip them all to the photo layer. Shift-click all the layers from the Photo Filter adjustment layer to the Light Leak layer to select them all. Then go to Layer > Create Clipping Mask (Alt-Control-G) to clip them all to the photo layer.

Awesome Work!
Congratulations! See how easy it is to age a digital photo using some high-quality textures and a few filter tricks? I'd love to see your results in the comments below.

Original Link:
TutsPlus - Design
More About this Source Visit TutsPlus - Design