How to Create a Game Character Sprite Sheet in Affinity Designer

If you've ever wanted to try out game development and character design, then this tutorial is for you! Today we’ll be creating a sprite sheet for a fancy bird-like creature for video and mobile games, using various tools and functions of Affinity Designer. We’ll go through the full process, from outlining the sketch to coloring and creating a set of poses that can be used for animation. Let’s get started!
1. Draw the Basic Parts of the Character
Step 1
I usually start making up a character by
sketching and trying to find the proper image, an interesting form, and an unusual
appearance. Try combining some fictional details of animals or objects that
you meet in real life, searching for original and extraordinary solutions. You
can get inspired by browsing through the game charactersor game spritessections of Envato Market or searching game character sprite on Pinterest.Try to make up your own original ideas, creating unexpected combinations.
When you’ve made several variations, select
the one you like most and continue working with it. Try different poses and facial expressions.
I make a lot of rough sketches, which help
me to understand how my character moves, whether it looks interesting and original, whether it fits the surrounding environment or concept of our
future game and so on.

Finally, I’m quite satisfied with the
fantasy mysterious look of this little guy, and here’s the sketch we’ll be
working with in this tutorial. You can download it directly from here—justright mouse click on the picture and
save it to your PC.

Step 2
We’ll be working with the Drawing Persona
of Affinity Designer, using its vector features to create our character sprite
for video games, which can be easily animated in different poses.
Let’s create a New Document of 600 x 800 px
size. Use the Place Image Tool to
import our sketch and position it in the center of the canvas.
And let’s start outlining the character.
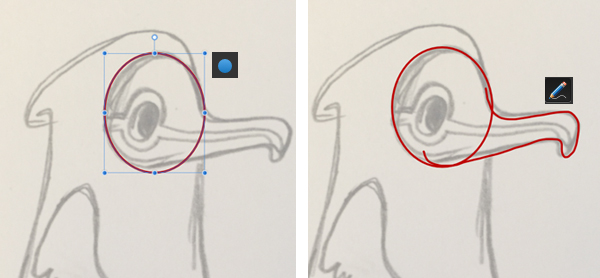
Take the Ellipse Tool (M) and make a
shape, fitting the size of the face. Arm yourself with the Pencil Tool (N) and draw a beak, tracing the sketch. You can edit
the stroke using the Node Tool (A)
to make it more smooth and flowing.

Step 3
Select both shapes that we’ve created and
use theAddOperationin the upper context
toolbar. This way we’ve merged both elements into a single shape.
Now use the Ellipse Tool (M) to make an eye and add a couple more ellipses
to make it more detailed. Follow the lines of the sketch, making the shapes fit
the sketch.

Step 4
Use the Pencil Tool (N) to draw a long, curved line across the face and edit
it, if needed, using the Node Tool (A). We
can change the Style, Width and
other parameters of our line in the
Stroke panel (you’ll find it in one of the tabs next to the Colour panel).
From here, let’s set
the Width to 11 pt and move down to the Pressure
drop-down window. Here we can vary the width of separate segments of the line,
using the graph. Select the right point of the curve on the graph and drag it down to make
the right part of the stroke (which is at the nose of the character) thinner.

Step 5
Now take the Rectangle Tool (M) and let’s move on to the body. Make a rectangle,
aligning it to the body, and Convert
it to Curves in the top context
toolbar. Switch to the Node Tool (A)
and start moving the bottom nodes away from each other, making the bottom part
wider.
Select both upper nodes and drag them up to cover the head of our
character. Then select the top right node and use the Convert to Smooth
function from the top context toolbar, making the right part of the rectangle
smooth and rounded.

Step 6
Now use the Node Tool (A) to modify the left side of the body, adding more
nodes, making the corners smooth and making the outline fit the sketch.

Step 7
Let’s add the feathers to the bottom part
of the body, forming a kind of skirt. Take the Ellipse Tool (M) and form a squashed shape at the bottom left side
of the body. Press Option-Shift and
drag the shape to the right, making a copy. Repeat the same action, making more
copies and filling all the bottom part.
Finally, select the body shape and the
feathers, head to the top context toolbar and apply the Add Operations. Great! Now we’ve merged the elements into a
single shape.

Step 8
Now we move on to the leg. Let’s make it
simple: draw a straight vertical line with a small foot at the bottom.
Head to the Stroke panel and let’s
add more dimension to the leg by making it thicker. Set the Width value to 60 pt and use the Pressure
graph to make its bottom part thinner, as shown in the screenshot below.

Step 9
Now we need to turn the stroke into a shape
so that we’re able to edit it, to add details, outlines and so on. Keeping
the leg selected, go to Layer >
Expand Stroke. The shape looks good enough, although it might have a bunch
of nodes.

While the shape still looks smooth, it may
become very tricky and time-consuming to delete all the unneeded nodes manually. We have two options here: either to leave the shape as it is with a
bunch of nodes, or, if you’re particular about quality, to make a new shape.
We
can use one of the drawing tools here—either the Pencil tool (N) or the Pen Tool (P). I prefer the Pen Tool (P). Just trace the created leg above, making a smooth, rounded shape, and using the Node Tool
(A) to move the nodes around.
Copy the leg to add another one.

Step 10
We have a two-layered feather “skirt” on
our sketch, so let’s add a second feathered body layer.
Copy the body shape and extend it down, making the shape tall, so that it
fits the sketch. Delete the top part of the extended shape, leaving only the skirt.
You can do this with the help of the Node
Tool (A) by selecting all the unneeded upper nodes and deleting
them.
As an option, you can also erase the upper part of the shape with the Vector Crop Tool. However, I prefer the
first method, because the Vector Crop
Tool leaves the erased part hidden inside a clipping mask. This can be
quite helpful in many cases, when you need to restore the shape, but we won’t
need to do it.

Step 11
Now let’s form a stylized arm or a wing for
our bird character. Make an ellipse, fitting the wing on the sketch, and Convert it to Curves. Drag both side anchor points down a bit, making the
shape wider at the bottom. Add another ellipse, making the arm bent at the
elbow.

Step 12
Proceed by Converting the second ellipse to
Curves, and use the Node Tool (A)
to move the lines around, making them fit the sketch. Use the Add Operation to merge the shapes and
make all the nodes smooth.

Step 13
Finally, use the Pencil Tool (N) to draw
a small tuft of feathers at the elbow and merge it together with the arm as well.
Great! The outlines are ready. Now let’s
add the colors!

2. Applying Colors & Varying Poses
Step 1
We’ll be working with a dark-purple
palette. I usually pick the colors with the help of the Colour panel and the Eyedropper
Tool, which can be found right above the color wheel in the Colour panel.

Try making the top parts of the character
lighter than the bottom parts in order to separate the elements from each
other, making them pop out. Make the face light beige, creating a striking
contrast in order to make it the main element of the character, which attracts
the viewer's attention.

Step 2
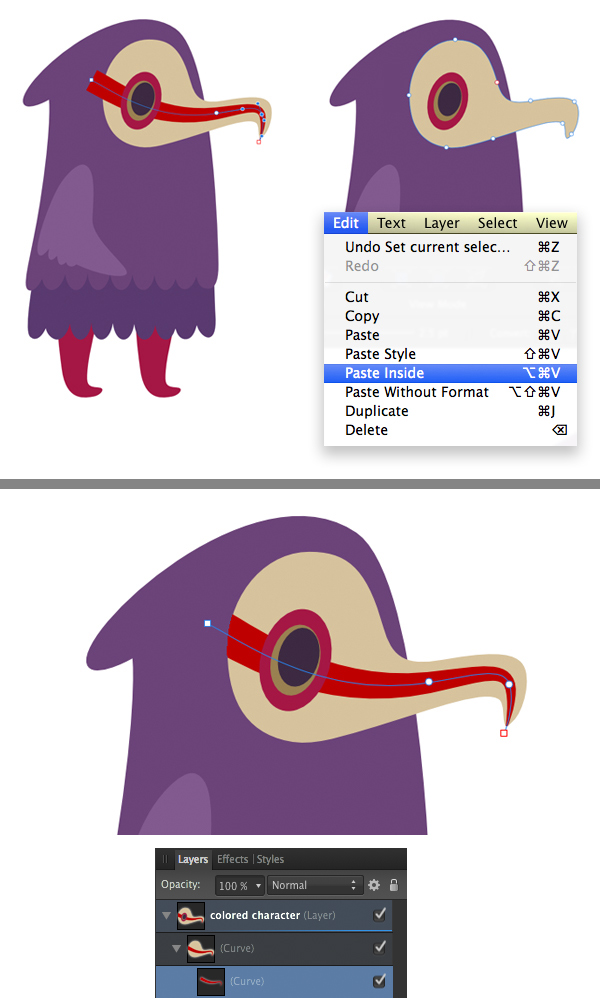
Now let’s work with the face. Apply the
colors to all three ellipses of the eye, making its inner part darker, creating a
hole. And let’s edit the red line across the face. Make it thicker, increasing
the Stroke Weight in the Stroke panel. Cut
(Command-X) the line, select the beige face shape and go to Edit > Paste Inside. Great! Now the
line is inside the face shape, like being inside a clipping mask, and we still can
edit it, if needed.

Step 3
Let’s add some shadows to our character,
making it more detailed. Take the Pencil
Tool (N) and start drawing a shape, partially covering the left side of the
body. It doesn’t have to be perfect, because we’re going to Cut (Command-X) it and then Edit > Paste Inside of the body
shape. Make the shadow a bit darker than the body.

Step 4
Use the Ellipse Tool (M) to add a group of small circles along the edge of
the shadow, overlapping each other and making the shadow textured. Hold down Shift to make the circles perfectly
even.
Add a darker-purple ellipse for the shadow
beneath the face (press Command-[
several times to move the ellipse beneath the face shape). Make more details,
forming a dark shadow on the lower “skirt”, and add a blue overtone with
speckled circles at the right side of the character’s body. Finally, make the
arm much lighter than the body, separating it from the rest of the elements.
Don’t forget to add two small, rounded
shadows to the legs, making them more three-dimensional.

Step 5
Lower the Opacity of the bright-blue highlight in the Layers panel to make it more subtle.
If you want to play around with the colors, making them more vivid, use the Eyedropper Tool to pick the color from
one element and apply it to the other. If you haven’t tried this tool in Affinity Designer yet, it may be a bit
tricky but still very convenient.
Find the Eyedropper
icon in the Colour panel and drag it
right onto your image. You will see a magnifier that helps to select the
desired color, which appears next to the Eyedropper
icon in the Colour panel. Now you
can apply it to any shape you select, simply by clicking the tiny colored circle in the Colour panel.

Step 6
Let’s add more details to our fancy guy.
Add the shadows to all the body parts, including the head and the arm (if you
haven’t added yet) and make some more spots on the face to make it more textured.
Place a couple more ellipses inside the
eye, gradually brightening the colors to make it look glowing. You can see my Layers panel
in the screenshot below, demonstrating all the parts of the eye group.

Step 7
Our character already looks good at this
stage, but if we imagine putting it above a detailed video-game background, it might blend with the
background if the color palettes of the elements are similar. We
need to make our character more distinct above any kind of a
background. It must be attractive and clearly visible at first glance.
And here is a simple way to visually separate the character: we should use
outlines! The thicker the outline around the character is, the more distinct it
becomes!
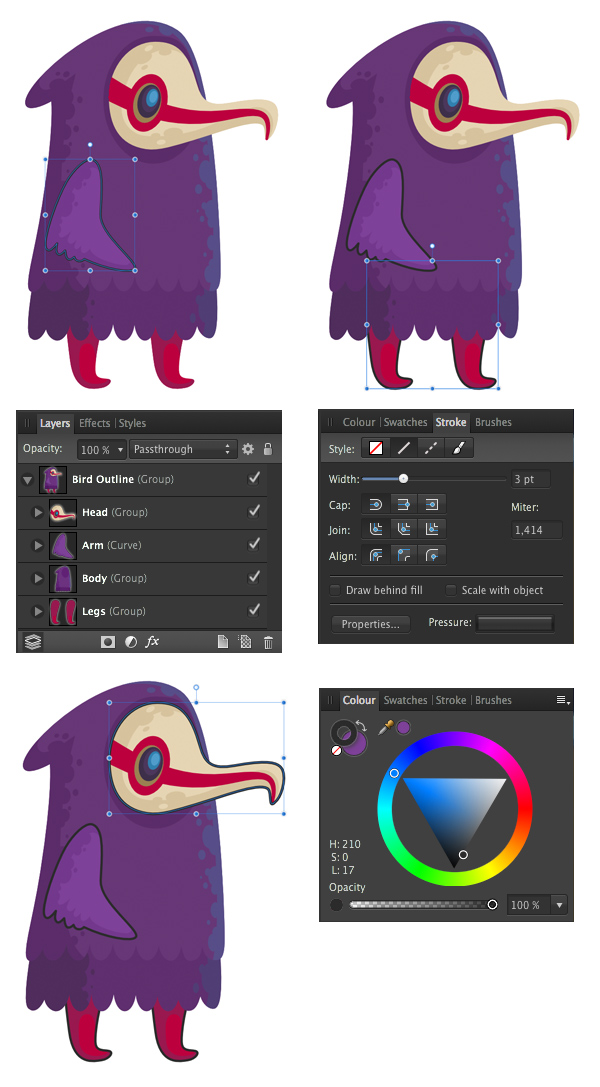
Select the arm, go to the Colour panel and apply a black Stroke
with 3 pt Width value. Add the
outline to the face and legs as well. You might need to select the elements inside the group using the Layers panel, in order to apply the Stroke.

Step 8
As for the body, I want to apply a single
outline to the whole shape. However, the body consists of two elements, so we’ll do a little trick.
Select both body parts and duplicate them (Command-C
> Command-V). You will see the copies in your Layers panel. Select the
copies and merge them into a single shape using the Add Operation.
Now we can actually set the Fill color of the merged shape to none
in the Colour panel and apply a nice
thick 4 pt Stroke, keeping the
outline shape on top of the body.

Step 9
Let’s see what we have so far. We’ve
created a fancy fantasy character, which consists of the body (together with
the face), a pair of winged arms and a pair of funny legs. And that’s actually
all we need to make a moving game sprite! Make sure you’ve Grouped (Command-G) all the parts properly in the Layers panel, keeping your work neat and
consistent.

Now we can make a certain set of poses
that can be performed by our character during the game. You can browse the game character sprite sheet section at GraphicRiver to see what poses are usually used in games, or make up your own.
Here I’ve presented the basic poses by
simply moving the parts of our sprite, making it stand, run, jump or faint.
Notice that I’ve removed the glowing eyes in the faint pose to make it look
more unconscious.

Victory! Our Fantasy Game Character Sprite
Is Ready!
Great job! We’ve just finished creating
our fancy bird creature and made a sprite sheet of several simple poses that can be
used for animation. I hope you’ve found some useful tips and tricks that will
help you to get to know Affinity Designer better or will inspire you to
create some new unique characters and sprite sheets for PC, browser or
mobile games.
If you want to get a ready-to-use vector
EPS file with our fancy bird, including the detailed frames for each pose, check out this bird creature sprite sheet.
It can be used for simple animation.
Have fun designing new characters, and
don’t forget to share your results!

Original Link:
TutsPlus - Design
 TutsPlus+ is a blog/Photoshop site made to house and showcase some of the best Photoshop tutorials around.
More About this Source Visit TutsPlus - Design

