
An Interest In:
Web News this Week
- April 27, 2024
- April 26, 2024
- April 25, 2024
- April 24, 2024
- April 23, 2024
- April 22, 2024
- April 21, 2024
Some of Our Sources
- Engadget
- Team Treehouse
- Joshua Blankenship
- Smashing Magazine
- Naldz Graphics
- FanExtra - PSD
- Web Design Ledger
- CSS Globe
- Design Modo
- TechPowerUp
Help Webnuz
Referal links:
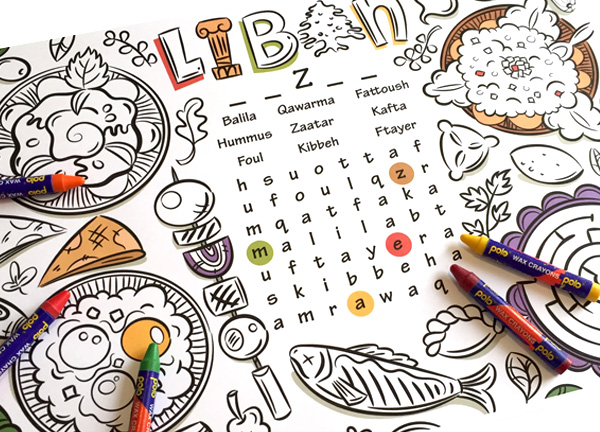
Create a Lebanese Inspired, Printable Placemat for Kids in Adobe Illustrator
Mealtime should be a fun time for the young, whether they are in a restaurant, at home, or any place they are eating. So what better way to entertain them than by creating a playful placemat design for the meal?
For this tutorial I chose to create a placemat to suit the "mezza" of Lebanese cuisine. This type of cuisine is an ancient one and part of the Levant region, which is the eastern coast of the Mediterranean Sea, including also the regions of Israel, Jordan, Palestine and Syria.
Levantine cuisine is exquisite and rich, with fruits, vegetables, whole grain, seafood and meats, seasoned with plentiful herbs, garlic, olive oil, and lemon flavors.
Mezza is the name forthe selection of small dishes served as appetizers, or which may also be served as an entire meal.
In this tutorial we'll put together a ready-to-color scene, using Lebanese food items and some fun word games. We'll use Adobe Sketch for the initial sketch, and then create the placemat in Adobe Illustrator.
1. Adobe Sketch and File Setup
Step 1
If you have never experienced authentic Lebanese mezza before, it's worth a try. Your mind may boggle at
such a fabulous
array of native dishes. Mezza is served either simply with olives, pickled
vegetables or raw vegetables, or as a meal to include a variety of dishes
like
humus, hot pita bread, Halloumi cheese, tabbouleh, Baba Ghanouj,
grilled 'mashawi" or marinated seafood, raw meat, and a whole selection
of specialties. On top of that, the meal would typically end with fresh fruits, baklava and coffee. A belly full feast.
Before we move to Illustrator, let's start by sketching out our chosen theme on Adobe Sketch.
Download Adobe Sketchonto your iPad. You'll need a compatible sensitive pen, and a free or paid Creative Cloud account.
Adobe Sketch behaves like any sketch software, and is quite easy to use.
Open Adobe Sketch, select any one of the five built-in brushes from the top menu, and a blue color tone, and start sketching.
I've sketched a word search game, a word puzzle and a maze into the artwork.
When you are done, click the Share menu, and Send to Illustrator.

Step 2
Your file should open in Adobe Illustrator, if you are logged in to Creative Cloud.
File > Document Setup and Edit Artboards.
Set Width: 28.5 cm and Height:20.5 cm for standard placemat size, Orientation at landscape mode and OK.
Note: If you are printing the placemat from home, chose an A3 or A4 size, compatible with the printer available.

Scale and position the sketch on your artboard
properly.
Next open the Layers panel: Window > Layers.
In the Layers panel,
name "Layer 1" as“Sketch”. Click
the submenu of the Layers panel, select Options for Sketch, and checkDim Images to: 30%, and OK.

Then Create New Layer, on top of the Sketch
layer, and name it “Text”.
File > Save As (Command-Shift-S) "Lebanese_Mezza_Placemat" and OK.
2. Text Placement
Step 1
Let's begin by placing in the text.
Open the Character panel, Window > Type > Character (Command-T).
Select the Type Tool in the Tools panel, and create a type area by dragging the Type Tool cursor on the area you wish to place the text.
Type > Add Fonts from Typekit... This will open the Adobe Typekit webpage, where you can subscribe, access and sync fonts to your projects. I have selected the free, hand written font Tekton Pro and synced it to my Creative Cloud.

Set the text-formatting options. Select Paragraph: Align Center, Leading: 29 pt, Font Size: 19pt, from the Control
panel or Character panel, and type in your text.
Note: If you enter more text than the selected type area, a small box containing a plus symbol (+) will appear near the
bottom of the bounding area. You can either resize
the text area or change the leading and kerning of your text.

Create another two type areas for the word search game words, following the same specs as for the first text area, or for a shortcut just hold down Shift-Command-Drag to Copy the first text area created.
Step 2
Next take the Type Tool and create vertical text strip areas to create the word search game box.
Character: Tekton Pro Bold, Paragraph: Center Aligned, Font Size: 25 pt and Leading: 29 pt. Type in all the letters for the word search game.

To view the bounding box or Outline of the text areas, pressCommand-Y.
Select all the text areas with the Selection Tool (V), and from theControl panel, select the Horizontal Align Center option.

To go back to Preview, press Command -Y.
For the word puzzle, on top of the word search game, select the Type Tool, and use Font Size: 41 pt , Leading: 49.63 pt and Align Center to type in "_ _ Z_ _".
Lock the "Text" Layer, and Create New Layer and name it as "Artwork".

Looking good. Let's move on to creating brushes for the artwork.
Close the Character panel, since we no longer need it.
File > Save.
3. Create Art Brushes and Trace the Artwork
Step 1
Let's create some art brushes to stylize our artwork.Art brushes are great as they stretch a brush shape or an object shape along a path's length.
Open your Brushes window, Window > Brushes.
Select the Pen Tool (P) and draw in some brush shapes that look like brush strokes.
Drop and drag each created art brush onto
the Brushes panel, and the New Brush dialog box will pop up. Select
Art Brush, and OK.
An Art Brush Options dialog
box will appear. Select Stretch to Fit
Stroke Length, so it can stretch along the length of our brush stroke.
Make Width: Pressure, so the brush will vary in angle, roundness or diameter
based on the pressure of a digital pen. This is most useful
if you have a graphics
tablet.
Set Colorization Method to None since our placemat stroke will be in black.
The first art brush is now created.

Follow the same technique with the other brush strokes you have created.
When you are done, select all the created brush shapes with the Selection Tool (V) and Hide Selection (Command-3), in case you need to go back and edit them.
Step 2
Double click the Paintbrush Tool (B) to open the Paintbrush Tool Options dialog box.
Set your Fidelity to Accurate.
This controls how far you need to move your stylus before
Illustrator adds a new anchor point to the path. So an Accurate
Fidelity adds more anchor points and is more precise to the stylus pressure and stroke you apply. Smooth Fidelity means a smoother and less complex path.

Step 3
Now for the fun part: tracing.
Select your Paintbrush Tool (B) and any one of the created art brushes, and starting with a Stroke of 0.75 pt selected from the Control panel, begin tracing over the artwork.
Try out the different art brushes, and play with the stroke weights as you go along.
It should look something like this:

Step 4
While tracing, the ellipse shapes were left out, because they are easier to add in with the Ellipse Tool (L). So select the Ellipse Tool (L) and with Fill to None and any art brush of your preference selected, trace over the ellipses in the illustration.
Where there are overlapping strokes in the ellipses, you need to cut them off using the Scissors Tool (C). Click and hold the Eraser Tool (Shift-E) to see
and choose the Scissors Tool. The Scissors Tool (C) allows you to split paths at an anchor
point or along a segment.
Delete any excess line work.
File > Save.

Step 5
Next we need to trace our maze.
Select the Ellipse Tool (E), and with Fill to None and any art brush of your preference selected, trace over the outer ellipse of the maze.
Then, Object > Path > Offset Path.
To create an ellipse within an ellipse, you need a negative offset, like -0.6 cm.
Make sure Preview is checked, to see if you got the correct measurements, and OK.

Repeat the offset, until you cover all the maze's ellipses.
Then select the Scissors Tool (C) and split the paths to create the maze shape.
With the Paintbrush Tool (B), freehand draw the vertical bars.

Step 6
Afterwards, we need to align all the illustration elements properly within our space.
With the Lasso Tool (Q), you can easily select around the elements you want to move, and with the Selection Tool (V) you can position them where it is fitting.

For the text positioning, Unlock the "Text" layer from theLayers panel to align it properly to the artwork.
Step 7
Next, go back to the "Artwork" layer.
Select the Paintbrush Tool (B) and add in any missed details to the artwork.
Delete the "Sketch" layer from theLayers panel, so that you can view the artwork properly.
Once you are done, lock the "Artwork" layer.
Looking great!
File > Save.

4. Color, Shadow & Outline Type
Step 1
From the Layers panel, Create New Layer under "Text" and name it "Color".
We will add just a bit of color, so it doesn't look so boring, and kids can be inspired to color the rest.
Select the Pen Tool (P), and trace in the color fill, under the strokes you created.
For the plates, create an ellipse with the Ellipse Tool (E), and then trace in the contents of the plate with the Pen Tool (P) so we can trim it out. (I used a green fill, for the shape, so you can preview the action.)
Select both shapes, and open the Pathfinder panel: Windows > Pathfinder.Select Minus Front from the panel to trim out the selection.

Step 2
For the word puzzle hints, use the Ellipse Tool (E), and hold down Shift, to create perfect circles. Give each a different fill color.

Next select a soft hue color fill, with stroke to none, and with the Pen Tool (P), create a shadow effect under each element, to give the illustration some depth.
File > Save.

Step 3
Lastly, if you are printing at a printing press, it's best to outline the text to preserve the font appearance. If you are printing from home, skip this step.
Unlock the "Text" layer from theLayers panel.
Select the text with the Selection Tool (V).
Type > Create Outline (Shift-Command-O).

File > Save As (Command-Shift-S) as "Lebanese_Mezza_Placemat_print" and OK.
Print, play and feast!

Congrats! You Are Ready to Feast!
With Creative Cloud and the simple features in Illustrator CC (17.1), work has never been any faster. Learn to sync between software, memorize shortcuts, and be familiar with all the tools available in the program, and you will find you can be easily creative, work faster, and edit your design more easily. I hope you enjoyed the tutorial.
A fun play sheet will keep the kids happy and
occupied while the parents enjoy a little peace and feast.
The placemat can easily be created and customized to suit all types of restaurants and businesses. It can be printed on both sides and come with a variety of
illustrations and elements. You can include the restaurant logo and contact details for everyone to see and take home.
Don't forget to include fun designs full of puzzles, games and
activities to entertain the guests. Enjoy your meal!
Original Link:
TutsPlus - Design
More About this Source Visit TutsPlus - Design