

My name is Marcos Torres, I'm Graphic Artist from Porto Alegre, Brasil. You can get to know more about me by acessing my Personal Website or by following me on Twitter: @marcos333. You can also see some of my last projects at my Flickr.
An Interest In:
Web News this Week
- May 1, 2024
- April 30, 2024
- April 29, 2024
- April 28, 2024
- April 27, 2024
- April 26, 2024
- April 25, 2024
Some of Our Sources
- Slashdot
- Techcrunch
- Team Treehouse
- Spoon Graphics
- Smashing Apps
- Vandelay Design
- Noupe
- CSS Globe
- Freelance Switch
- Daily Now
Help Webnuz
Referal links:
January 30, 2012 09:05 am GMT


Original Link: http://feedproxy.google.com/~r/abduzeedo-tutorials/~3/ZbBtJQpLe-o/create-creamy-ice-cream-poster-illustrator
Create a Creamy Ice Cream Poster on Illustrator
Hi everyone, before someone say it's winter on the north pole, I gotta say it's damn hot here in Brasil, so I though a tasty and frosty illustration would be a good exercise to do.
This is a step by step tutorial forwarding some of the previous tutorials. The idea is to incentive the idea of playing in Illustrator. It's a simple tutorial but it will deal with some pretty basic shapes, but a good knowledge of the softwares tool will make things quite easier for you, also if you are using a tablet for this tutorial. So, let's do it.
Step 1
First all did some warm ups and rough sketches to get the main idea of what I was going to do. The idea was to make a happy ice cream and a creamy type turning into a tongue at the end.

So, let's open Adobe Illustrator and make a new canvas with a A4 size.

Using the rectangle tool (M) make a light blue rectangle fitting all the canvas.

Using the pen tool (P) or the star tool you're going to create a triangle that will be the base of the ice cream. Use a beige as fill color and 5 pt. Oval dark brown stroke.

You should adjust the lower corners using the pencil tool (N).

I made some hard shadows one the bottom of the triangle using a hard gradient gradation of ellipses. Ok this was a bit hard to understand, what I mean was to use the ellipse tool (L) to create some ellipses over another with the darker on the center and the lighter on the border.


As every form can be decomposed on simple and basic shapes as triangles, squares and circles, the ice cream form is basically a couple of spheres.

Also added the little wave on the top using the pencil tool (N).

Well, you should make some adjustments using the direct selection tool (A) on the vector points so the circles look more organic.

Here's a trick: When trying to draw something melting, first draw the drop and fat part of it. Later just make the bridge using the pencil tool (N),but why would be better drawing this way? You know, most time I try to draw the drop at once it happens that it get's really flat without the sinuos curves that giver it a melting apperance.


Ok, now just select all the pink shapes of the ice cream and use the pathfinder option called Unite. Then just give it the same fat stroke (5 pt. Oval) that you used on the base.


Step 2
So, let's add some lighter pink inside, use the pen tool (P) for that task.

Draw a smple mouth silhouette using the previous tool.

Some wrinckles.

A red tongue (no strokes).

And some light pink inside this fill, let's also add some brightnesses.


Using the ellipse tool (L) I made this eye silhouettes, they're going to be useful later when we try to make some brightnesses on the eyes.

Let's not forget he's teeth, use the pen tool (P) to create this shape.

And add some grey shading on it.

Ok, so duplicate the white ellipse and turn it brown. Then make a triangle on the top using the pen tool (P), select both shapes and go to the pathfinder panel and choose the option called Minus Front.


Then just duplicate it.

Make some eyebrowns and a second filling inside of them.


Ok, now let's add some more brightnesses on the head, start with some on the eyes, then go to the drops and the rest of the head. Use pencil tool (N) for this task. Don't forget that the brightnesses shold be always inside the lighter pink area, as we're trying to make a hard gradation effect.


Step 3
Let's go back to the base (or should we call it body?). Anyway, don't forget to put the head on a separate layer and create a exclusive for the body. Let's first make some semi-circles bellow the head using brow and orange.


Use the pen tool (P) to make the orange shape inside the body, this will later give a feell of depth on it.

Use the previous tool to crete some hashing on the body, classic squares as we see on waffles and Vans shoes.

It's quite boring to do this, but yeah, you're going to make beige squares on each of these parts using the pen tool (P).

Later, using the Minus Front at the pathfinder panel, you're going to create some brow borders around the beige ones. This will take sometime, but as you finish you will get effect we're trying to reach.


Step 4
The arm it's pretty basic. first draw the silhouette using the pencil tool (N).

Let's draw part of the glove here.

Make a lighter brown fill inside the arm.

Using the pencil tool (N) I drawed the palm and the indicator finger.
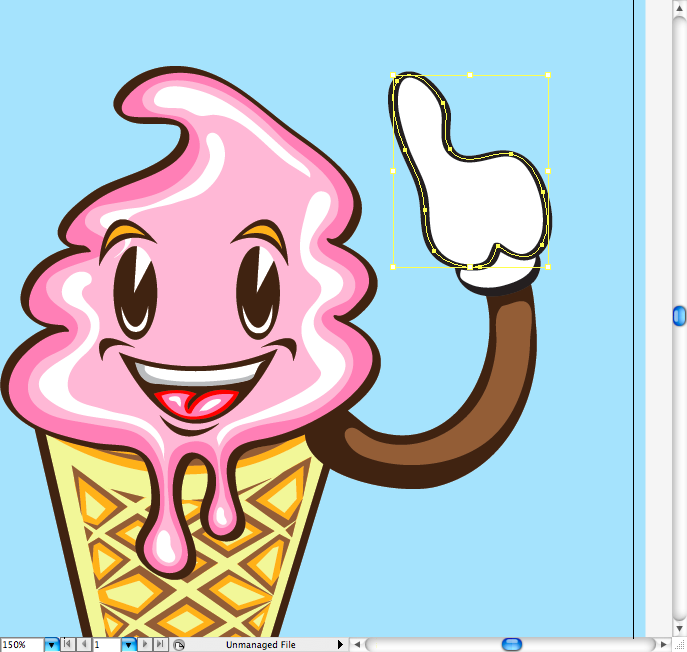
The other two fingers closed.

And, of course, the toe.

Now let's add some details as wrinckles using the brush tool (B).

Then we need some shades on it, I decided to make pink shadows as it's more funky than just classic grey. Create them on the parts that would be darken using the pencil tool (N).

Now go to the transparency panel, select all shadows and choose the blending mode called Multiply.

Also give a little swing on it using some brushes.

Step 5
Let's skip to the type, I used the Val font, a really cool and fat typeface. You can grab it at Font Frabric.

So I wrote "Creamy!" and transformed the font in outlines, then used the same light pink fill of the ice crem on it.

Now go to Object > Offset Path and create a 0,4 path on the letters. After that select the letter and the offset path and group each of them (ctrl + G / command + G). This will avoid the letter to overlap each other.


Add that same stroke on it.

Now let's just add some glows around each letter using the pencil tol (N).


Ok, now let's do the tongue and unite it with the "!".

It's quite simple: draw the tongue shape then select the offset path from the "!" and use the pathfinder option called Unite.

Do the same thing with the light pink fill.

Add the main wrinckle of the tongue using the pen tool (P)

Now let's add some glows along the tongue.


Mkae a shadow suing the same light pink, go to the tranparency panel and use the blending mode called Multiply on it.


Step 6
Just added a coupe of triangles around the indicator finger.

I think that after doing all the previous steps, this part is going to be quite quick. First draw the dribble and the drops, use the pencil tool (N) for the dribble and the ellipse tool (L) for the drops.


Change it's opacity to 70% to give a more realistic definition.

Add some shades using a darker blue, use the Multiply blending mode on them later.

Then let's finally add some light blue as glows all over it.


Step 7
Final step guys, just a little type exercise. Using again the Val typeface I wrote "for sure".

Then as before I just outlined it, used a offset path with a darker color and added some glows along the type using the pencil tool (N).


The easiest way to create splashes like this is using the crystalizze tool, first make a ellipse then set the tool to work correctly and positionate it on the center of the sphere to create equally sharp borders.

Later I just duplicate the same shape to do a inner fill and a hard shadow.


Conclusion
I hope you guys got a better understood of aspects over vector illustration that a have not explored this way before. Even If you haven't followed the whole tutorial, I hope you learned some good tricks today.
Download the Adobe Illustrator File
Download the Adobe Illustrator file used for this tutorial
Original Link: http://feedproxy.google.com/~r/abduzeedo-tutorials/~3/ZbBtJQpLe-o/create-creamy-ice-cream-poster-illustrator
Share this article:
Tweet

View Full Article
Abduzeedo
 Abduzeedo is a collection of visual inspiration and useful tutorials
More About this Source Visit Abduzeedo