
An Interest In:
Web News this Week
- April 27, 2024
- April 26, 2024
- April 25, 2024
- April 24, 2024
- April 23, 2024
- April 22, 2024
- April 21, 2024
Some of Our Sources
- Abduzeedo
- Creative Curio
- Inspiredology
- Naldz Graphics
- My Ink Blog
- Fudge Graphics
- Stylized Web
- Android Dissected
- Codrops
- Willems Lab
Help Webnuz
Referal links:
Containerize your multi-services app with docker compose
This article was posted first on my personal blog mariusniemet.me
In this previous article, we learned what a container is and took a brief introduction by learning how to create an image and then run a container, it was a good starting point.
But with the new industry standard most of the time you will work on apps made by multiple services that have dependencies between them, frontend, backend, database, caching, queue, and so on.
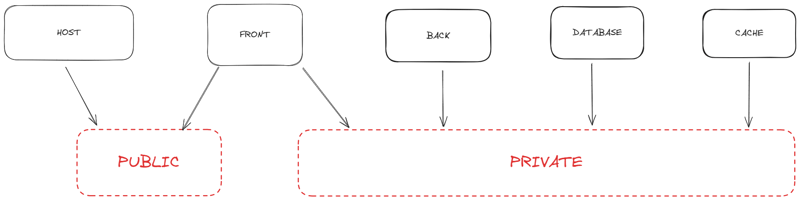
Project architecture

The image above describes the architecture of the project we want to containerize, as you can see we have four different services
- Front: a single-page app built with React
- Back: a graphQL server built with Nestjs
- Database: a MySQL db
- Cache: a Redis cache
If you want to follow along you have to download the source code here.
What is docker compose?
Docker Compose is a tool for defining and running multi-container applications. Compose simplifies the control of your entire application stack, making it easy to manage services, networks, and volumes in a single, comprehensible YAML configuration file.
How to create a stack?
First, you have to create a Dockerfile for each custom service (service for which you are responsible for building the image), for our current project, we have to create a Dockerfile for the front and back services.
Front
cd clientcreate a file named Dockerfile and add the content below:
FROM node:18-alpineWORKDIR /appCOPY package.json .RUN npm installCOPY . .EXPOSE 5173CMD [ "npm", "run", "dev" ]Back
cd graphql-servercreate a file named Dockerfile and add the content below:
FROM node:16-alpine AS base# Set working directoryWORKDIR /app# Copy package.json and package-lock.jsonCOPY package*.json ./FROM base AS dev# Install dependenciesRUN npm install # Copy source codeCOPY . .# Expose port 3000EXPOSE 3000# Start appCMD ["npm", "run", "start:dev"]FROM base as prod ENV NODE_ENV production # Install app dependenciesRUN npm install# Bundle app sourceCOPY . .# Creates a "dist" folder with the production buildRUN npm run build# Start the server using the production buildCMD [ "node", "dist/main.js" ]The compose file
Once we have the Dockerfile for our services the next step is to create a compose.yaml file, docker compose relies on that file for the stack configuration. Compose also supports docker-compose.yaml and docker-compose.yml for backward compatibility with earlier versions. If both files exist, Compose prefers the canonical compose.yaml.
name: composeintroductionIf you dont set a name compose will use the name of the directory in which the compose file is located.
Services
A service is an abstract definition of a computing resource within an application. A service is defined by a Docker image and a set of runtime arguments (mostly docker run arguments). While creating a service you can use an existing image by setting the image name and tag compose will fetch it from the registry for you or you can ask compose to build a new image for you by specifying the path to the Dockerfile.
Lets create the compose service for the backend:
name: composeintroductionservices: backend: build: context: ./graphql-server dockerfile: Dockerfileservices is a top-level argument and all our services will be declared here.
First, we have the service name in this case its backend and since for that service, we wont rely on an existing image we have to specify how compose should build the image thats the role of the build section, context is used to specify the subfolder in which the Dockerfile is located and the dockerfile argument is to specify the name. If your file is named Dockerfile you can remove that argument but if the name is different for any reason you have to specify it.
If your Dockerfile uses a multi-stage build you can specify the stage you are targeting and the command you want docker-compose to run inside your container once its ready.
name: composeintroductionservices: backend: build: context: ./graphql-server dockerfile: Dockerfile target: dev command: npm run start:devFrom now we will have a service named backend that will be built using the Dockerfile inside the graphql-server subfolder, the target stage will be dev and the command used will be npm run start:dev
Port definition:
As we have mentioned above all the arguments you usually pass to the docker run command are available here so to define ports for our container we use the syntax below:
name: composeintroductionservices: backend: build: context: ./graphql-server dockerfile: Dockerfile target: dev command: npm run start:dev ports: -"3000:3000"The port at the left is the external accessible on the host machine and the right is the port inside the container (the same exposed in the Dockerfile).
Environnment variable
There are multiple ways to pass environment variables to a service:
- By using a file: An .env file in Docker Compose is a text file used to define environment variables that should be made available to Docker containers when running docker compose up. This file typically contains key-value pairs of environment variables, and it allows you to centralize and manage configuration in one place.
The .env file content:
DB_PASSOWORD=passwordDB_USERNAME=username: composeintroductionservices: backend: build: context: ./graphql-server dockerfile: Dockerfile target: dev command: npm run start:dev ports: -"3000:3000" env_file: - .env- By passing key-value directly: There are two syntaxes for that
name: composeintroductionservices: backend: build: context: ./graphql-server dockerfile: Dockerfile target: dev command: npm run start:dev ports: -"3000:3000" environment: DB_PASSWORD: password - DB_USERNAME=userIts up to you to choose the way you want to set variables, for the rest of this article we will use the syntax below:
name: composeintroductionservices: backend: build: context: ./graphql-server dockerfile: Dockerfile target: dev command: npm run start:dev ports: -"3000:3000" environment: DB_PASSWORD: password DB_USERNAME: userNow lets create the service for the database.
services: database: image: mysql:latest environment: MYSQL_ROOT_PASSWORD: password MYSQL_DATABASE: db MYSQL_USER: user MYSQL_PASSWORD: passwordFor the database service, since we will use the MySQL official image we dont need the build section here, compose will fetch the image with the tag latest for us from the registry.
Last update the compose file by adding the remaining services:
name: composeintroductionservices: backend: build: context: ./graphql-server dockerfile: Dockerfile target: dev command: npm run start:dev ports: - "3000:3000" environment: DB_PASSWORD: password DB_USERNAME: user database: image: mysql:latest environment: MYSQL_ROOT_PASSWORD: password MYSQL_DATABASE: db MYSQL_USER: user MYSQL_PASSWORD: password cache: image: redis:latest ports: - "6380:6379" frontend: build: context: ./client dockerfile: Dockerfile command: npm run dev ports: - "5173:5173"Now we have added the frontend service and the cache service. We can now run our stack. First, we have to build the images by calling the command below inside our projects folder :
docker compose buildThen compose will build the backend and the frontend image by using the specifications we have added in the compose file, your terminal should display something like the image below:

Once the images are built you can run the stack by calling the command below:
docke compose up -d The flag -d is for running the command in detach mode. By running this command compose will run all the containers declared in the compose file, for the backend and frontend compose will use the images built first for the database and the cache compose will fetch the images from the registry.
If everything went well you should have the result below just make sure the ports we have exposed arent used by other containers on your machine.
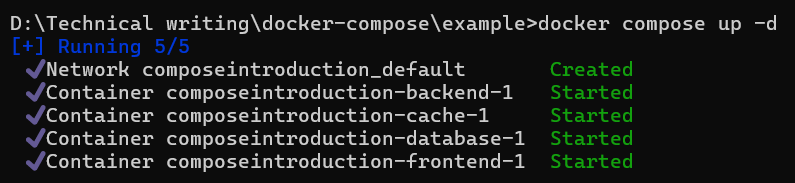
Each containers name includes the stack name, the service name, and a number. Here we have one since there is only one instance by service.
Communication
Once we have our services running we want to establish communication between them, the backend should talk to the database and the cache, and the frontend should talk to the backend.
There are two things to consider here:
- The first is that compose creates a default network for your entire stack if you pay attention to the image above you have the first line
Network composeintroduction_defaultthat shows the name of the default network. - The second is that compose comes with a DNS so if your services are in the same network you can use the service name + the port to communicate compose will figure out the IP address of the service you want to communicate with.
Based on these two pieces of information we understand that we can already establish the communication between our services just by using the service name, lets update the backend first:
import { CacheModule } from '@nestjs/cache-manager';import { Module } from '@nestjs/common';import { TypeOrmModule } from '@nestjs/typeorm';import * as redisStore from 'cache-manager-redis-store';import { AppController } from './app.controller';import { AppService } from './app.service';@Module({ imports: [ TypeOrmModule.forRoot({ type: 'mysql', host: 'database', port: 3306, username: process.env.DB_USERNAME, password: process.env.DB_PASSWORD, database: process.env.DB_NAME, entities: ['dist/**/*entity.js'], synchronize: true, }), CacheModule.register({ isGlobal: true, store: redisStore, host: 'cache', port: 6379, }), ], controllers: [AppController], providers: [AppService],})export class AppModule {}Then the front:
import { ApolloClient, ApolloProvider, InMemoryCache } from "@apollo/client";import React from "react";import ReactDOM from "react-dom/client";import App from "./App.tsx";import "./index.css";const client = new ApolloClient({ uri: "http://backend:3000/graphql", cache: new InMemoryCache(),});ReactDOM.createRoot(document.getElementById("root")!).render( <React.StrictMode> <ApolloProvider client={client}> <App /> </ApolloProvider> </React.StrictMode>);Now if we rebuild our images using docker compose build then run the containers using docker compose up -d we can access the frontend at http://localhost:5174 and fetch the data from the backend that will communicate with the cache and the database.
You may think that everything is great since our services can communicate with each other but we have a tiny issue here, all our services are inside the same default network exposed externally which means we can access the db, the cache, and the backend from the host machine which is something we dont necessarily like, the idea is to have something like the image below:
Here we have two networks, public which is accessible from the host machine and private which is accessible only internally. Since the frontend will be accessed from the host and will communicate with the backend it should be inside the two networks.
Now lets see how to do that in compose:
First, we start by adding a new top-level section named networks all the networks have to be declared there then we add two entries public and private which are the names of our networks. The private should have a parameter name internal set to true which will tell compose to not expose those services outside.
networks: public: private: internal: trueOnce our networks are declared the last thing to do is to update the services definition by adding a network section:
name: composeintroductionservices: backend: build: context: ./graphql-server dockerfile: Dockerfile target: dev command: npm run start:dev ports: - "3000:3000" environment: DB_PASSWORD: password DB_USERNAME: user networks: - private database: image: mysql:latest environment: MYSQL_ROOT_PASSWORD: password MYSQL_DATABASE: db MYSQL_USER: user MYSQL_PASSWORD: password networks: - private cache: image: redis:latest ports: - "6380:6379" networks: - private frontend: build: context: ./client dockerfile: Dockerfile ports: - "5173:5173" networks: - private - publicnetworks: public: private: internal: trueWe have added a network section for each service and only the frontend service has two networks now the services inside the private network cant be accessed from the host. Note that the names private and public are not mandatory you can give any name you want the thing that makes the network private is the internal: true
Persistent volume
If we dont want to lose our database and cache data each time the services are started we have to create volumes and assign them to the services.
The top-level volumes declaration lets you configure named volumes that can be reused across multiple services lets do it :
volumes: db-data: cache-data:Then update the services definition:
cache: image: redis:latest ports: - "6380:6379" networks: - private volumes: - cache-data:/datadatabase: image: mysql:latest environment: MYSQL_ROOT_PASSWORD: password MYSQL_DATABASE: db MYSQL_USER: user MYSQL_PASSWORD: password networks: - private volumes: - db-data:/var/lib/mysqlOnce the volumes are declared and assigned to the services we can restart the stack how many times we want the data wont be lost.
Startup order
When we run the docker compose up command, from the logs printed we can see in which order the services are started
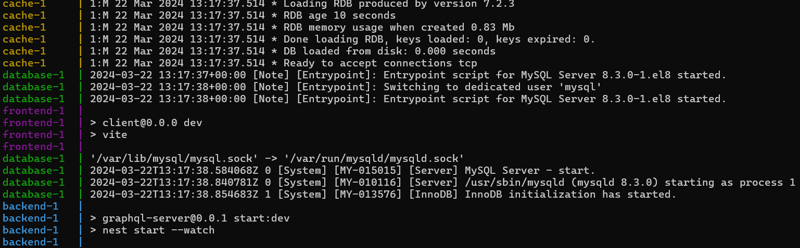
We can notice that the order is the following cache, database, frontend then backend but there are two issues here:
- First, the order wont always be the same
- Second, the front will be available before the backend although it is the first that calls the second.To fix these issues compose provides an attribute nameddepends_on available for each service that will be used to control the startup and shutdown order.
The depends_on attribute takes a list of services for which the current service depends and for each service, we have to set a condition that can be service_started or service_healthy .
Lets update the backend service then explain:
backend: build: context: ./graphql-server dockerfile: Dockerfile target: dev command: npm run start:dev ports: - "3000:3000" environment: DB_PASSWORD: password DB_USERNAME: user networks: - private depends_on: database: condition: service_started cache: condition: service_startedWe have updated the backend service definition by adding the depends_on attribute. We have added two dependencies the database and the cache. Their condition is service_started that means compose will run the backend container only if the database and the cache have been already started.
Now lets update the frontend service:
frontend: build: context: ./client dockerfile: Dockerfile ports: - "5173:5173" networks: - private - public depends_on: backend: condition: service_healthyHere the condition is service_healthy which is different than service_started the idea is to give the developers more control over when a dependency can be considered ready to receive requests cause having the backend started doesnt always mean its ready to receive requests.
Now we have to define how compose will define if the backend service is healthy and to do that we are going to update the backend service definition by adding a new attribute named healthcheck :
backend: build: context: ./graphql-server dockerfile: Dockerfile target: dev command: npm run start:dev ports: - "3000:3000" environment: DB_PASSWORD: password DB_USERNAME: user networks: - private depends_on: database: condition: service_started cache: condition: service_started healthcheck: test: ["CMD", "curl", "-f", "http://backend:3000/healthcheck"] interval: 1m30s timeout: 10s retries: 3 start_period: 40s start_interval: 5sWhen a container has a healthcheck specified, it has a health status in addition to its normal status. This status is initially starting. Whenever a health check passes, it becomes healthy (whatever state it was previously in). After a certain number of consecutive failures, it becomes unhealthy. The value of the test attribute can be whatever you want here we are making an HTTP request since its a web service but for example, in the case of a database, you can replace it with a mysql ping command.
The final compose.yaml file should look like this:
name: composeintroductionservices: backend: build: context: ./graphql-server dockerfile: Dockerfile target: dev command: npm run start:dev ports: - "3000:3000" environment: DB_PASSWORD: password DB_USERNAME: user networks: - private depends_on: database: condition: service_started cache: condition: service_started healthcheck: test: ["CMD", "curl", "-f", "http://backend:3000/healthcheck"] interval: 1m30s timeout: 10s retries: 3 start_period: 40s start_interval: 5s database: image: mysql:latest environment: MYSQL_ROOT_PASSWORD: password MYSQL_DATABASE: db MYSQL_USER: user MYSQL_PASSWORD: password networks: - private cache: image: redis:latest ports: - "6380:6379" networks: - private frontend: build: context: ./client dockerfile: Dockerfile ports: - "5173:5173" networks: - private - public depends_on: backend: condition: service_startednetworks: public: private: internal: trueSecrets
A secret is a blob of data, such as a password, SSH private key, SSL certificate, or another piece of data that should not be transmitted over a network or stored unencrypted in a Dockerfile or your applications source code.
To use a secret in our compose stack we have to do the following actions:
First, declare the secret by using the secrets top-level element. The source of the secret is either file or external.
secrets: my_certificate: file: ./basic-certificate.certSecond, grant the access to the secret for the frontend service
build: context: ./client dockerfile: Dockerfile ports: - "5173:5173" networks: - private - public depends_on: backend: condition: service_started secrets: - my_certificateThe final compose file should look like this:
name: composeintroductionservices: backend: build: context: ./graphql-server dockerfile: Dockerfile target: dev command: npm run start:dev ports: - "3000:3000" environment: DB_PASSWORD: password DB_USERNAME: user networks: - private depends_on: database: condition: service_started cache: condition: service_started healthcheck: test: ["CMD", "curl", "-f", "http://backend:3000/healthcheck"] interval: 1m30s timeout: 10s retries: 3 start_period: 40s start_interval: 5s database: image: mysql:latest environment: MYSQL_ROOT_PASSWORD: password MYSQL_DATABASE: db MYSQL_USER: user MYSQL_PASSWORD: password networks: - private cache: image: redis:latest ports: - "6380:6379" networks: - private volumes: - cache-data:/data frontend: build: context: ./client dockerfile: Dockerfile ports: - "5173:5173" networks: - private - public depends_on: backend: condition: service_started secrets: - my_certificatesecrets: my_certificate: file: ./basic-certificate.certvolumes: db-data: cache-data:networks: public: private: internal: trueConclusion
We have come to the end of this article that aimed to show how to containerize a multi-container app using docker-compose. You can find the final version of the project here. Dont hesitate to check the compose documentation there are a lot of fun things to discover like working with multiple compose files or docker-compose watch.
I hope you enjoy this article as much as I enjoyed writing it.
Feel free to reach out to me on LinkedIn or Twitter.
Original Link: https://dev.to/niemet0502/containerize-your-multi-services-app-with-docker-compose-206
Dev To
More About this Source Visit Dev To