
An Interest In:
Web News this Week
- April 28, 2024
- April 27, 2024
- April 26, 2024
- April 25, 2024
- April 24, 2024
- April 23, 2024
- April 22, 2024
Some of Our Sources
- TutsPlus - Code
- Web Designer Wall
- Team Treehouse
- Just Creative
- Fuel Your Creativity
- Crazy Leaf Design
- CSS Globe
- Line 25
- Specky Boy
- The Verge
Help Webnuz
Referal links:
Tutorial: Create an AI agent that reads Wikipedia for you
In this tutorial, you'll learn how to create an agent that answers questions by searching and reading Wikipedia articles using JS Agent. You can find the complete code in the Wikipedia agent example.
This is the high-level flow of the agent: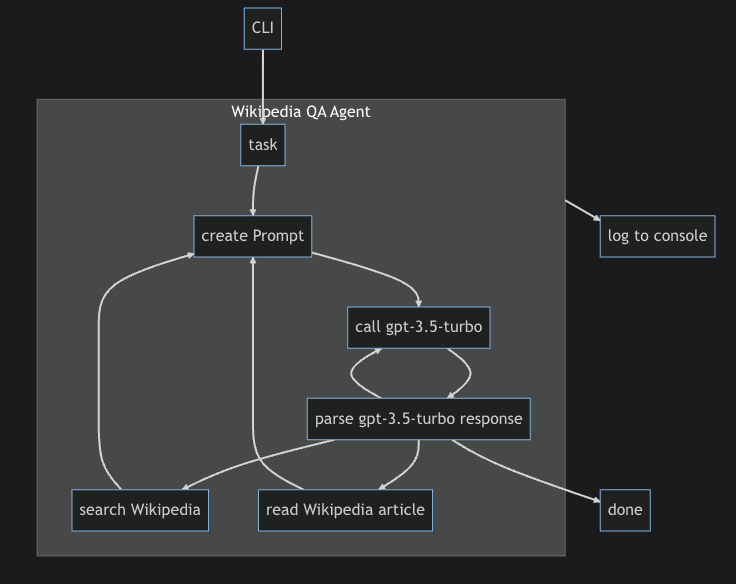
The agent will use the following components:
- OpenAI
gpt-3.5-turbochat completion model - A loop in which the agent determines and executes steps ("GenerateNextStepLoop")
- A custom prompt
- Wikipedia search tool (implemented using a Programmable Search Engine)
- Wikipedia article reading tool
- Command line interface and console logger that shows the agent's progress
Setup
Pre-requisites
This tutorial assumes that you have Node.js (v18 or newer) installed. You also need access to the OpenAI API.
Create a new Node.js project
mkdir wikipedia-agentcd wikipedia-agentnpm init -ymkdir srcSetup TypeScript
npm install --save-dev typescript ts-node @types/nodenpx tsc --init --rootDir src --outDir .buildInstall JS Agent
npm install js-agentYou should have a basic Node.js project that has TypeScript and JS Agent installed.
Create agent.ts
src/agent.ts will contain the Wikipedia agent. To get started, add the following content:
const task = process.argv.slice(2).join(" ");runWikipediaAgent() .then(() => {}) .catch((error) => { console.error(error); });async function runWikipediaAgent() { console.log(task);}You can now run it with e.g.:
npx ts-node src/agent.ts "how many people live in BC, Canada?"At this point, it only outputs the task to the console.
Setup the LLM model
Next, we'll set up the LLM model and create the agent loop with a basic prompt.
Load OpenAI API key
Update the code to load the OpenAI API key from the environment and inject it into the agent:
const task = process.argv.slice(2).join(" ");const openAiApiKey = process.env.OPENAI_API_KEY;if (!openAiApiKey) { throw new Error("OPENAI_API_KEY is not set");}runWikipediaAgent() .then(() => {}) .catch((error) => { console.error(error); });async function runWikipediaAgent() { console.log(openAiApiKey); console.log(task);}Create the LLM model
First, import JS Agent:
import * as $ from "js-agent";You can then create the chat model in runWikipediaAgent:
const chatGpt = $.provider.openai.chatModel({ apiKey: openAiApiKey, model: "gpt-3.5-turbo",});Call the model with a basic prompt
Once you have a model, you can call it directly with a basic prompt:
const fullResponse = await chatGpt.generate([ { role: "user" as const, content: task },]);And extract the main output from its response:
const output = await chatGpt.extractOutput(fullResponse);console.log(output);Putting this together, this is the current code:
import * as $ from "js-agent";const task = process.argv.slice(2).join(" ");const openAiApiKey = process.env.OPENAI_API_KEY;if (!openAiApiKey) { throw new Error("OPENAI_API_KEY is not set");}runWikipediaAgent() .then(() => {}) .catch((error) => { console.error(error); });async function runWikipediaAgent() { const chatGpt = $.provider.openai.chatModel({ apiKey: openAiApiKey, model: "gpt-3.5-turbo", }); const fullResponse = await chatGpt.generate([ { role: "user" as const, content: task }, ]); const output = await chatGpt.extractOutput(fullResponse); console.log(task); console.log(output);}When you run it, it'll use the knowledge that's trained into the LLM to answer the question:
npx ts-node src/agent.ts "how many people live in BC, Canada?"how many people live in BC, Canada?As an AI language model, I do not have access to real-time data. However, according to the latest census conducted in 2016, the population of British Columbia, Canada was approximately 4.6 million.Create the basic agent
Now we're ready to create a basic agent. Let's update the runWikipediaAgent function with the following code:
const chatGpt = $.provider.openai.chatModel({ apiKey: openAiApiKey, model: "gpt-3.5-turbo",});return $.runAgent<{ task: string }>({ properties: { task }, agent: $.step.generateNextStepLoop({ actions: [], actionFormat: $.action.format.flexibleJson(), prompt: async ({ runState: { task } }) => [ { role: "user" as const, content: `${task}` }, ], model: chatGpt, }), controller: $.agent.controller.maxSteps(3), observer: $.agent.observer.showRunInConsole({ name: "Wikipedia Agent", }),});When you run it, it'll output the basic LLM answer to the console until the maximum number of steps is reached:
npx ts-node src/agent.ts "how many people live in BC, Canada?"### Wikipedia Agent ###{ task: 'how many people live in BC, Canada?' }ThinkingAs an AI language model, I do not have access to real-time data. However, according to the latest census conducted in 2016, the population of British Columbia, Canada was approximately 4.6 million.ThinkingAs an AI language model, I do not have access to real-time data. However, according to the latest census conducted in 2016, the population of British Columbia, Canada was approximately 4.6 million.ThinkingAs an AI language model, I do not have access to real-time data. However, according to the latest census conducted in 2016, the population of British Columbia, Canada was approximately 4.6 million.Cancelled: Maximum number of steps (3) exceeded.Let's dig into the code.
$.runAgent runs an agent. It is typed to the properties of the agent, which are also its input. We pass in the task as a property:
return $.runAgent<{ task: string }>({ properties: { task }, // ...});The agent property contains the root step of the agent. We use a $.step.generateNextStepLoop step, which generates steps using the LLM until the agent is done:
return $.runAgent<...>({ // ... agent: $.step.generateNextStepLoop({ actions: [], actionFormat: $.action.format.flexibleJson(), prompt: async ({ runState: { task } }) => [ { role: "user" as const, content: `${task}` }, ], model: chatGpt, }),The loop is configured with our earlier prompt function and the chatGpt model. This prompt is used when calling the chatGpt model generate function. We'll configure and talk about the actions later.
Because the agent has no actions yet and does not know when to stop, we limit the maximum number of steps to 3:
return $.runAgent<...>({ // ... controller: $.agent.controller.maxSteps(3),And finally, we use an observer that outputs the agent's run to the console:
return $.runAgent<...>({ // ... observer: $.agent.observer.showRunInConsole({ name: "Wikipedia Agent", }),With the basic agent in place, let's add some tools next.
Create the Wikipedia search tool
Create a programmable search engine
First, you need to create a programmable search engine for Wikipedia.
When you set up the search engine, configure the site to be en.wikipedia.org/*. The search engine id (the cx parameter) is on the overview page. You can get the search engine key in the documentation ("Get a Key"; requires a Google project).
Create the search action
JS Agent has a built-in tool for using programmable search engines. You can use it to create a search action.
Tools are actions that run (potentially external) code in some fashion. They don't affect the control flow directly. There are other kinds of actions, e.g., the "done" action, that an agent can select.
const searchWikipediaAction = $.tool.programmableGoogleSearchEngineAction({ id: "search-wikipedia", description: "Search wikipedia using a search term. Returns a list of pages.", execute: $.tool.executeProgrammableGoogleSearchEngineAction({ key: "your search engine key", cx: "your search engine id", }),});The id and description parameters are included in the LLM prompt. It is important to choose names and descriptions that are easy to understand for the LLM, because they will determine if and when the agent decides to use this action.
The execution parameter contains the function that is running the tool code. It provides additional flexibility, e.g., using executors that run in a Docker container.
Create an article reader
The read article action is implemented using the JS Agent extractInformationFromWebpage tool:
const readWikipediaArticleAction = $.tool.extractInformationFromWebpage({ id: "read-wikipedia-article", description: "Read a wikipedia article and summarize it considering the query.", inputExample: { url: "https://en.wikipedia.org/wiki/Artificial_intelligence", topic: "{query that you are answering}", }, execute: $.tool.executeExtractInformationFromWebpage({ extract: $.text.extractRecursively({ split: $.text.splitRecursivelyAtCharacter({ maxCharactersPerChunk: 2048 * 4, }), extract: $.text.generateText({ id: "summarize-wikipedia-article-chunk", prompt: $.prompt.extractChatPrompt(), model: chatGpt, }), }), }),});In addition to the id and the description, the action has an inputExample that will be shown to the LLM. Input examples help with guiding the LLM to take the right action. Every tool has a default input example that can be overridden.
The page is then summarized using text extraction. It is split recursively until the chunks are small enough for gpt-3.5-turbo to handle. gpt-3.5-turbo is used to generate a summary for each chunk and the concatenated summaries.
$.prompt.extractChatPrompt(), which is part of JS Agent, contains the following prompt:
async ({ text, topic }: { text: string; topic: string }) => [  {    role: "user" as const,    content: `## TOPIC
${topic}`,  },  {    role: "system" as const,    content: `## ROLEYou are an expert at extracting information.You need to extract and keep all the information on the topic above topic from the text below.Only include information that is directly relevant for the topic.`,  },  {    role: "user" as const,    content: `## TEXT
${text}`,  },];
Now that we have created a summarization tool, we can put everything together and craft a better agent prompt.
Adding the actions to the agent
Now that we have a search Wikipedia and a read article action, we can set up the actions in the Wikipedia agent. Let's add them to the actions section of $.step.generateNextStepLoop:
return $.runAgent<...>({ // ... agent: $.step.generateNextStepLoop({ actions: [searchWikipediaAction, readWikipediaArticleAction], actionFormat: $.action.format.flexibleJson(),The actionFormat parses the first flat JSON object in the LLM output. It is specifically designed for ChatGPT, which tends to output the JSON object in various places in the response.
Create a better prompt
The agent has yet to be made aware of the actions and it does not know that it should read Wikipedia articles. Let's improve the agent prompt.
return $.runAgent<...>({ // ... prompt: $.prompt.concatChatPrompts( async ({ runState: { task } }) => [ { role: "system", content: `## ROLEYou are an knowledge worker that answers questions using Wikipedia content.## CONSTRAINTSAll facts for your answer must be from Wikipedia articles that you have read.## TASK${task}`, }, ], $.prompt.availableActionsChatPrompt(), $.prompt.recentStepsChatPrompt({ maxSteps: 6 }) ),Let's dissect the prompt. We first tell the model about its general role, and then we instruct it always to read Wikipedia articles to find the answer and give it the task.
## ROLEYou are an knowledge worker that answers questions using Wikipedia content.## CONSTRAINTSAll facts for your answer must be from Wikipedia articles that you have read.## TASK${task}The next part informs the model about the available actions. After that, we ensure to include the last steps the model took in the prompt for the next iteration. This provides some basic memory required for moving the agent forward in its task.
return $.runAgent<...>({ // ... prompt: $.prompt.concatChatPrompts( // ... $.prompt.availableActionsChatPrompt(), $.prompt.recentStepsChatPrompt({ maxSteps: 6 }) ),The different prompts are concatenated using $.prompt.concatChatPrompts.
Update the maximum steps
The agent is now ready to be run.
We increase the maximum number of steps to 10 to provide the agent with more time to find the answer.
return $.runAgent<...>({ // ... controller: $.agent.controller.maxSteps(10),The complete Wikipedia Agent
The agent now looks like this:
import * as $ from "js-agent";const task = process.argv.slice(2).join(" ");const openAiApiKey = process.env.OPENAI_API_KEY;if (!openAiApiKey) { throw new Error("OPENAI_API_KEY is not set");}runWikipediaAgent({ task, openAiApiKey,}) .then(() => {}) .catch((error) => { console.error(error); });async function runWikipediaAgent({ task, openAiApiKey,}: { task: string; openAiApiKey: string;}) { const chatGpt = $.provider.openai.chatModel({ apiKey: openAiApiKey, model: "gpt-3.5-turbo", }); const searchWikipediaAction = $.tool.programmableGoogleSearchEngineAction({ id: "search-wikipedia", description: "Search wikipedia using a search term. Returns a list of pages.", execute: $.tool.executeProgrammableGoogleSearchEngineAction({ key: "your search engine key", cx: "your search engine id", }), }); const readWikipediaArticleAction = $.tool.extractInformationFromWebpage({ id: "read-wikipedia-article", description: "Read a wikipedia article and summarize it considering the query.", inputExample: { url: "https://en.wikipedia.org/wiki/Artificial_intelligence", topic: "{query that you are answering}", }, execute: $.tool.executeExtractInformationFromWebpage({ extract: $.text.extractRecursively({ split: $.text.splitRecursivelyAtCharacter({ maxCharactersPerChunk: 2048 * 4, }), extract: $.text.generateText({ id: "summarize-wikipedia-article-chunk", prompt: $.prompt.extractChatPrompt(), model: chatGpt, }), }), }), }); return $.runAgent<{ task: string }>({ properties: { task }, agent: $.step.generateNextStepLoop({ actions: [searchWikipediaAction, readWikipediaArticleAction], actionFormat: $.action.format.flexibleJson(), prompt: $.prompt.concatChatPrompts( async ({ runState: { task } }) => [ { role: "system", content: `## ROLEYou are an knowledge worker that answers questions using Wikipedia content.## CONSTRAINTSAll facts for your answer must be from Wikipedia articles that you have read.## TASK${task}`, }, ], $.prompt.availableActionsChatPrompt(), $.prompt.recentStepsChatPrompt({ maxSteps: 6 }) ), model: chatGpt, }), controller: $.agent.controller.maxSteps(10), observer: $.agent.observer.showRunInConsole({ name: "Wikipedia Agent" }), });}Example Run
Here are the results of a test run:
npx ts-node src/agent.ts "how many people live in BC, Canada?"### Wikipedia Agent ###{ task: 'how many people live in BC, Canada?' }ThinkingI will start by searching for the population of British Columbia, Canada on Wikipedia.{ "action": "search-wikipedia", "query": "population of british columbia canada"}Executing search-wikipedia## Found 5 search results.### British Columbia - Wikipediahttps://en.wikipedia.org/wiki/British_ColumbiaWith an estimated population of 5.3 million as of 2022, it is Canada's third-most populous province. The capital of British Columbia is Victoria and its...### Vancouver - Wikipediahttps://en.wikipedia.org/wiki/VancouverVancouver is a major city in western Canada, located in the Lower Mainland region of British Columbia. ... Vancouver has the highest population density in Canada, with over 5,700...### Demographics of British Columbia - Wikipediahttps://en.wikipedia.org/wiki/Demographics_of_British_ColumbiaPopulation of British Columbia 5.399 million (2023) ; Percentage of National Population: 13.2% (unchanged) ; Population Growth Rate: 5.6%...### Victoria, British Columbia - Wikipediahttps://en.wikipedia.org/wiki/Victoria,_British_ColumbiaVictoria is the capital city of the Canadian province of British Columbia, on the southern ... In the 2021 Census of Population conducted by Statistics Canada,...### Surrey, British Columbia - Wikipediahttps://en.wikipedia.org/wiki/Surrey,_British_ColumbiaIn the 2021 Canadian census conducted by Statistics Canada, Surrey had a population of 568,322 living in 185,671 of its 195,098 total private dwellings, a...ThinkingThe third search result, "Demographics of British Columbia - Wikipedia", seems to be the most relevant. I will read the article and summarize it to answer the question.{ "action": "read-wikipedia-article", "url": "https://en.wikipedia.org/wiki/Demographics_of_British_Columbia", "topic": "population of British Columbia, Canada"}Executing read-wikipedia-article## Extracted information on topic 'population of British Columbia, Canada' from https://en.wikipedia.org/wiki/Demographics_of_British_ColumbiaThe population of British Columbia, Canada is 5.399 million as of 2023, which represents 13.2% of the national population. The population growth rate is 5.6%. In terms of visible minorities and indigenous peoples, 30.3% of the population in 2016 were visible minorities, and 5.9% were indigenous. The largest visible minority groups were South Asian, Chinese, and Black. In terms of immigration, in 2021, immigrants comprised 29.0% of the total population of British Columbia, with the largest immigrant groups being from China, India, and the Philippines. Finally, the 2021 Canadian census counted a total of 197,420 people who immigrated to British Columbia between 2016 and 2021.ThinkingAccording to the information I found on Wikipedia, the population of British Columbia, Canada is 5.399 million as of 2023.{ "action": "done"}DoneOriginal Link: https://dev.to/lgrammel/tutorial-create-an-ai-agent-that-reads-wikipedia-for-you-31cm
Dev To
More About this Source Visit Dev To