
An Interest In:
Web News this Week
- April 3, 2024
- April 2, 2024
- April 1, 2024
- March 31, 2024
- March 30, 2024
- March 29, 2024
- March 28, 2024
Some of Our Sources
- Simplebits
- TutsPlus - Code
- You The Designer
- Fuel Your Creativity
- Crazy Leaf Design
- Web Design Ledger
- CSS Tricks
- Android Dissected
- Dev To
- The Verge
Help Webnuz
Referal links:
Docker Tutorial
Docker Tutorial Chapters
Small Tips: Starting with
means that it is a command that you can run in your terminal.
- Introduction
- Why should I use Docker ?
- Then what is Docker?
- So we use docker for :
- How does Docker work?
- Example of Docker in action
- What is difference between Docker and Virtual Machine(VM)?
- What is VM?
- What is Docker?
- How do they differ?
- How to install Docker
- Containers , Images and Volumes
Docker Version- Let's start with Docker
- Let's play with Postgresql
Pulling an imageCheck the imagesRun a containercheck the containersStop and start a containerPull according to the versionStop the containerRemoving all containers
- Let's play with the mongo
-
Port Mapping -
Docker Logs -
Delete the container
-
- Let's Connect the mongo express with the mongo ??
-
Syntax Understanding -
Better Syntax -
Lost network finding- Let's Understand the Docker Compose
- Step 1
- Step 2
-
Running the docker-compose file- Step 3 (Data Persistence)
-
Creating a volume in docker-compose file -
Stop running all containers- Our First Project with Docker
-
Python Flask App -
Build the docker image -
Run the docker image -
Stop the docker container -
Mapping the port -
Push the docker image to the docker hub - Our Second Project with Docker
-
NodeJs SetupLogin to the docker hubCheck the container idStop the containerKill the containerRemove the containerRemove the imagePull the docker image- What did we understand from these two projects?
- Docker Best CLI Cheat Sheet
- Conclusion
Another Platform For Better Reading Experience
![]()
Introduction
This tutorial is designed for complete beginners to advanced users who want to learn Docker from scratch. It covers everything you need to know about Docker, from installation and configuration to creating and running containers, images, and volumes. It also explains the concepts and benefits of Docker, such as port mapping, networking, security, and compose. By the end of this tutorial, you will have no doubts about how to use Docker effectively and efficiently.
This tutorial is also full of practical examples and projects that will help you apply what you learn and gain hands-on experience with Docker. You will learn how to create a Python Flask app, a Node.js app, a Postgresql database, and a Mongo Express web interface using Docker. You will also learn how to build, run, stop, delete, and push your Docker images and containers.
I have created this tutorial with the aim of helping you learn Docker in a fun and easy way. If you appreciate his effort and find this tutorial useful, please give it a star () on GitHub and share it with your friends.
So what are you waiting for? Let's dive into the world of Docker and see what it can do for you!
Why should I use Docker ?
Have you ever faced this problem?
Your code works fine on your dev environment, but when you publish it on the server, it breaks and gives you errors. You don't know why ,and you have to fix it quickly. You find out that you forgot to install a dependency or you used a different version of a tool.
If yes, then you need Docker!
Docker is a tool that lets you create and run containers. Containers are like boxes that have everything your app needs to run. They have the same files, programs, and settings on any environment. You can use the same container on your dev environment, your server, or any other computer.
Using Docker will make your life easier because:
- You won't have to worry about missing or mismatched dependencies on your server. Your container will have them all.
- You won't have to install or configure anything on your dev environment. You can just use a container that has everything ready for you.
- You can use containers for old or new projects. You can keep the dependencies that you need without affecting other projects or systems.
- You can use containers to run your app on the cloud. You can also use tools like Docker Swarm or Kubernetes to manage multiple containers.
Docker is awesome and you should try it!
Then what is Docker?
Docker is a software platform that lets you run applications inside containers. Think of containers like virtual machines, but lighter and more efficient!
So we use docker for :
- Simplifies application deployment: Package your application and all its dependencies into a container that can run on any machine with Docker installed.
- Increases portability: Move Docker containers easily from one environment to another, like from a developer's laptop to a production server.
- Improves scalability: Quickly spin up multiple instances of your application to handle increased traffic.
How does Docker work?
Docker creates containers, which are isolated environments with their own filesystem, network, and processes. Each container runs a specific application along with its dependencies.
To create a container, you first need to create a Docker image, which is a snapshot of your application and its dependencies. You can create an image by writing a Dockerfile, a script that specifies the instructions for building the image.
Once you have an image, you can use it to create a container by running the docker run command. This starts a new container based on the image and runs the application inside it.
Example of Docker in action
Let's say you have a web application that uses Node.js and MongoDB. Normally, you would need to install Node.js and MongoDB on your server and configure them to work together. With Docker, you can create two separate containers, one for Node.js and one for MongoDB, and run them on the same server
To do this, you would create two Docker images: one for the Node.js application and one for the MongoDB database. Then you would use the docker run command to start both containers, making sure to link them together so that the Node.js container can communicate with the MongoDB container.
By using Docker, you can simplify the deployment of your web application, make it more portable, and improve its scalability.
What is difference between Docker and Virtual Machine(VM)?
What is VM?
VM stands for virtual machine. A virtual machine is also like a mini-computer that runs on your main computer. But unlike a container, a virtual machine has its own operating system. This means that it can run any kind of application, regardless of the operating system of your main computer.
The advantage of using virtual machines is that they are very secure and isolated. They don't share anything with your main computer or with other virtual machines. If something goes wrong with one virtual machine, it won't affect the others. You can also run different operating systems on different virtual machines.
What is Docker?
Docker is a tool that lets you create and run containers. Containers are like virtual machines, but they don't have their own operating system. They only have the files, programs, and settings that they need to run their application. This makes them very efficient and fast.
Docker doesn't have kernel-level virtualization like virtual machines do. Instead, it uses a container engine to create containers. This makes Docker much lighter and faster than virtual machines.
How do they differ?
The main difference between docker and vm is how they use the resources of your main computer. Docker containers share the same operating system as your main computer. They only use the software that they need to run their application. This makes them very efficient and fast.
Virtual machines don't share anything with your main computer. They have their own operating system and hardware resources. This makes them more independent and secure, but also more heavy and slow.
Here is a table that summarizes some of the key differences between docker and vm:
| Topic | Docker | VM |
|---|---|---|
| Operating system | Shared | Separate |
| Performance | Fast | Slow |
| Portability | Easy | Hard |
| Security | Low | High |
How to install Docker
- To get started, open this website: https://docs.docker.com/ and click on the Download and Install button. Then select the Docker Desktop for Windows or Docker Desktop for Mac or Docker Desktop for Linux button depending on your operating system. This will take you to the download page.
- Follow the instructions to install Docker Desktop for your operating system. You may need to restart your computer after the installation.
- Once you have installed Docker Desktop, you will see an interface like this:

- Now you can sign in to your Docker account or create a new one if you don't have one already.
- On the interface, you will notice three sections: Containers, Images and Volumes. These are the main components of Docker that you need to know about.
Containers , Images and Volumes
- Containers are like boxes that you can put things in. Each box has its own things that are separate from the other boxes. You can open and close a box without affecting the other boxes or the room. Containers are like boxes that have their own files, programs, and settings that are separate from the other containers or the computer. You can create and delete containers without affecting the other containers or the computer. Containers are fast and easy to use because they use the same system as the computer and do not need to start a whole new system like virtual machines do.
- Images are like recipes for making containers. They tell you what ingredients and steps you need to make a container. You can use an existing recipe from a public place like Docker Hub, or you can write your own recipe using a Dockerfile. Recipes do not change once they are written. You can use the same recipe to make many containers with the same ingredients and steps.> let's say you have a project that consists of a web application written in Node.js, a backend server written in Java, and a machine learning component written in Python. You can create three separate Docker images for each of these components, each with its own dependencies and configurations, and then use them to create containers that can run the entire project.
For instance, you can create a Docker image for the Node.js application by specifying the base image as node and then copying the application code into the container. You can then build and tag the image with a specific name, like my-node-app.
- Volumes are like external drives that you can connect to your containers. They let you save data that your containers make or use, such as databases, logs, or configuration files. Volumes do not get deleted when you delete a container. You can also share volumes among many containers or access them from the computer. Volumes are the best way to save data with Docker because they are easier to back up, move, and manage than other ways of saving data.### Docker VersionTo check if docker is installed or not, you can run this command in your terminal:
docker --versionor
docker versionor
docker -vLet's start with Docker
If you want to learn the actual thing, you should work on real-world problems that challenge you and make you think. As you try to fix the issues and errors that arise, you will learn more concepts and skills along the way. Thats why Ill focus on showing you how to work on a real-world application with docker, and how to troubleshoot any problems that may occur. You will also learn how to read documentation, understand complexity, and solve any problem that comes your way. Lets dive right in!
Let's play with Postgresql
Pulling an image
- First open this website for postgresql: https://hub.docker.com/_/postgresyou will see this right side of the page:
docker pull postgres- Open your terminal and type this command:
docker pull postgres
- You can check docker is installed or not by typing this command:
docker --version- You can visit the docker documentation for pull command: https://docs.docker.com/engine/reference/commandline/pull/
- Pulling an image doesn't mean installing it. It just means that you are downloading the image from the Docker Hub to your computer.
- It will download the latest version of the image. If you want to download a specific version, you can add the version number after the image name. For example,
docker pull postgres:9.6.2will download the 9.6.2 version of the image.### Check the images- Now may be you want to check your images, so type this command:
docker image ls
- You can visit the docker documentation for image command:https://docs.docker.com/engine/reference/commandline/image/
You can see the output like this:
REPOSITORY TAG IMAGE ID CREATED SIZEpostgres latest ceccf204404e 30 hours ago 379MBEven you can open the docker desktop and check the images there ,and you will see the same output.
- You can visit for ps command: https://docs.docker.com/engine/reference/commandline/ps/
Run a container
- Now if you want to run postgresql, first you should visit postgresql documentation: https://hub.docker.com/_/postgres check for
How to use this image - You will see this:
$ docker run --name some-postgres -e POSTGRES_PASSWORD=mysecretpassword -d postgres- Now open your terminal you need to modify this command:
docker run -e POSTGRES_PASSWORD=mysecretpassword postgreshere e is for environment variable, and POSTGRES_PASSWORD is the environment variable name, and mysecretpassword is the value of the environment variable.
now you can
here e is for environment variable, and POSTGRES_PASSWORD is the environment variable name, and mysecretpassword is the value of the environment variable.
now you can see the output like this:
PostgreSQL init process complete; ready for start up.2023-04-13 13:00:11.415 UTC [1] LOG: starting PostgreSQL 15.2 (Debian 15.2-1.pgdg110+1) on x86_64-pc-linux-gnu, compiled by gcc (Debian 10.2.1-6) 10.2.1 20210110, 64-bit2023-04-13 13:00:11.431 UTC [1] LOG: listening on IPv4 address "0.0.0.0", port 54322023-04-13 13:00:11.432 UTC [1] LOG: listening on IPv6 address "::", port 54322023-04-13 13:00:11.443 UTC [1] LOG: listening on Unix socket "/var/run/postgresql/.s.PGSQL.5432"2023-04-13 13:00:11.455 UTC [62] LOG: database system was shut down at 2023-04-13 13:00:11 UTC2023-04-13 13:00:11.465 UTC [1] LOG: database system is ready to accept connections
- If you want to shut down you can simply type
wsl --shutdownin your terminal.- If you dont interact with the container, it will eventually exit. However, you can keep the container running by interacting with it or by running it in detached mode using the -d flag when starting the container. For example,
docker run -d -e POSTGRES_PASSWORD=mysecretpassword postgreswill start the container in detached mode.
- Now hit
docker run -e POSTGRES_PASSWORD=mysecretpassword -d postgres> One Id will be generated - Now if you want to check your containers on the software, you can see
the another containeris running with another name.
check the containers
- Now if you want to check your containers on the terminal, you can type this command:
docker psyou will see the output like this:
CONTAINER ID IMAGE COMMAND CREATED STATUS PORTS NAMES8fee7f681552 postgres "docker-entrypoint.s" 2 minutes ago Up 2 minutes 5432/tcp beautiful_curieStop and start a container
- Now if you want to stop the container, you can type this command:
docker stop my_container
- in my case, my_container is beautiful_curie
- you can also mention your container id instead of the name.
- or you can go to the docker desktop and click on the stop button.
- Now again if you want to run the container, you can type this command:
docker start my_container
- in my case, my_container is beautiful_curie
- you can do the same thing with the docker desktop.
Pull according to the version
I want to spin up two machines one with postgres latest one with postgres 13.8 rest of the stuff will be same
- First hit this command:
docker run --name postgres-lates -e POSTGRES_PASSWORD=mysecretpassword -d postgresHere postgres-lates is the name of the container
- Now hit this command:
docker run --name postgres-old -e POSTGRES_PASSWORD=mysecretpassword -d postgres:13.8you will see the output like this:
Unable to find image 'postgres:13.8' locally13.8: Pulling from library/postgrese9995326b091: Pull completea0cb03f17886: Pull completebb26f7e78134: Pull completec8e073b7ae91: Pull complete99b5b1679915: Pull complete55c520fc03c5: Pull completed0ac84d6672c: Pull complete4effb95d5849: Pull complete97fd2548fc1e: Pull complete43e7f13e3769: Pull complete2898936d5b2e: Pull completeb4b731b0864d: Pull completefbd79522dd4c: Pull completeDigest: sha256:2b31dc28ab2a687bb191e66e69c2534c9c74107ddb3192ff22a04de386425905Status: Downloaded newer image for postgres:13.8309ecc4e9fd6173f9c6173a2b3a07f8cb656e1cefed0b2b92418bbcc10df7379First it will check whether the image is present in your local machine or not, if not it will download the image from the docker hub.
- Now if you check in your docker desktop, you will see two containers are running.

- Now you might notice the port number is not showing in the docker desktop so you can check the port number by typing this command:
docker port postgres-latesor,
docker ps
Here you will notice the port number same for both the containers like 5432/tcp this means the port number is 5432. Port number is where the postgres is running if the same port number is running in your local machine then you cant run the postgres in your local machine.
- For that you should learn about docker container you can check my blog on docker container here
Stop the container
- Here I want to learn about docker container stop so you can check this docker container stop hereSo I will stop the container by typing this command:
docker container stop postgres-lates
- you can also give the container id instead of the name.
- no if you hit the command
docker container lsyou will see the container is stopped.- you can also use docker
container ls -ato see all the containers.

Removing all containers
- Now if you want to remove all containers you can type this command:
- Before removing the container you should check how I find this on internet or stackoverflow check this here
docker container pruneyou will see the output like this:
WARNING! This will remove all stopped containers.Are you sure you want to continue? [y/N] yDeleted Containers:309ecc4e9fd6173f9c6173a2b3a07f8cb656e1cefed0b2b92418bbcc10df7379e5dbcda75300b6cebb4c40aad10cfdb4245ce5ac526efef42b02da7e78ea6ed98fee7f68155231c08da8a1441be7c196c8fae68f4cb72fb8d35e53669683d44c04d5b89229259396524f85a0fb222c2f24bc9207e4912240277667fac4a067c6Total reclaimed space: 63BThis is dangerous command so be careful while using this command.
Check volumes
- Now if you want to check the volumes you can type this command:
docker volume ls
Let's play with the mongo
- First pull the mongo image from the docker hub
docker pull mongo- Now create a container
docker run --name my-mongo-one -d mongo- Now check the container
docker container ls
Port Mapping
- One version of the mongo is running now I want to run another version of the mongo so I will map the port number.
docker run --name my-mongo-one -p 4000:27017 -d mongothen
docker run --name my-mongo-two -p 4001:27017 -d mongo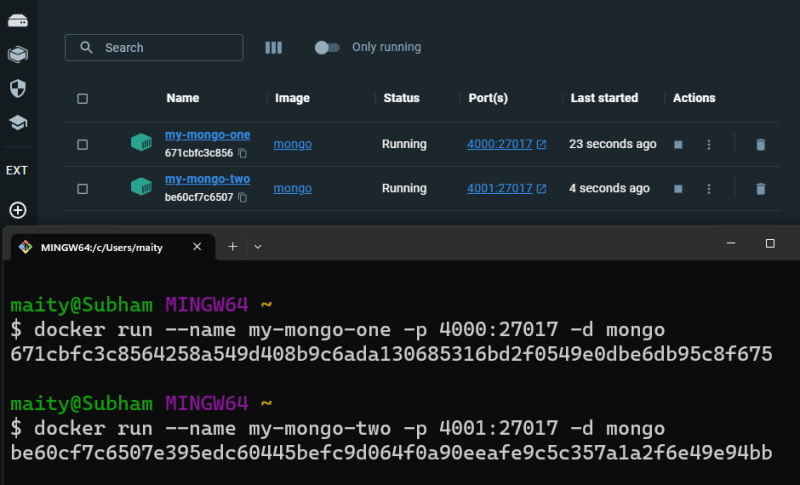
Docker Logs
- Now if you want to see the logs of the container you can type this command:
Logs is basically to see what is happening inside the container and all the details of the container.
docker logs my-mongo-one- You can id instead of the name.
Delete the container
- Let's delete the container
docker container rm my-mongo-oneLet's Connect the mongo express with the mongo ??
Our idea is to create a container of the mongo and another container of the mongo express now we will connect the mongo express with the mongo container because mongo express depends on the mongo container.
- You can assume this Idea for any kind of project.
- Also in this case you have to give a same network name to both the containers.
- First open the documentation of mongo here and mongo express here and check the environment variables and ports and also check docker's documentation on network
Syntax Understanding
- If you want to create mongo with network port environment variables you can type this command:
docker run -p 27017:27017 -e MONGO_INITDB_ROOT_USERNAME=admin -e MONGO_INITDB_ROOT_PASSWORD=password --name mongodb --net mongo-network -d mongodockermeans you are using docker.runmeans you are running the container.-pmeans you are mapping the port number in this case you are mapping the port number 27017 to 27017.-emeans you are giving the environment variables if you open mongo documentation you will see the environment variables.--namemeans you are giving the name to the container.--netmeans you are giving the network name to the container in this case you are giving the network namemongo-network.-dmeans you are running the container in the background d means detached.mongomeans you are pulling the mongo image from the docker hub.### Better SyntaxBut you can write this even better way:
docker run -d \-p 27017:27017 \-e MONGO_INITDB_ROOT_USERNAME=admin \-e MONGO_INITDB_ROOT_PASSWORD=password \--name mongodb \--net mongo-network \mongoif you see any network not found error you can create the network by typing this command:
docker network create mongo-network
Lost network finding
- Assume you have created the network and you have created the container but you have lost the network name so you can find the network name by typing this command:
docker network ls
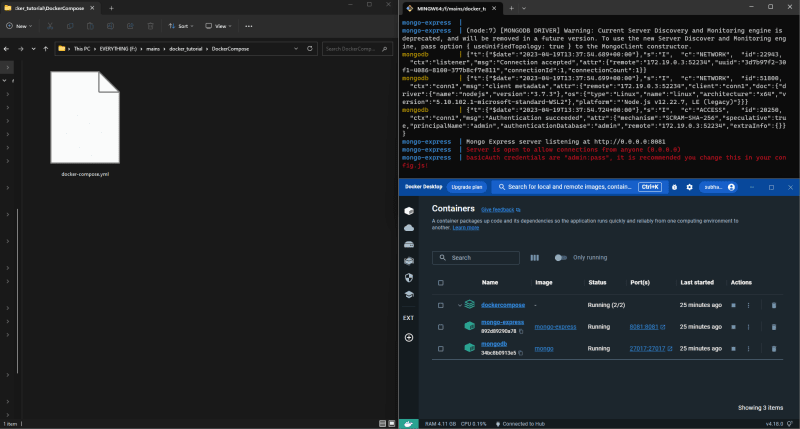
- Now we are going to create the mongo express container:
docker run -d \-p 8081:8081 \-e ME_CONFIG_MONGODB_ADMINUSERNAME=admin \-e ME_CONFIG_MONGODB_ADMINPASSWORD=password \-e ME_CONFIG_MONGODB_SERVER=mongodb \--name mongo-express \--net mongo-network \mongo-express- Now check the container
docker container ls- Now you can run mongo express on the browser by typing this url:
http://localhost:8081
Let's Understand the Docker Compose
Docker Compose is a tool that helps you manage multiple containers as a single application. You define your applications services in a YAML file and then use a single command to start or stop all the services. This makes it easy to share and collaborate on projects with others
- Create a file named
docker-compose.ymland install pluginsindent-rainbowanddocker-compose - Please use
tabinstead ofspacein this file because yml file is similar to python it strictly follows the indentation. - Create two folder
CodesandDockerCompose - Inside the
DockerComposefolder create a file nameddocker-compose.yml> - you can name the file anything but it is a good practice to name itdocker-compose.yml> - You can useindent-rainbowplugin to make the indentation better.
Inside the docker-compose.yml file type this code:
Step 1
Writing on YML file
version: '3'services: mongodb: mongo-express:- Whatever you wrote on the terminal you have to write it here.
Step 2
Your compose file doesn't know which container to run first, so it could run
Expressfirst or it could runmongodbfirst. We also know that Express relies onmongodb, so it could run mongodb first or maybe it could run Express first. But we know thatExpressrelies onmongodb, so the mongodb containers should be up and running first and then Express should come into the picture. Now there is an option where we can write this container first, then second Express, which is dependent on mongodb. Or we can keep this Express container up and say 'hey, you keep on restarting until you find a connection with mongodb.' The majority of the time people will be using something like 'depends on' for that. So for that, we have to write depends on then we have to write the name of the container, which is mongodb."
version: '3'services: mongodb: image: mongo container_name: mongodb ports: - 27017:27017 environment: - MONGO_INITDB_ROOT_USERNAME=admin - MONGO_INITDB_ROOT_PASSWORD=password mongo-express: image: mongo-express restart: always container_name: mongo-express ports: - 8081:8081 environment: - ME_CONFIG_MONGODB_ADMINUSERNAME=admin - ME_CONFIG_MONGODB_ADMINPASSWORD=password - ME_CONFIG_MONGODB_SERVER=mongodb
versionmeans you are using docker-compose version 3.servicesmeans you are creating the services.mongodbmeans you are creating the mongodb service.imagemeans you are pulling the image from the docker hub.container_namemeans you are giving the name to the container.portsmeans you are mapping the port number in this case you are mapping the port number 27017 to 27017.environmentmeans you are giving the environment variables if you open mongo documentation you will see the environment variables.restartmeans you are saying that if the container is stopped then restart it.depends_onmeans you are saying that this container depends on the mongodb container.
ME_CONFIG_MONGODB_SERVERmeans you are giving the name of the mongodb container.ME_CONFIG_MONGODB_ADMINUSERNAMEmeans you are giving the username of the mongodb container.ME_CONFIG_MONGODB_ADMINPASSWORDmeans you are giving the password of the mongodb container.ME_CONFIG_MONGODB_SERVERmeans you are giving the name of the mongodb container.
Running the docker-compose file
- Now in the terminal type this command:
docker-compose -f docker-compose.yml upThis will create the container and run the container. But make sure you are in the same directory where the
docker-compose.ymlfile is located.
docker-composemeans you are using docker-compose.-fmeans you are giving the file name.docker-compose.ymlmeans you are giving the file name.upmeans you are running the container.


Now you can see the response in the terminal.
- Now stop the container from docker desktop.
- And again run the container from the terminal.
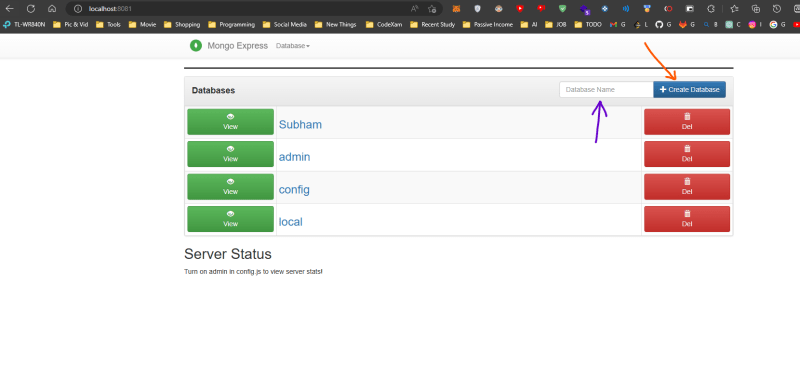
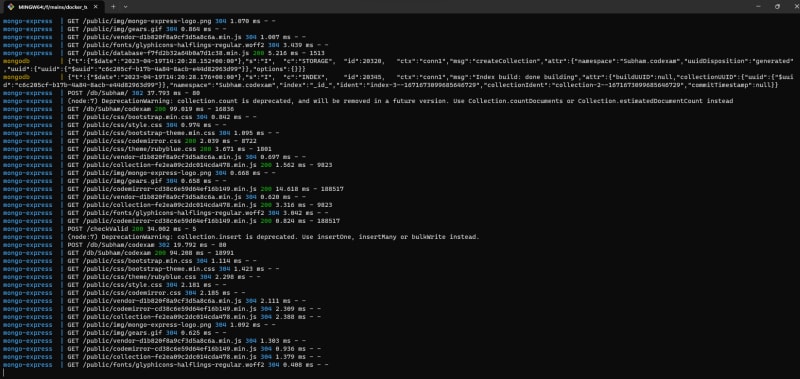
docker-compose -f docker-compose.yml upYou might see Subham database again when you visit the localhost:8081.
Step 3 (Data Persistence)
One of the biggest problems in the Docker world is that data doesnt persist. This means that the container is a removable or detachable item and anything mentioned in the docker-compose file will be removed when you remove the container. This can actually be a good thing when you are making a sensitive application, especially something like a code engine. There is a chance that someone might throw up malicious code that could corrupt your entire system. But with a Docker container, you dont have to worry too much because everything just goes away after that. However, in this case, we want to keep this data and understand what is keeping it. For this, we need to understand Docker volumes. Docker Desktop sometimes, in fact most of the time, creates automatic volumes for you, especially for databases. It assumes that you might want to keep this database there. This is where something interesting comes into the picture.
Why do we need to know about data persistence?
- If you are using a database, you need to know how to persist the data meaning how to keep the data even after you remove the container or even after you restart the container.
- So here comes the concept of volumes.Volumes are one way to achieve data persistence in a containerized environment. They allow you to store data outside of the containers file system so that it can be accessed even if the container is removed or restarted.
Creating a volume in docker-compose file
version: '3'services: mongodb: image: mongo container_name: mongodb ports: - 27017:27017 environment: - MONGO_INITDB_ROOT_USERNAME=admin - MONGO_INITDB_ROOT_PASSWORD=password volumes: - mongodb_data:/data/db mongo-express: image: mongo-express restart: always container_name: mongo-express ports: - 8081:8081 environment: - ME_CONFIG_MONGODB_ADMINUSERNAME=admin - ME_CONFIG_MONGODB_ADMINPASSWORD=password - ME_CONFIG_MONGODB_SERVER=mongodbvolumes: mongodb_data: driver: local- Now again do the same thing as we did in the previous step.
- Stop the container from docker desktop.
- Run the container from the terminal.
- Visit the localhost:8081.
- Create a database.
- Stop the container from docker desktop.
- Run the container from the terminal.
- Visit the localhost:8081.
- Now you can see the database.
 I understand that it is a little bit confusing but don't worry I will explain it in detail.
Let's do some fun stuff so that you can understand it better.
- step 1: Stop the container by pressing
ctrl+cin the terminal. - step 2: Now go to your
docker-compose.ymlfile and rename the volume name frommongodb_datatomongodb_data1like this:
version: '3'services: mongodb: image: mongo container_name: mongodb ports: - 27017:27017 environment: - MONGO_INITDB_ROOT_USERNAME=admin - MONGO_INITDB_ROOT_PASSWORD=password volumes: - mongodb_data1:/data/db mongo-express: image: mongo-express restart: always container_name: mongo-express ports: - 8081:8081 environment: - ME_CONFIG_MONGODB_ADMINUSERNAME=admin - ME_CONFIG_MONGODB_ADMINPASSWORD=password - ME_CONFIG_MONGODB_SERVER=mongodbvolumes: mongodb_data1: driver: local
- step 4: Now create a database name
SubhamSecondand create a collection nameSubhamSecondCollectionand add some data.Start the container again by running the container from the terminal.
docker-compose -f docker-compose.yml upNow if you visit the localhost:8081 you will see the database.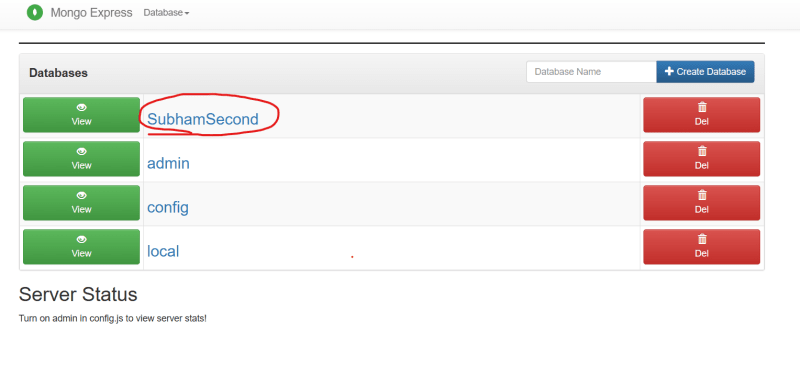
- step 5: Now stop the container from docker desktop or by pressing
ctrl+cin the terminal. - step 6: Now again change the
docker-compose.ymlfile like this and rename the volume name frommongodb_data1tomongodb_datameans previous volume name.
version: '3'services: mongodb: image: mongo container_name: mongodb ports: - 27017:27017 environment: - MONGO_INITDB_ROOT_USERNAME=admin - MONGO_INITDB_ROOT_PASSWORD=password volumes: - mongodb_data:/data/db mongo-express: image: mongo-express restart: always container_name: mongo-express ports: - 8081:8081 environment: - ME_CONFIG_MONGODB_ADMINUSERNAME=admin - ME_CONFIG_MONGODB_ADMINPASSWORD=password - ME_CONFIG_MONGODB_SERVER=mongodbvolumes: mongodb_data: driver: localNow again start the container from the terminal.
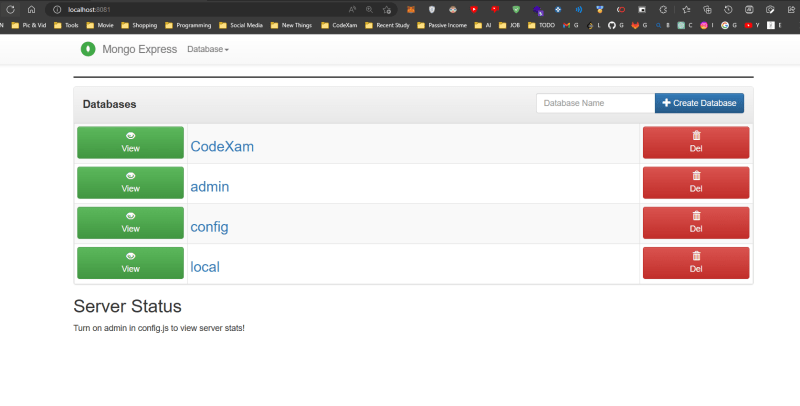
docker-compose -f docker-compose.yml upNow if you visit the localhost:8081 you will see the database CodeXam
So this is called data persistence. Now you can understand why we need to know about data persistence.
You can create as many volumes as you want. If you want to know more about data persistence in docker then you can check out this link.
Stop running all containers
ctrl+cdoesn't actually stop the container. It just stops the container from running in the terminal. So if you want to stop the container from running then you can use the following command.
docker-compose -f docker-compose.yml downAWS also provides you like docker hub. You can store your docker images in AWS ECR (Elastic Container Registry). You can check out this link to know more about AWS ECR.
Our First Project with Docker
Now we are going to create our first project.
- Step 1: Create a folder name
first projectand inside that create a file nameindex.pyandrequirements.txt- Step 2: Now create a file name
Dockerfileand paste the following code in it.### Python Flask App
FROM python:3-alpine3.15WORKDIR /appCOPY . /appRUN pip install -r requirements.txtEXPOSE 5000CMD python ./index.py
FROM python:3-alpine3.15: Specifies the base image to use for the build. In this case, it'spython:3-alpine3.15, which is a lightweight Python 3 image based on Alpine Linux.WORKDIR /app: Sets the working directory for the build to/app. All subsequent commands will be run from this directory.COPY . /app: Copies the contents of the current directory (i.e., the directory containing the Dockerfile) into the/appdirectory in the image.RUN pip install -r requirements.txt: Runs the commandpip install -r requirements.txtto install the dependencies specified inrequirements.txt.EXPOSE 5000: Informs Docker that the container will listen on port 5000 at runtime.CMD python ./index.py: Sets the default command to run when the container starts topython ./index.py.- Step 3: Open the
index.pyfile and paste the following code in it.
from flask import Flaskhelloworld = Flask(__name__)@helloworld.route("/")def run(): return "{ \"message\": \"Hey there I am Subham\" }"if __name__ == "__main__": helloworld.run(host="0.0.0.0", port=int("5000"), debug=True)
- This is a simple flask app. It will return a json object when you visit the localhost:5000.
- Don't worry if you don't understand the code. If you really want to learn flask , then you can think of it as of now assume that it is a simple flask app that returns a json object or hello world type of thing.
- Step 4: Open the
requirements.txtfile and paste the following code in it.
Flask==2.2.3- Step 5: Now open the terminal and go to the
first projectfolder and run the following command.### Build the docker image
docker build -t subham4041/first-flask-app:0.0.1.RELEASE .
docker build -t: This command is used to build the docker image.subham4041/first-flask-app: This is the name of the docker image. heresubham4041is my docker hub username andfirst-flask-appis the name of the docker image.0.0.1.RELEASE: This is the version of the docker image you can change it to whatever you want..: This is the path of the dockerfile. In this case, it is the current directory.You can see the docker image in the docker desktop.

Run the docker image
- Step 6: Now run the following command to check if the docker image is working or not.
docker run -d -p 5000:5000 subham4041/first-flask-app:0.0.1.RELEASEYou will see the something like this
9ff963bcb47695be360e0974224604dcd46782b8606.........
you can check usingdocker pscommand.
- Step 7: Now visit the
localhost:5000and you will see the following output.
{ "message": "Hey there I am Subham"}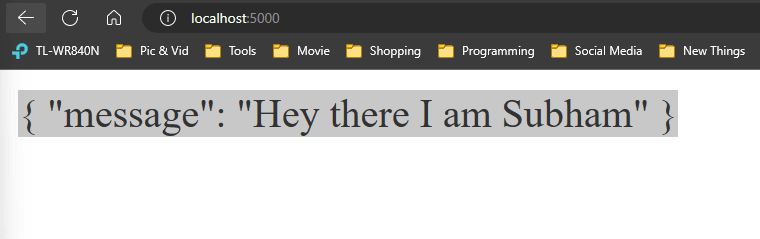
Stop the docker container
- Step 8: Now stop the docker container using the following command.
docker container stop 684dfe64fad50af65280f603f5...........or
docker container stop 9ff
- No need to write the full container id. You can write the first 3-4 characters of the container id.
docker container stop: This command is used to stop the docker container and you can see the container id in the terminal.
Mapping the port
- Step 9: While it is not possible to change the main port of a Docker container, you can map a port on your local machine to the containers port.
docker run -d -p 8000:5000 subham4041/first-flask-app:0.0.1.RELEASE
docker run -d -p 8000:5000: This command is used to map the port 8000 of the local machine to the port 5000 of the docker container.subham4041/first-flask-app:0.0.1.RELEASE: This is the name of the docker image.- Now visit the
localhost:8000and you will see the following output.
{ "message": "Hey there I am Subham"}- Step 10: Now stop the docker container using the following command.
docker container stop 684
- No need to write the full container id. You can write the first 3-4 characters of the container id.
- Step 11: Let's push the docker image to the docker hub.
Push the docker image to the docker hub
docker push subham4041/first-flask-app:0.0.1.RELEASE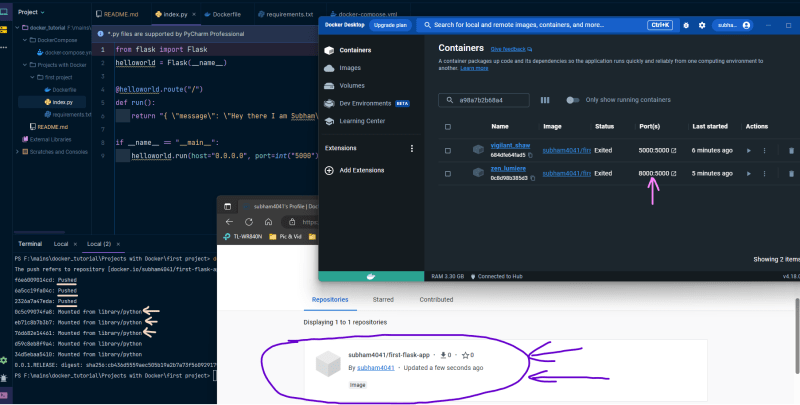
Our Second Project with Docker
Our second project is a simple nodejs app that returns a json object.
Nodejs Setup
Install nodejs in your system you can download it from here.
If you don't have any idea about nodejs don't worry this is a simple demo app so there is no need to understand the code in detail. We will completely focus on how docker works. If you know nodejs then you can easily understand the code also.
- Step 1: Create a new folder and name it
second project. - Step 2: Open the terminal and go to the
second projectfolder and run the following command.
npm init -yBasically, this command will create a
package.jsonfile where all the dependencies will be stored.
- Step 3: Now just replace the
scriptinside thepackage.jsonfile with the following code.
"scripts": { "start": "node index.js" },
Let me explain what does it mean.
scripts: This is the key in thepackage.jsonfile.start: This is the name of the script.node index.js: This is the command that will run when we run thenpm startcommand.- So basically, when we run the
npm startcommand it will run thenode index.jscommand.- node is a javascript runtime environment. It is used to run javascript code outside the browser.
index.js: This is the name of the file where we will write our code and using the node environment we will run the code.
- Step 4: Now just install the express module using the following command.
npm install express
npm install express: This command is used to install the express module.npmis a package manager for the javascript runtime environment node.express: This is a nodejs framework. It is used to create a web application.- You can see the
node_modulesfolder in thesecond projectfolder.
- Step 5: Now create a new file and name it
index.jsand paste the following code in it.
const express = require('express');const app = express();const port = 5000;app.get('/', (req, res) => { res.json({ message: 'Hello World!' });});app.listen(port, () => { console.log(`Example app listening at http://localhost:${port}`);});No need to worry about the code. This is similar to the flask app we created in the first project. We are just returning a json object.
const express = require('express');: This is used to import the express module.const app = express();: This is used to create an express app.const port = 5000;: This is the port number of the app.app.get('/', (req, res) => {: This is the route of the app. Whenever we visit thelocalhost:5000it will return the json object.
terminal.
- Step 6: Now run the following command to start the app.
npm starthit this in the terminal and you will see the following output.
Example app listening at http://localhost:5000Now visit the localhost:5000 and you will see the following output.
{ "message": "Hello World!"}
Login to the docker hub
First, you need to login to the docker hub using the following command.
docker loginYou will see the following output.
Logging in with your password grants your terminal complete access to your account.- Step 7: Now stop the app using the
ctrl+ccommand then delete thenode_modulesfolder and create a new file and name itDockerfileand paste the following code in it.
FROM node:14.17.0-alpine3.13WORKDIR /appCOPY . /appRUN npm installEXPOSE 5000CMD node index.js- Step 8: Now run the following command to build the docker image.
docker build -t subham4041/second-node-app:0.0.1.RELEASE .
docker build -t subham4041/second-node-app:0.0.1.RELEASE .: This command is used to build the docker image.docker build: This is the command to build the docker image.-t subham4041/second-node-app:0.0.1.RELEASE: This is the name of the docker image.
subham4041: This is the docker hub username. You will get this when you log in to the docker hub.second-node-app: This is the name of the docker image.0.0.1.RELEASE: This is the version of the docker image..: This is the path of the dockerfile. In our case, it is the current directory.
now you will see something like this.
- Step 9: Now check how many docker images running in your system using the following command.
docker lsYou will see the following output.
CONTAINER ID IMAGE COMMAND CREATED STATUS PORTS NAMES
CONTAINER ID: This is the id of the container.IMAGE: This is the name of the docker image.COMMAND: This is the command that is running inside the container.CREATED: This is the time when the container was created.STATUS: This is the status of the container.PORTS: This is the port number of the container.NAMES: This is the name of the container.- You can see that there is no docker image running in your system.
- Step 10: Now run the following command to run the docker image.
docker run -d -p 5001:5000 subham4041/second-node-app:0.0.1.RELEASE
docker run -d -p 5001:5000 subham4041/second-node-app:0.0.1.RELEASE: This command is used to run the docker image.docker run: This is the command to run the docker image.-d: This is used to run the docker image in the background.-p 5001:5000: This is used to map the port number of the docker image to the port number of the host machine.subham4041/second-node-app:0.0.1.RELEASE: This is the name of the docker image.- You can see that the docker image is running in the background.
- Step 11: Now check how many docker images running in your system using the following command.
docker psYou will see the following output.
CONTAINER ID IMAGE COMMAND CREATED STATUS PORTS NAMESb3b0b5b5b9b0 subham4041/second-node-app:0.0.1.RELEASE "docker-entrypoint.s" 10 seconds ago Up 9 seconds- Step 12: Now visit the
localhost:5001and you will see the following output.
{ "message": "Hello World!"}- Step 13: Now run the following command to push the docker image to the docker hub.
docker push subham4041/second-node-app:0.0.1.RELEASE
- Step 14: Now let's delete the docker image from the local system using the following command.
You can do this using the docker desktop app also.
Check the container id
First, you need to check the image id using the following command.
docker psStop the container
Now run the following command to stop the container.
docker stop <container_id>In my case, the container id is
b3b0b5b5b9b0so I will run the following commanddocker stop b3b0b5b5b9b0.
Kill the container
Now run the following command to kill the container.
docker kill <container_id>This will send a signal to the container to gracefully stop. If you want to forcefully stop the container immediately, you can use the docker kill command instead:
docker stop <container_id>
Remove the container
You can remove the container using the docker rm command followed by the container ID. For example, to remove the container with ID b9061e6d08b6, you can use the following command:
docker rm b9061e6d08b6Remove the image
After removing the container, you can then delete the image using the docker rmi command:
docker rmi <image_id>In my case, the image id is
a0dacd3ecd79e1252ca8e8a655902af1b6ae98ee609cdee91056c67a6ca00a5cso I will run the following commanddocker rmi a0dacd3ecd79e1252ca8e8a655902af1b6ae98ee609cdee91056c67a6ca00a5c.
This will delete the image from your system.
- Step 15: Now run the following command to pull the docker image from the docker hub.### Pull the docker image
docker pull subham4041/second-node-app:0.0.1.RELEASE- Step 16: Now run the following command to run the docker image.
docker run -d -p 5001:5000 subham4041/second-node-app:0.0.1.RELEASENow visit the localhost:5001 and you will see the following output.
{ "message": "Hello World!"}What did we understand from these two projects?
If someone pulls the docker image from the docker hub, then they don't need to install the nodejs and npm in their system. They just need to install the docker in their system and then they can run the docker image and they can easily access the application without installing the nodejs and npm in their system. This is the magic of docker.
Docker CLI Cheat Sheet
1. Installation
| Command | Meaning | Syntax |
|---|---|---|
| For Windows | This command helps you to install Docker on Windows. | https://download.docker.com/win/stable/InstallDocker.msi |
| For Linux | This command helps you to install Docker on Linux. | `curl -sSL https://get.docker.com/ |
| For Mac | This command helps you to install Docker on Mac OS. | {% raw %}https://download.docker.com/mac/stable/Docker.dmg |
2. Docker Registry and Repository
| Command | Meaning | Syntax |
|---|---|---|
| Login to a Registry | This command helps you log in to your Registry. | docker login [options] [server] |
| Logout from a registry | This command helps you log out from your Registry. | docker logout [server] |
| Searching an image | By using this docker command you can search any image from your docker. | docker search [options] term |
| Pulling an image | This command can be used to download a specific image or set of images. | docker pull [options] name[:tag] |
| Pushing an image | This command can be used to push a specific image or set of images. | docker push [options] name[:tag] |
3. Running Containers
| Command | Meaning | Syntax |
|---|---|---|
| Running a container from an image | This command creates and starts a container from an image. You can specify various options such as ports, volumes, environment variables, etc. | docker run [options] image[:tag] [command] [args] |
| Listing running containers | This command shows all the containers that are currently running. You can use filters and format options to customize the output. | docker ps [options] |
| Listing all containers (running and stopped) | This command shows all the containers that exist on your system, regardless of their status. You can use filters and format options to customize the output. | docker ps -a [options] |
| Stopping a container | This command stops a running container by sending a SIGTERM signal and then a SIGKILL signal if the container does not stop within a grace period. You can specify multiple containers to stop at once. | docker stop [options] container [container...] |
| Starting a stopped container | This command starts a stopped container by restoring its state. You can specify multiple containers to start at once. | docker start [options] container [container...] |
| Restarting a container | This command restarts a running or stopped container by stopping and then starting it again. You can specify multiple containers to restart at once. | docker restart [options] container [container...] |
| Removing a container | This command removes one or more containers from your system. You can use filters and force options to remove containers that are running or have volumes attached to them. | docker rm [options] container [container...] |
4. Managing Images
| Command | Meaning | Syntax |
|---|---|---|
| Building an image from a Dockerfile | This command builds an image from a Dockerfile and optionally tags it with a name and tag. You can specify various options such as build arguments, cache settings, etc. | docker build [options] path |
| Removing an image from your system | This command removes one or more images from your system. You can use filters and force options to remove images that are in use or have dependent images. | docker rmi [options] image [image...] |
| Tagging an image with a name and tag | This command assigns a name and tag to an image. You can use this to create aliases for images or to prepare them for pushing to a registry. | docker tag [options] image[:tag] name[:tag] |
| Saving an image to a tar archive | This command saves one or more images to a tar archive file. You can use this to backup or transfer images between systems. | docker save [options] image [image...] -o file |
| Loading an image from a tar archive | This command loads one or more images from a tar archive file. You can use this to restore or import images from a backup or another system. | docker load [options] -i file |
5. Managing Volumes
| Command | Meaning | Syntax |
|---|---|---|
| Creating a volume | This command creates a volume on your system. You can specify various options such as name, driver, labels, etc. | docker volume create [options] [name] |
| Listing volumes on your system | This command shows all the volumes that are stored on your system. You can use filters and format options to customize the output. | docker volume ls [options] |
| Inspecting a volume | This command shows detailed information about a specific volume. You can use this to check the status, driver, mount point, etc. of a volume. | docker volume inspect [options] volume [volume...] |
| Removing a volume from your system | This command removes one or more volumes from your system. You can use filters and force options to remove volumes that are in use or have dependent containers. | docker volume rm [options] volume [volume...] |
| Pruning unused volumes from your system | This command removes all the volumes that are not referenced by any containers from your system. You can use filters to exclude some volumes from pruning. | docker volume prune [options] |
6. Managing Networks
| Command | Meaning | Syntax |
|---|---|---|
| Creating a network | This command creates a network on your system. You can specify various options such as name, driver, subnet, etc. | docker network create [options] [name] |
| Listing networks on your system | This command shows all the networks that are available on your system. You can use filters and format options to customize the output. | docker network ls [options] |
| Inspecting a network | This command shows detailed information about a specific network. You can use this to check the status, driver, IP range, connected containers, etc. of a network. | docker network inspect [options] network [network...] |
| Removing a network from your system | This command removes one or more networks from your system. You can use filters and force options to remove networks that are in use or have dependent containers. | docker network rm [options] network [network...] |
| Pruning unused networks from your system | This command removes all the networks that are not used by any containers from your system. You can use filters to exclude some networks from pruning. | docker network prune [options] |
7. Miscellaneous Commands (continued)
| Command | Meaning | Syntax |
|---|---|---|
| Getting help on docker commands and options | This command shows the usage and options for any docker command or subcommand. You can use this to learn more about how to use docker. | docker [command] --help |
| Getting the version of docker | This command shows the version and build information of docker on your system. You can use this to check if you have the latest version or if you need to update. | docker version [options] |
| Getting system-wide information on docker | This command shows system-wide information about docker on your system. You can use this to check the status, resources, configuration, etc. of docker. | docker info [options] |
| Executing a command in a running container | This command executes a command in a running container and returns the output. You can use this to run commands that are not available in the container's shell or to interact with the container's processes. | docker exec [options] container command [args] |
| Attaching to a running container | This command attaches your terminal to a running container's standard input, output, and error streams. You can use this to interact with the container's shell or processes. | docker attach [options] container |
| Copying files or folders between a container and your system | This command copies files or folders between a container and your system. You can use this to transfer data to or from a container. | docker cp [options] source destination |
| Viewing logs from a container | This command shows the logs from a container's standard output and error streams. You can use this to monitor or troubleshoot a container's activity. | docker logs [options] container |
| Committing changes to an image | This command creates a new image from a container's changes. You can use this to save your modifications or to create new images based on existing ones. | docker commit [options] container [repository[:tag]] |
| Building an image from stdin or a URL | This command builds an image from a Dockerfile that is provided through stdin or a URL. You can use this to build images from remote sources or scripts. | docker build [options] - < Dockerfile or docker build [options] url |
| Showing the history of an image | This command shows the history of an image, including the layers and commands that were used to create it. You can use this to inspect how an image was built or to optimize it. | docker history [options] image |
Conclusion
Congratulations! You have completed this tutorial on Docker and learned how to use it for various purposes. You have also created some amazing projects using Docker that showcase your skills and creativity. You should be proud of yourself!
Now you can experiment with whatever you want with Docker and explore its endless possibilities. You can also improve this tutorial with a pull request or add more content if you have any suggestions or ideas. Your feedback is always welcome and appreciated.
Thank you for reading this tutorial and following along. I hope you enjoyed it and learned something new. Happy Docking!
Original Link: https://dev.to/codexam/docker-tutorial-5f7b
Dev To
More About this Source Visit Dev To