
Some of Our Sources
- Engadget
- Simplebits
- Smashing Apps
- TutsPlus - Design
- Creative Curio
- Fuel Your Creativity
- My Ink Blog
- Reencoded
- 24 Ways
- Hashedout
Help Webnuz
Referal links:
Extending Medusa Example: Build an Open Source Marketplace
Medusa is the set of building blocks that developers can use to create their custom use case. Instead of forcing developers to use a standardized solution, leading them to enforce hacky-workarounds, Medusa embraces customization and extendability.
This tutorial gives an example of that by giving an overview look of how you can create a marketplace with Medusa. While the steps in this tutorial may not lead to a fully-fledged marketplace, they will give you an idea of how it can be implemented by building the foundation. Youll also find other resources at the end of the tutorial that can guide you through the rest of your marketplace development.
Last year, we wrote a blog about how to create a marketplace with Medusa and Medusa Extender. At the time, Medusa did not provide the necessary functionalities to extend its core, which required developers to use Medusa Extender. With the release of v1.8 of Medusa, the marketplace can now be built with Medusa only. This tutorial illustrates how to do that.
The code of this tutorial is available in this GitHub Repository.
What Youll be Building
By following along the steps in this tutorial, youll be implementing the following logic:
- Every time a user is created, a new store associated with that user is created.
- When the user retrieves the stores details, their stores details will be retrieved.
- Every time a product is created, it is associated with the store of the logged-in user.
- The user will only be able to retrieve products from their store.
Prerequisites
This article assumes you already have a Medusa backend with v1.8 of Medusa installed. If not, you can learn how to install it here.
Extend the Store Entity
In this section, youll extend the Store entity so that you can later add new relations to it. Extending an entity requires extending its repository as well.
You can learn more about extending an entity in our documentation.
Create the file src/models/store.ts with the following content:
import { Entity } from "typeorm"import { Store as MedusaStore,} from "@medusajs/medusa"@Entity()export class Store extends MedusaStore { // TODO add relations}This imports the Store entity from the Medusa core package as MedusaStore and creates a new Store entity that extends it.
Extend the StoreRepository
Next, create the file src/repositories/store.ts with the following content:
import { Store } from "../models/store"import { dataSource,} from "@medusajs/medusa/dist/loaders/database"import { StoreRepository as MedusaStoreRepository,} from "@medusajs/medusa/dist/repositories/store"export const StoreRepository = dataSource .getRepository(Store) .extend({ ...Object.assign( MedusaStoreRepository, { target: Store } ), })export default StoreRepositoryThis imports the StoreRepository from the Medusa core package as MedusaStoreRepository, then extends the repository to target the new Store entity you created.
Create index.d.ts
Finally, to ensure TypeScript is aware of the new type youre creating, create the file src/index.d.ts with the following content:
export declare module "@medusajs/medusa/dist/models/store" { declare interface Store { // TODO add relations }}Youll later add relations to the Store interface as you add them to the Store entity. Youll also be using the same file when extending other entities.
Extend the User Entity
Next, youll extend the user entity to add a new column and relation to the Store entity. The steps are the same as the ones described in the previous section.
Start by creating the src/models/user.ts file with the following content:
import { Column, Entity, Index, JoinColumn, ManyToOne } from "typeorm"import { User as MedusaUser,} from "@medusajs/medusa"import { Store } from "./store";@Entity()export class User extends MedusaUser { @Index("UserStoreId") @Column({ nullable: true }) store_id?: string; @ManyToOne(() => Store, (store) => store.members) @JoinColumn({ name: 'store_id', referencedColumnName: 'id' }) store?: Store;}This imports the User entity from the Medusa core package as MedusaUser and creates a new entity User that extends it. In the entity, you add a new column store_id and a relation store to the Store entity.
Then, in the Store entity created in src/models/store.ts, add the following relation to the entity:
import { Entity, OneToMany } from "typeorm"import { User } from "./user";// other imports...@Entity()export class Store extends MedusaStore { @OneToMany(() => User, (user) => user?.store) members?: User[];}You might see some TypeScript errors in your editor now. This can be resolved by replacing the content of the src/index.d.ts with the following content:
export declare module "@medusajs/medusa/dist/models/store" { declare interface Store { members?: User[]; }}export declare module "@medusajs/medusa/dist/models/user" { declare interface User { store_id?: string; store?: Store; }}This informs TypeScript that the User entity now has store_id and store properties, and the Store entity has a members property. You can learn more here.
Extend the UserRepository
Next, create the file src/repositories/user.ts with the following content:
import { User } from "../models/user"import { dataSource,} from "@medusajs/medusa/dist/loaders/database"import { UserRepository as MedusaUserRepository,} from "@medusajs/medusa/dist/repositories/user"export const UserRepository = dataSource .getRepository(User) .extend({ ...Object.assign( MedusaUserRepository, { target: User } ), })export default UserRepositoryThis imports the UserRepository from the Medusa core package as MedusaUserRepository and creates a new UserRepository that extends it but targets the new User entity.
Create Migration for the User Entity
Since youre adding a new column store_id to the User entity, you must add a new migration that reflects that column in your database.
You can learn more about migrations in our documentation.
First, run the following command in the root directory of your backend:
npx typeorm migration:create src/migrations/add-user-store-idThis will create a new file under src/migrations. The files name should be of the format <TIMESTAMP>_UserChanged.ts.
In the file, theres a migration class with two methods: up and down. Replace the methods with the following content:
public async up(queryRunner: QueryRunner): Promise<void> { await queryRunner.query(`ALTER TABLE "user" ADD "store_id" character varying`); await queryRunner.query(`CREATE INDEX "UserStoreId" ON "user" ("store_id") `);}public async down(queryRunner: QueryRunner): Promise<void> { await queryRunner.query(`DROP INDEX "public"."UserStoreId"`); await queryRunner.query(`ALTER TABLE "user" DROP COLUMN "store_id"`);}Before you run the migrations, run the build command which transpiles the files under the src directory into the dist directory:
npm run buildThen, run the migration command:
medusa migrations runThis will add the new store_id column to the user table.
Create Middleware to Register Logged-In User
To get access to the logged-in user across your services, you need to register it through a middleware. This middleware will run on all endpoints under the /admin path, except for the /admin/auth endpoints.
You can learn more about middlewares in our documentation.
Start by creating the file src/api/middlewares/logged-in-user.ts with the following content:
import { UserService } from "@medusajs/medusa"import { User } from "../../models/user"export async function registerLoggedInUser(req, res, next) { let loggedInUser: User | null = null if (req.user && req.user.userId) { const userService = req.scope.resolve("userService") as UserService loggedInUser = await userService.retrieve(req.user.userId) } req.scope.register({ loggedInUser: { resolve: () => loggedInUser, }, }) next()}This retrieves the logged-in user from req.user.userId and, if available, registers it in Medusas dependency container under loggedInUser.
You can learn more about the dependency container and injection in our documentation.
Next, create the file src/api/index.ts with the following content:
import { Router } from "express"import configLoader from "@medusajs/medusa/dist/loaders/config"import { registerLoggedInUser,} from "./middlewares/logged-in-user"import authenticate from "@medusajs/medusa/dist/api/middlewares/authenticate"import * as cors from "cors"export default function (rootDirectory: string) { const router = Router() const config = configLoader(rootDirectory) const adminCors = { origin: config.projectConfig.admin_cors.split(","), credentials: true, } router.use( /\/admin\/[^(auth)].*/, cors(adminCors), authenticate(), registerLoggedInUser ) return router}This registers the middleware on all paths starting with /admin except for /admin/auth paths. Notice that you also add the authenticate middleware before the registerLoggedInUser middleware. The authenticate middleware authenticates the user and sets req.user. If not added, the registerLoggedInUser middleware will not be able to access the logged-in user.
Youll see the middlewares work in action when you start customizing services in the upcoming sections.
Extend Store Service
In this section, youll extend the Store service to change the logic behind retrieving a store. In the Medusa core package, its assumed theres one store and so the first store is retrieved. Youll be changing that to retrieve the store of the logged-in user.
You can learn more about extending services in the documentation.
Create the file src/services/store.ts with the following content:
import { Lifetime } from "awilix"import { FindConfig, StoreService as MedusaStoreService, Store, User,} from "@medusajs/medusa"class StoreService extends MedusaStoreService { static LIFE_TIME = Lifetime.SCOPED protected readonly loggedInUser_: User | null constructor(container, options) { // @ts-expect-error prefer-rest-params super(...arguments) try { this.loggedInUser_ = container.loggedInUser } catch (e) { // avoid errors when backend first runs } } async retrieve(config?: FindConfig<Store>): Promise<Store> { if (!this.loggedInUser_) { return super.retrieve(config); } return this.retrieveForLoggedInUser(config); } async retrieveForLoggedInUser (config?: FindConfig<Store>) { const storeRepo = this.manager_.withRepository(this.storeRepository_); const store = await storeRepo.findOne({ ...config, relations: [ ...config.relations, 'members' ], where: { id: this.loggedInUser_.store_id }, }); if (!store) { throw new Error('Unable to find the user store'); } return store }}export default StoreServiceYou import the StoreService from the Medusa core package as MedusaStoreService. You then create a new StoreService class that extends MedusaStoreService.
In the class, you set the LIFE_TIME of the service to Lifetime.SCOPED. This is necessary for the service to access the registered loggedInUser. You can learn more about it in the documentation.
You also add a new class attribute loggedInUser_ and set its value in the constructor. Notice that you wrap the initialization of loggedInUser_ in the constructor with a try-catch block to avoid errors when the loggedInUser is not registered in the Medusa container.
You then override the retrieve method. In that method:
- You check if the
loggedInUser_is set. If not, you call theretrievemethod of the service from the core package. - If the
loggedInUser_is set, you retrieve the store using a new methodretrieveForLoggedInUser. This method retrieves the store using the value ofstore_idof theloggedInUser_and expands themembersrelation.
Before you test out this method, you should create the logic that associate a new user with a new store.
Extend the User Service
In this section, youll implement the logic behind creating a store for every new user. To do this, youll extend the UserService from the Medusa core to override the create method.
Create the file src/services/user.ts with the following content:
import { Lifetime } from "awilix"import { UserService as MedusaUserService } from "@medusajs/medusa"import { User } from "../models/user"import { CreateUserInput as MedusaCreateUserInput } from "@medusajs/medusa/dist/types/user"import StoreRepository from "../repositories/store"type CreateUserInput = { store_id?: string} & MedusaCreateUserInputclass UserService extends MedusaUserService { static LIFE_TIME = Lifetime.SCOPED protected readonly loggedInUser_: User | null protected readonly storeRepository_: typeof StoreRepository; constructor(container, options) { // @ts-expect-error prefer-rest-params super(...arguments) this.storeRepository_ = container.storeRepository try { this.loggedInUser_ = container.loggedInUser } catch (e) { // avoid errors when backend first runs } } async create(user: CreateUserInput, password: string): Promise<User> { if (!user.store_id) { const storeRepo = this.manager_.withRepository(this.storeRepository_) let newStore = storeRepo.create() newStore = await storeRepo.save(newStore) user.store_id = newStore.id } return await super.create(user, password) }}export default UserServiceIn this file you:
- Extend the cores
UserServicewhich is imported asMedusaUserService. - You change the value of the
LIFE_TIMEattribute of the service. This is explained in the Extend Store Service section. - You add a new
loggedInUser_attribute and initialize it in the constructor. - You override the
createmethod. In the method, you first check if theuserdoes not have astore_id. This allows you to specifically set the store of the user in other places if necessary. This can be helpful if youre creating a team of users in one store. If the user doesnt havestore_idset, a new store is created and thestore_idproperty of the user is set to the ID of the new store. The user is saved then using the logic implemented in the core service.
Test Store-User Relation
Time to test everything youve implemented so far. To do that, run the build and the start commands in your Medusa backend:
npm run build && npm startOnce your Medusa backend starts, login with any admin user that you have using the User Login endpoint. If youve seeded your database with demo data, you should have the following login credentials:
{ "email": "[email protected]", "password": "supersecret"}Notice that when you log in, the store_id of the user is set to null.
Then, try to get the stores data using the Get Store Details endpoint. The default store will be returned, which has an empty members array.

Next, try to create a new user using the Create a User endpoint. You should see that the new user has a set store_id.

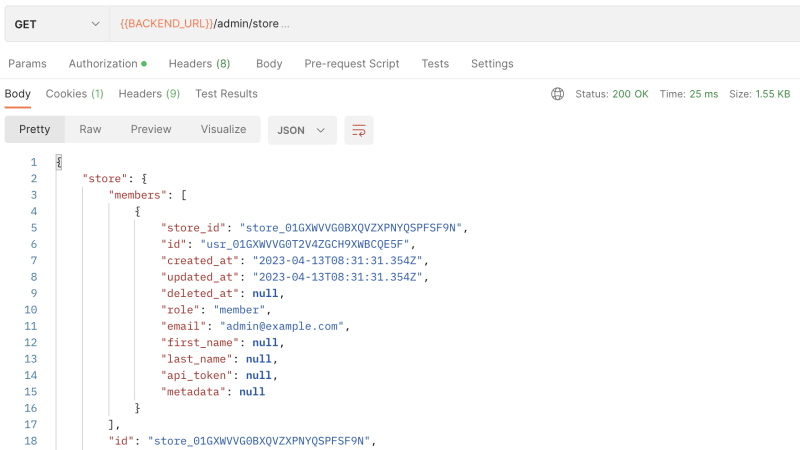
Now, try to login with your new user, then try to retrieve the stores data using the Get Store Details endpoint as mentioned earlier. Youll see now that a different store is retrieved than the first time. This is the store that was created for this new user. It also has the new user as part of its members array.
The user-store relation is now established and ready for use. Next, youll be working on the product-store relation.
Extend the Product Entity
In this section, youll extend the Product entity to add a new column and relation to the Store. The process will be very similar to that of extending the User entity.
Start by creating the file src/models/product.ts with the following content:
import { Column, Entity, Index, JoinColumn, ManyToOne } from "typeorm"import { Product as MedusaProduct,} from "@medusajs/medusa"import { Store } from "./store";@Entity()export class Product extends MedusaProduct { @Index("ProductStoreId") @Column({ nullable: true }) store_id?: string; @ManyToOne(() => Store, (store) => store.products) @JoinColumn({ name: 'store_id', referencedColumnName: 'id' }) store?: Store;}This imports the Product entity from the Medusa core package as MedusaProduct and creates a new entity Product that extends it. In the entity, you add a new column store_id and a relation store to the Store entity.
Then, in the Store entity created in src/models/store.ts, add the following relation to the entity:
import { Product } from "./product";// other imports...@Entity()export class Store extends MedusaStore { // other relation... @OneToMany(() => Product, (product) => product?.store) products?: Product[];}You might see some TypeScript errors in your editor now. This can be resolved by adding the products relation to the Store interface and adding a new declaration for the Product in index.d.ts:
export declare module "@medusajs/medusa/dist/models/store" { declare interface Store { members?: User[]; products?: Product[]; }}// user declaration...export declare module "@medusajs/medusa/dist/models/product" { declare interface Product { store_id?: string; store?: Store; }}Extend the ProductRepository
Next, create the file src/repositories/product.ts with the following content:
import { Product } from "../models/product"import { dataSource,} from "@medusajs/medusa/dist/loaders/database"import { ProductRepository as MedusaProductRepository,} from "@medusajs/medusa/dist/repositories/product"export const ProductRepository = dataSource .getRepository(Product) .extend({ ...Object.assign( MedusaProductRepository, { target: Product } ), })export default ProductRepositoryThis imports the ProductRepository from the Medusa core package as MedusaProductRepository and creates a new ProductRepository that extends it but targets the new Product entity.
Create Migration for the Product Entity
Since youre adding a new column store_id to the Product entity, you must add a new migration that reflects that column in your database.
First, run the following command in the root directory of your backend:
npx typeorm migration:create src/migrations/ProductChangedThis will create a new file under src/migrations. The files name should be of the format <TIMESTAMP>_ProductChanged.ts.
In the file, theres a migration class with two methods: up and down. Replace the methods with the following content:
public async up(queryRunner: QueryRunner): Promise<void> { await queryRunner.query(`ALTER TABLE "product" ADD "store_id" character varying`); await queryRunner.query(`CREATE INDEX "ProductStoreId" ON "product" ("store_id") `);}public async down(queryRunner: QueryRunner): Promise<void> { await queryRunner.query(`DROP INDEX "public"."ProductStoreId"`); await queryRunner.query(`ALTER TABLE "product" DROP COLUMN "store_id"`);}Before you run the migrations, run the build command which transpiles the files under the src directory into the dist directory:
npm run buildThen, run the migration command:
medusa migrations runThis will add the new store_id column to the product table.
Extend the Product Service
In this section, youll extend the product service to do two things:
- Change the
savelogic to attach the product to the logged-in users store. - Change the methods used to retrieve products including the
list,listAndCount, andretrievemethods to retrieve the products only associated with the logged-in users store.
Create the file src/services/product.ts with the following content:
import { Lifetime } from "awilix"import { ProductService as MedusaProductService, Product, User,} from "@medusajs/medusa"import { CreateProductInput as MedusaCreateProductInput, FindProductConfig, ProductSelector as MedusaProductSelector } from "@medusajs/medusa/dist/types/product"type ProductSelector = { store_id?: string} & MedusaProductSelectortype CreateProductInput = { store_id?: string} & MedusaCreateProductInputclass ProductService extends MedusaProductService { static LIFE_TIME = Lifetime.SCOPED protected readonly loggedInUser_: User | null constructor(container, options) { // @ts-expect-error prefer-rest-params super(...arguments) try { this.loggedInUser_ = container.loggedInUser } catch (e) { // avoid errors when backend first runs } } async list(selector: ProductSelector, config?: FindProductConfig): Promise<Product[]> { if (!selector.store_id && this.loggedInUser_?.store_id) { selector.store_id = this.loggedInUser_.store_id } config.select?.push('store_id') config.relations?.push('store') return await super.list(selector, config) } async listAndCount(selector: ProductSelector, config?: FindProductConfig): Promise<[Product[], number]> { if (!selector.store_id && this.loggedInUser_?.store_id) { selector.store_id = this.loggedInUser_.store_id } config.select?.push('store_id') config.relations?.push('store') return await super.listAndCount(selector, config) } async retrieve(productId: string, config?: FindProductConfig): Promise<Product> { config.relations = [ ...(config.relations || []), 'store' ] const product = await super.retrieve(productId, config); if (product.store?.id && this.loggedInUser_?.store_id && product.store.id !== this.loggedInUser_.store_id) { // Throw error if you don't want a product to be accessible to other stores throw new Error('Product does not exist in store.'); } return product } async create(productObject: CreateProductInput): Promise<Product> { if (!productObject.store_id && this.loggedInUser_?.store_id) { productObject.store_id = this.loggedInUser_.store_id } return await super.create(productObject); }}export default ProductServiceIn this file you:
- Extend the cores
ProductServicewhich is imported asMedusaProductService. - You change the value of the
LIFE_TIMEattribute of the service. This is explained in the Extend Store Service section. - You add a new
loggedInUser_attribute and initialize it in the constructor. - You override the
listandlistAndCountmethods to filter the retrieved products by the logged-in users store ID. You also ensure that thestore_idattribute is retrieved as part of the product and that thestorerelation is expanded. - You override the
retrievemethod to check if the retrieved product belongs to the logged-in users store. If not, you throw an error that the product does not exist. - You override the
createmethod to check if the logged-in user has a store and, if so, associate the products store ID with that store.
Notice that you didnt implement the
savemechanism as part of the repository this time. This is because the repository does not have access to the Medusa container. So, you wont be able to access the logged-in user in it.
Test the Product-Store Relation
You can now test the relation between the product and the store.
Start by running the build and start commands in the root of your Medusa backend:
npm run build && npm startThen, log in as a user who has a store as explained in the previous testing section.
After that, retrieve the available products by sending a request to the List Products endpoint. Youll see that there are no products returned, even if you previously had products in your store. This is because these products are not associated with the users store.

Then, try creating a new product using the Create Product endpoint. Youll see that the created product has a store attribute. The id of that store is the same ID of the users store.

If you try retrieving the list of products again, youll find your newly-created product in the returned array.

Note About Super-Admin User
So far in your implementation youve taken into accoun utsers that dont have a set store ID. These are considered super-admin users. These users would be able to view all products in the store and the default stores details.
If this logic does not work for you, make sure to change the implementation to require a store ID for a user in the different locations weve used it.
Whats Next
In this tutorial, you learned how to implement the foundation of a marketplace: having multiple stores, different users within those stores, and associating products with a store.
A marketplace has a variety of other features, each depending on your use case. Some of them are:
- Create order-store relation: This requires a similar implementation as what youve done in this tutorial with products and users. You need to extend the
Orderentity to include a relation to the store. You can learn more about extending entities in the documentation. - List orders by stores: This requires a similar implementation as what youve done in this tutorial with products. You need to extend the
OrderServiceto override the methods used to retrieve orders. You can learn more about extending services in the documentation. - Associate an order to a store: This requires listening to the
order.createdevent in a subscriber. The implementation can include creating child orders of an order if in your use case you support have products from multiple stores in one product. In this case, youd also need to extend the order entity to create a parent-child relation. You can learn more about subscribers in the documentation. - Implement teams within a store: You can implement a team within a store by extending the
Inviteentity to associate it with a store ID, then associate the user created from the invite with that store ID.
These are just some ideas and direction for your development of the marketplace. For further help in your development, make sure to check out the available guides in our documentation.
Original Link: https://dev.to/medusajs/extending-medusa-example-build-an-open-source-marketplace-18km
Dev To
More About this Source Visit Dev To