
An Interest In:
Web News this Week
- April 15, 2024
- April 14, 2024
- April 13, 2024
- April 12, 2024
- April 11, 2024
- April 10, 2024
- April 9, 2024
Some of Our Sources
- BoingBoing
- Technology Review
- Simplebits
- Pearsonified
- The Logo Smith
- Six Revisions
- Creative Curio
- Noupe
- CSS Globe
- Dev To
Help Webnuz
Referal links:
Docker: The Ultimate Guide to Streamline Application Development
In recent years, Docker has become a popular tool for developers looking to streamline their application development process. In this blog post, we will delve into the fundamentals of Docker, including its core components and how it compares to virtual machines. We will also touch on key terms and concepts that will help you understand how Docker can revolutionize your workflow.

Now what is docker?
Docker is a platform designed to simplify the process of building, running, and shipping applications. It achieves this by utilizing containerization technology, which allows developers to create isolated environments called containers for running applications.
Imagine you're moving to a new house, and you have a room with specific furniture, decorations, and settings that you want to recreate in your new place. Transporting everything individually, making sure nothing gets damaged, and setting it all up again in the new house can be a tedious and time-consuming process.
In this scenario, think of Docker as a portable room that you can use to pack all your belongings together. Docker allows you to put the furniture, decorations, and settings inside a container, which can then be sealed and transported to your new house without worrying about compatibility or damage. Upon arrival, you simply "unpack" the container, and your room is set up exactly as it was before.
In the world of software development, Docker works in a similar manner. Applications often depend on specific libraries, configurations, and runtime environments. Setting up these dependencies manually on different systems (e.g., development, testing, and production environments) can be complex and time-consuming, and may lead to inconsistencies or errors.
Docker containers encapsulate everything an application needs to run, including the operating system, libraries, dependencies, and application code. This ensures that the application runs consistently across different environments, regardless of the underlying system. With Docker, developers can build a container once and then deploy it to various stages of the development process (e.g., testing, staging, and production) without worrying about compatibility issues or discrepancies.
In summary, just as a portable room allows you to move your belongings easily and consistently between houses, Docker enables developers to build, run, and ship applications consistently across various environments, simplifying the deployment process and reducing potential errors.

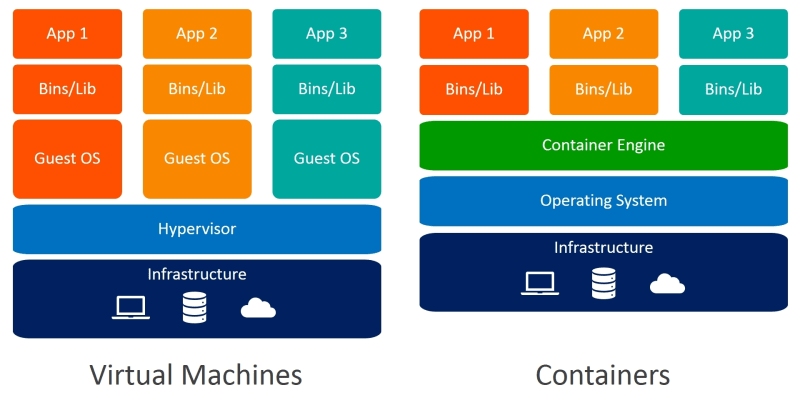
Containers vs. Virtual Machines
While both containers and virtual machines (VMs) enable running applications in isolated environments, they differ significantly in their underlying architecture and resource consumption.
A virtual machine is an abstraction of hardware resources, created and managed by hypervisors such as VirtualBox, VMware, or Hyper-V (Windows-only). VMs emulate a complete system, including the operating system, and can be resource-intensive and slow to start.
On the other hand, containers are lightweight and launch quickly, as they do not include a full-fledged operating system and share the host's operating system, specifically the kernel and only require an operating-system process with its own file system. This results in more efficient resource utilization and faster startup times compared to VMs.
The kernel is the core component of an operating system, responsible for managing both applications and hardware resources.
Docker Architecture
Docker operates using a client-server architecture, consisting of a client component and a server component that communicate through a REST API. The server, also known as the Docker engine, runs in the background, handling the tasks of building and running containers. Docker does have the following components:
Docker Client: The Docker client is the primary interface through which users interact with Docker. It provides a command-line interface (CLI) and allows users to issue commands for building, running, and managing containers. The client communicates with the Docker daemon (or Docker Engine) via a RESTful API to perform various tasks, such as creating containers, pulling images, and managing container lifecycles. In addition to the CLI, Docker also provides a graphical user interface (GUI) called Docker Desktop for Windows and macOS users, which makes it easier to manage containers and images visually.
Docker Daemon (Engine): The Docker daemon, also known as the Docker Engine, is a background process that runs on the host machine and manages the entire lifecycle of containers. The daemon listens for API requests from the Docker client and performs the required tasks, such as building images, creating containers, and managing container lifecycles. It is responsible for performing the actual work in the Docker system, including managing container isolation, networking, and storage.
Docker Images: Docker images are the building blocks of containers. They are read-only templates that contain the operating system, runtime environment, libraries, and application code necessary to run an application. Images can be created from a Dockerfile, which is a script that contains instructions for building the image. Docker images can be stored and shared through Docker registries, such as Docker Hub or private registries, allowing users to easily distribute and deploy applications across different environments.
Docker Containers: Docker containers are lightweight, portable, and isolated runtime environments for running applications. They are created from Docker images and have a writable layer on top of the image, which allows them to store runtime data and maintain their state. Containers run in isolation from each other, sharing only the host's kernel, which makes them highly efficient compared to virtual machines. Containers can be easily managed using Docker commands, such as docker start, docker stop, and docker rm.
Docker Networking:
Docker provides a robust networking model that enables communication between containers and the outside world. It supports multiple network drivers, such as bridge, host, overlay, and Macvlan, which offer different levels of isolation and performance. By default, Docker creates a virtual network called a bridge network, which allows containers to communicate with each other and the host. Users can also create custom networks to isolate containers or connect them to external networks.Docker Volumes and Storage:
Docker provides a flexible storage system for managing data within containers. It supports various storage drivers, such as overlay2, aufs, and btrfs, which determine how data is stored and managed on the host system. Docker also supports volumes, which are a way to persist data generated by containers and share it between containers. Volumes can be managed using Docker commands, such as docker volume create, docker volume ls, and docker volume rm.Docker Registries: Repositories for storing and sharing Docker images. Docker Hub is the most popular registry, providing a platform for storing and distributing images.
Docker Containers vs. Images
A fundamental distinction in Docker terminology is the difference between containers and images. An image is a read-only template that includes the operating system, runtime environment, libraries, and application code necessary to run an application. A container, on the other hand, is a running instance of an image. When a container is created from an image, a writable layer is added on top of the image, allowing the container to store runtime data and maintain its state.
Installing Docker
To install Docker on your machine, follow the official installation guides for your operating system:
Docker Container Lifecycle
The lifecycle of a Docker container typically consists of several stages:
Create: A container is created from a Docker image using the docker create or docker run command. When created, the container has a unique ID assigned by the Docker daemon.
Start: A created container can be started using the docker start command, or it can be created and started in a single command using docker run. Once started, the container runs the entrypoint command specified in the Dockerfile (or a custom command provided in the docker run command).
Pause/Resume: Containers can be paused using the docker pause command, which temporarily suspends all processes inside the container. To resume a paused container, use the docker unpause command.
Stop: A running container can be stopped using the docker stop command. This command sends a SIGTERM signal to the main process inside the container, allowing it to perform a graceful shutdown. After a grace period, if the container has not exited, a SIGKILL signal is sent to forcefully terminate the container.
Restart: A stopped container can be restarted using the docker restart command, which stops and starts the container again.
Remove: A container that is no longer needed can be removed using the docker rm command. This permanently deletes the container and its writable layer, freeing up system resources.

Development Workflow
- Write application code and create a Dockerfile: Start by writing your application code and creating a
Dockerfilethat defines the instructions for building the Docker image.
A Dockerfile is a text file containing a series of instructions used by Docker to build a new image. It automates the process of setting up an environment, installing dependencies, and configuring the application within a container. Docker reads the instructions from the Dockerfile and executes them in order, creating a new image as a result.
Build the Docker image: Use the
docker buildcommand to create a Docker image from the Dockerfile.Run the container: Use the docker run command to start a container from the Docker image.
Test the application: Test the application running inside the container to ensure it functions as expected.
Publish the Docker image: If the application works as expected, publish the Docker image to a registry like Docker Hub.
Deploy the container: Deploy the container to your desired environment using tools like Docker Compose, Kubernetes, or other orchestration platforms.
Dockerizing a Node.js Application
Create a Node.js application: Start by creating a simple Node.js application with an app.js file and a package.json file.
Here's a simple Node.js application that serves a "Hello, World!" message on port 3000.
First, make sure you have Node.js installed on your system. If not, you can download and install it from the official Node.js website.
Create a new directory for your Node.js application, and navigate to it in your terminal or command prompt.
Initialize a new Node.js project by running the following command:
npm init -yThis will create a package.json file with default values.
- Create a new file named app.js in your project directory and add the following code:
const http = require('http');const hostname = '0.0.0.0';const port = 3000;const server = http.createServer((req, res) => {  res.statusCode = 200;  res.setHeader('Content-Type', 'text/plain');  res.end('Hello, World!
');});server.listen(port, hostname, () => {  console.log(`Server running at http://${hostname}:${port}/`);});
This code creates a basic HTTP server that listens on port 3000 and responds with "Hello, World!" to any incoming requests.
- Update the package.json file to include a start script. Add the following line to the scripts section:
"start": "node app.js"Your package.json file should now look like this:
{ "name": "your-project-name", "version": "1.0.0", "description": "", "main": "app.js", "scripts": { "start": "node app.js", "test": "echo \"Error: no test specified\" && exit 1" }, "keywords": [], "author": "", "license": "ISC"}To run the Node.js application locally, execute the following command:npm start
You should see the message "Server running at http://0.0.0.0:3000/" in your terminal. Open your web browser and navigate to http://localhost:3000/ to see the "Hello, World!" message.
Now that you have a simple Node.js application, you can proceed to create a Dockerfile and Dockerize the application.
Create a Dockerfile:
In the same directory as your Node.js application, create a Dockerfile with the following content:
# Set the base imageFROM node:latest# Set the working directoryWORKDIR /app# Copy package.json and package-lock.json to the working directoryCOPY package*.json ./# Install dependenciesRUN npm install# Copy the application code to the working directoryCOPY . .# Expose the application portEXPOSE 3000# Start the applicationCMD ["npm", "start"]This Dockerfile uses the latest official Node.js image as a base, sets the working directory to /app, copies the package.json and package-lock.json files, installs the required dependencies, copies the application code, exposes port 3000, and runs the npm start command.
Here is a brief overview of some common instructions used in a Dockerfile:
FROM: Specifies the base image to be used as a starting point for the new image. Examples include official images like ubuntu, alpine, or node.
FROM node:latestWORKDIR: Sets the working directory within the container. Any subsequent instructions that use relative paths will be executed relative to this directory.
WORKDIR /appCOPY: Copies files or directories from the local machine (the build context) to the container's filesystem.
COPY package.json .ADD: Similar to COPY, but it can also download files from a URL and extract compressed files.
ADD https://example.com/file.tar.gz /appRUN: Executes a command within the container, typically used for installing packages or running build scripts.
RUN npm installCMD: Provides the default command to run when the container is started. If the user specifies a command when running the container, it will override this default command. There can be only one CMD instruction in a Dockerfile.
CMD ["npm", "start"]ENTRYPOINT: Similar to CMD, but it is not overridden when the user specifies a command when running the container. This is useful for defining a default executable for the container.
ENTRYPOINT ["npm"]CMD ["start"]ENV: Sets an environment variable within the container, which can be used by applications running inside the container.
ENV NODE_ENV=productionEXPOSE: Informs Docker that the container listens on the specified network ports at runtime. This does not actually publish the port; it serves as documentation and a reminder to publish the port using the -p flag when running the container.
EXPOSE 80VOLUME: Creates a mount point for a volume to persist data outside of the container. This is useful for sharing data between containers or retaining data when a container is removed.
VOLUME /app/data
- Build the Docker image: Run the following command in the terminal:
docker build -t your-image-name .Replace your-image-name with a descriptive name for your image.
- Run the Docker container: Start the container using the following command:
docker run -p 3000:3000Pushing this Docker Image to Docker Hub
Docker Hub is a public registry service that allows you to store and share Docker images. To push a Docker image to Docker Hub, you need to follow these steps:
Create a Docker Hub account: If you don't already have a Docker Hub account, sign up for one at . You'll need your Docker ID and password for subsequent steps.
Log in to Docker Hub: Open a terminal or command prompt and log in to Docker Hub using your Docker ID and password:
docker loginEnter your Docker ID and password when prompted. You should see a message indicating that you have successfully logged in.
Tag your Docker image: Before pushing the image to Docker Hub, you need to tag it with your Docker Hub username and a repository name. Use the following command to tag your image:
docker tag your-image-name your-docker-id/your-repository-name:your-tagReplace your-image-name with the name of the image you built in step 4, your-docker-id with your Docker Hub username, your-repository-name with a desired repository name, and your-tag with a version or any descriptive tag (e.g., 'latest').
For example:
docker tag myapp-image johnsmith/myapp:latestPush the Docker image to Docker Hub: Finally, push the tagged image to Docker Hub using the following command:
docker push your-docker-id/your-repository-name:your-tagReplace your-docker-id, your-repository-name, and your-tag with the values you used in step 5. Docker will upload your image to your Docker Hub account.
For example:
docker push johndoe/myapp:latestVerify the image on Docker Hub: Log in to your Docker Hub account and navigate to the "Repositories" section. You should see the newly pushed image listed under your repositories.
Now, your Docker image is successfully pushed to Docker Hub and can be easily pulled and run by others using the docker pull command, followed by docker run.
Benefits of Docker Containers
Docker containers offer several advantages over traditional deployment methods and virtual machines:
Consistency: Containers package all application dependencies and configurations, ensuring consistent behavior across various environments, from development to production.
Isolation: Containers run in isolated environments, preventing conflicts and ensuring that each application has access to its required resources.
Portability: Docker images can be easily shared and run on any system with Docker installed, making it easy to deploy applications across different platforms.
Resource Efficiency: Containers share the host operating system's kernel and resources, resulting in less overhead compared to virtual machines. This enables higher density and more efficient resource utilization.
Scalability: Containers can be easily scaled up or down to meet the changing demands of an application, making it easier to build and deploy microservices and distributed applications.
Version Control and Rollback: Docker images can be versioned, allowing for easy rollback to previous versions if needed. This can be particularly useful in case of application updates that introduce bugs or performance issues.
In summary, Docker containers provide an efficient, portable, and consistent environment for application deployment. By leveraging containerization, developers and operations teams can streamline the development, testing, and deployment process, ultimately leading to more reliable and maintainable software.
Original Link: https://dev.to/superiqbal7/docker-the-ultimate-guide-to-streamline-application-development-351e
Dev To
More About this Source Visit Dev To