
An Interest In:
Web News this Week
- April 28, 2024
- April 27, 2024
- April 26, 2024
- April 25, 2024
- April 24, 2024
- April 23, 2024
- April 22, 2024
Some of Our Sources
- TutsPlus - Code
- Just Creative
- Joshua Blankenship
- The Logo Smith
- My Ink Blog
- Line 25
- 24 Ways
- Design Modo
- Android Dissected
- The Verge
Help Webnuz
Referal links:
Self-Service AWS Infrastructure using Spacelift
Intro
In this article of the Self-Service AWS Infrastructure for Your Devs series, we're going to deploy our VPC and the peered Client VPC using Spacelift and several of its features. This will be the easiest of the methods since state is fully managed, all authentication with Github is managed, Authentication to AWS is simple, and the Blueprints feature provides an excellent self-service interface for your devs with very little effort. We'll deploy the entire setup using a few clicks in the GUI followed by writing everything else in Terraform. Let's get started!
Spacelift as Code
First, we're going to create the code needed to deploy all of the assets. Once we've done that, we'll create the initial Spacelift admin stack and deploy everything. This will all be created as a monorepo in Github, but you can structure it however you see fit if you have other organizational requirements.
The Admin Stack Repository Code
This Terraform code will create the infrastructure stack and the custom Blueprint the developers can use to deploy client VPCs. If you don't name your repository aws-self-service and use all of the same directory names, ensure you modify all references within the code.
# ./administrative/providers.tfterraform { required_providers { spacelift = { source = "spacelift-io/spacelift" } }}provider "spacelift" {}# ./administrative/stacks.tf# this data source will retrieve the stack_id of the admin stack # we will create next.data "spacelift_stack" "admin" { stack_id = "admin"}# Check the attributes below for your VCS settings# Learn more about stacks here: # https://docs.spacelift.io/concepts/stack/resource "spacelift_stack" "shared_infra" { autodeploy = false branch = "main" project_root = "shared_infra" description = "Core Infra Stack" name = "shared-infra" space_id = "root" repository = "aws-self-service" terraform_version = "1.2.9" labels = ["managed"]}# You will create the `dev-context` further in the post. # More about contexts here: # https://docs.spacelift.io/concepts/configuration/contextresource "spacelift_context_attachment" "attachment" { context_id = "dev-context" stack_id = "spacelift_stack.shared_infra.id" priority = 0}# ./administrative/blueprints.tf# More about Blueprints here: # https://docs.spacelift.io/concepts/blueprint/locals { bprint = file("${path.root}/blueprints/client_vpc.tftpl")}resource "spacelift_blueprint" "client_vpc" { name = "Client VPC" description = "Stack to create a new child VPC" space = "root" template = local.bprint state = "PUBLISHED" labels = ["client"]}# for troubleshooting purposeoutput "bprint" { value = local.bprint}# ./administrative/blueprints/client_vpc.tftpl# inputs are used to create input fieldsinputs: - id: client_name name: Client name - id: vpc_cidr name: CIDR of the VPC type: select# You could use a data source here to iterate over a list of # available subnets that don't overlap with the main. default: 10.1.0.0/16 options: - 10.2.0.0/16 - 10.3.0.0/16 - 10.4.0.0/16 - id: region name: Choose AWS region type: select# ensure you set these appropriately options: - us-east-1 - us-east-2 - id: trigger_run name: Trigger a run upon stack creation type: boolean default: falsestack: name: ${{ inputs.client_name }}-stack# More info about Spaces here: # https://docs.spacelift.io/concepts/spaces/ space: root description: > Stack created from a blueprint by ${{ context.user.name }} logged in as ${{ context.user.login }} labels: - "blueprints/${{ context.blueprint.name }}"# Uncomment the vcs section below and add your information. vcs: branch: main repository: aws-self-service project_root: client_vpc provider: GITHUB vendor: terraform: manage_state: true# Use your preferred version of Terraform here version: "1.4.0" attachments: contexts: - id: dev-context priority: 1 environment: variables: - name: TF_VAR_client_name value: ${{ inputs.client_name }} - name: TF_VAR_vpc_cidr value: ${{ inputs.vpc_cidr }} - name: TF_VAR_region value: ${{ inputs.region }}options: trigger_run: ${{ inputs.trigger_run }}Once you have created all of the code, commit it to your Git repository that contains the code from the first part of this series. If you do not wish to make modifications to VCS settings in the code, make sure you name your repo aws-self-service and your directories the same as what you see in the code snippets above. This is a relatively intermediate article, so I won't go into depth on how to do this. If you have any questions, feel free to reach out.
Creating the Spacelift Admin Stack
Setting up Spacelift is easy. If you don't have an account yet, you can see the "Getting Started" documentation here to get you up to speed quickly: https://docs.spacelift.io/getting-started.
Once you have your account setup, follow the steps below.
1. In the console, click on Add stack

2. Configure your repository settings

3. Customize any settings you need and click continue

4. Toggle Administrative and save

Create the AWS Credentials Context
There are multiple ways to provide AWS credentials to our stacks. In Spacelift, you can create a "Cloud Integration" that will assume a temporary role and use it to create resources. This is the preferred route, but in the interest of simplicity and focus, I'm going to pass in the credentials manually. With this method, ensure you rotate your keys frequently and disable them when not in use. Spacelift is a very secure product, but it's always better to be cautious.
What we're going to do is use a "Spacelift Context" to store the keys as an environment variables that can be accessed by any stack to which the Context is attached. To create the new Context, head to the Contexts pane on the left, fill out the necessary information, create the variables, add their values, and designate them as "secret" as shown in the image below. Unless you wish to modify the code above, ensure you use "dev-context" as the name:

Let's Deploy!
Once your code is in your repository, the Admin stack is connected to that code, and the Context has been created, it's time to finally deploy! This is going to deploy:
- The
shared-infrastack that will deploy the shared VPC. - A Spacelift Blueprint that will allow you to enter the information needed to create a stack that will deploy another VPC that will automatically peer to the shared-services VPC.
Once the configuration is finished, go ahead and trigger the Admin stack and let's check it out! You should see your Admin stack and your new shared-infra stack:

And your new Blueprint:

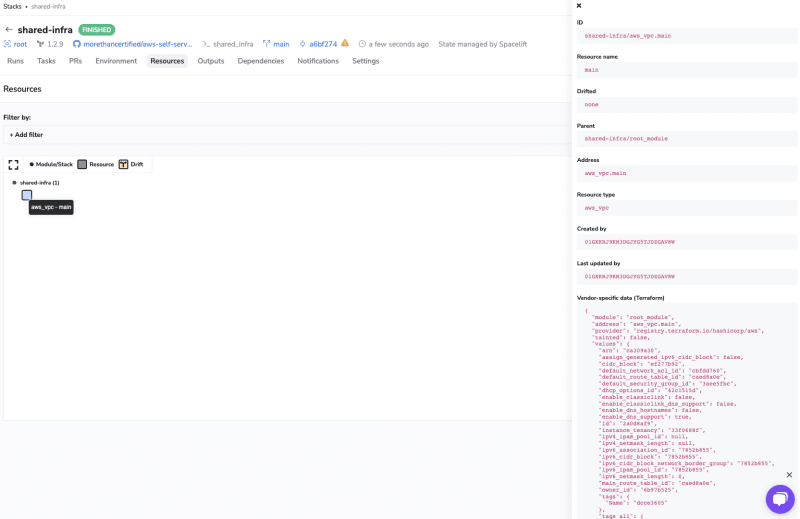
Once those resources have been deployed, it's time to deploy the shared-resources VPC. Trigger the shared_infra stack to do so and verify the resources were created afterwards:
Once that's complete, your self-service deployment is complete! Head over to the Blueprints tab, fill out the necessary information, and create stack:

Once the stack is created, you can trigger it and you'll have your very own self-service VPC!

Original Link: https://dev.to/aws-builders/self-service-aws-infrastructure-using-spacelift-1de7
Dev To
More About this Source Visit Dev To