
An Interest In:
Web News this Week
- April 15, 2024
- April 14, 2024
- April 13, 2024
- April 12, 2024
- April 11, 2024
- April 10, 2024
- April 9, 2024
Some of Our Sources
- Web Designer Wall
- Team Treehouse
- Joshua Blankenship
- Six Revisions
- TutsPlus - Design
- Fudge Graphics
- Reencoded
- CSS Tricks
- Android Dissected
- Android Headlines
Help Webnuz
Referal links:
Kotlin CRUD Rest Api using Spring Boot, Hibernate, Postgres, Docker and Docker Compose
Let's create a CRUD Rest API in Kotlin, using:
- Spring boot
- Gradle
- Hibernate
- Postgres
- Docker
- Docker Compose
If you prefer a video version:
All the code is available in the GitHub repository (link in the video description): https://youtube.com/live/BbT1PCAOS2s
Intro
Here is a schema of the architecture of the application we are going to create:
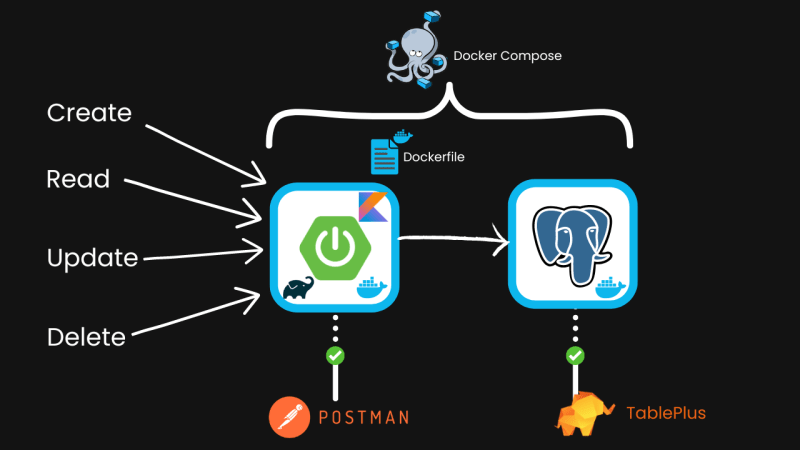
We will create 5 endpoints for basic CRUD operations:
- Create
- Read all
- Read one
- Update
- Delete
Here are the steps we are going through:
- Create a Spring Boot project using Spring Initializr
- Configure the database connection
- Create User.kt, UserRepository.kt and UserService.kt
- Dockerize the application
- Create docker-compose.yml to run the database and the application
- Test the application with Postman and Tableplus
We will go with a step-by-step guide, so you can follow along.
Requirements:
- Kotlin installed
- Docker installed and running
- (Optional): Postman and Tableplus to follow along, but any testing tool will work
Optional: VS Code with the following extensions:
- Java Extension Pack
- Spring Boot Extension Pack
Create a new Kotlin project
There are many ways to create a new Kotlin project, but I will use the Spring Initializr in VS Code.
To do this, you need to have the Java Extension Pack and the Spring Boot Extension Pack installed.
Open VS Code and click on the "Create Java Project" button:

This will open a prompt at the top of the screen. Click on the following in order:
- Spring boot
- Gradle
- 3.0.5 (it might change in the future)
- Kotlin
- com.example (just click enter)
- demo (just click enter)
- Jar
- Java 17
This will open another prompt. Click on the following in order:
- Spring Web (dependency to create a Rest API)
- Spring Data JPA (dependency to use Hibernate)
- PostgreSQL Driver (dependency to connect to Postgres)
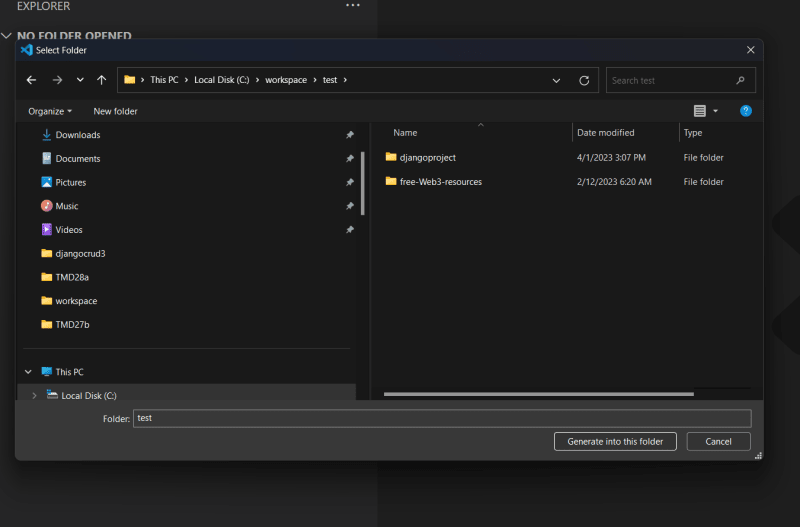
Then you should select the folder where you want to create the project.
select a folder and clock on "Generate into this folder".
Now click the button at the bottom right of the screen to open the project in a new window.

We are done with the creation of the project.
Now we can start coding the application.
Code the application
There are two steps to code the application:
- Configure the database connection
- Create the User entity, the UserRepository and the UserService
Configure the database connection
Open the application.properties file in the src/main/resources folder (it should be empty).
Add the following content:
spring.datasource.url=${DB_URL}spring.datasource.username=${PG_USER}spring.datasource.password=${PG_PASSWORD}spring.jpa.hibernate.ddl-auto=updatespring.jpa.properties.hibernate.dialect=org.hibernate.dialect.PostgreSQLDialectExplanation:
spring.datasource.url: the url of the database.spring.datasource.username: the username of the database.spring.datasource.password: the password of the database.spring.jpa.hibernate.ddl-auto: the way we want to update the database. We will useupdateto create the tables if they don't exist, and update them if they do.spring.jpa.properties.hibernate.dialect: the dialect of the database. We will use PostgreSQL.
We will use the environment variables later (and it will be a bit tricky).
Create the resource structure
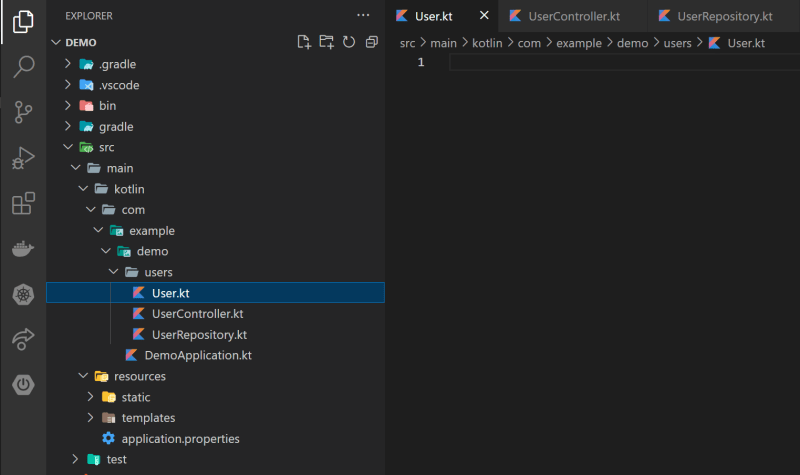
Create a new folder called users in the demo folder (or whatever you named your project).
Create three files in this folder:
User.ktUserRepository.ktUserController.kt
Your folder shold look like this:
Now let's populate the files.
User.kt
The User.kt file will contain the entity of the user.
Open the file and add the following content (change the package name to match your project):
package com.example.demo.usersimport jakarta.persistence.*@Entity@Table(name = "users")data class User( @Id @GeneratedValue(strategy = GenerationType.IDENTITY) val id: Long, val name: String, val email: String)Explanation:
@Entity: decorator to tell Hibernate that this class is an entity.@Table: decorator to tell Hibernate the name of the table in the database ("users in this case").@Id: decorator to tell Hibernate that this field is the primary key.@GeneratedValue: decorator to auto-increment the id whenever we create a new user.
An user will have three fields: id, name and email.
UserRepository.kt
The UserRepository.kt file will contain the interface to interact with the database.
Open the file UserRepository.kt and add the following content (change the package name if you used a different one):
package com.example.demo.usersimport org.springframework.data.repository.CrudRepositoryinterface UserRepository : CrudRepository<User, Long>Explanation:
interface UserRepository: the interface that will contain the methods to interact with the database. It will be of typeCrudRepository. This is a generic interface that contains the basic methods to interact with the database. It will have a typeUserand anInt(the type of the primary key).
UserController.kt
The UserController.kt file will contain the Rest API.
Open the file UserController.kt and add the following content (change the package name if you used a different one):
package com.example.demo.usersimport org.springframework.beans.factory.annotation.Autowiredimport org.springframework.http.HttpStatusimport org.springframework.http.ResponseEntityimport org.springframework.web.bind.annotation.*@RestController@RequestMapping("/api/users")class UserController(@Autowired private val userRepository: UserRepository) { @GetMapping("") fun getAllUsers(): List<User> = userRepository.findAll().toList() @PostMapping("") fun createUser(@RequestBody user: User): ResponseEntity<User> { val createdUser = userRepository.save(user) return ResponseEntity(createdUser, HttpStatus.CREATED) } @GetMapping("/{id}") fun getUserById(@PathVariable("id") userId: Int): ResponseEntity<User> { val user = userRepository.findById(userId).orElse(null) return if (user != null) ResponseEntity(user, HttpStatus.OK) else ResponseEntity(HttpStatus.NOT_FOUND) } @PutMapping("/{id}") fun updateUserById(@PathVariable("id") userId: Int, @RequestBody user: User): ResponseEntity<User> { val existingUser = userRepository.findById(userId).orElse(null) if (existingUser == null) { return ResponseEntity(HttpStatus.NOT_FOUND) } val updatedUser = existingUser.copy(name = user.name, email = user.email) userRepository.save(updatedUser) return ResponseEntity(updatedUser, HttpStatus.OK) } @DeleteMapping("/{id}") fun deleteUserById(@PathVariable("id") userId: Int): ResponseEntity<User> { if (!userRepository.existsById(userId)) { return ResponseEntity(HttpStatus.NOT_FOUND) } userRepository.deleteById(userId) return ResponseEntity(HttpStatus.NO_CONTENT) }}Explanation:
@RestController: decorator for Spring.@RequestMapping: to tell Spring the base url of the Rest API. In this case, it will be/api/users.@Autowired: to tell Spring to inject theUserRepository.
Then we have the five methods to interact with the database:
getAllUsers: to get all the users.createUser: to create a new user.getUserById: to get a user by id.updateUserById: to update a user by id.deleteUserById: to delete a user by id.
Our Rest API is ready to get Dockerized.
Dockerization
Now the fun part: Dockerization.
In this project, I decided to build the Kotlin project directly inside the Docker image.
Another option would be to build the project locally and then copy the jar file to the Docker image.
Dockerfile
Create a new file called Dockerfile in the root of the project.
Add the following content (explanation is in the comments):
# Start with a base image containing Java runtimeFROM amazoncorretto:17-alpine-jdk# Create a directoryWORKDIR /app# Copy all the files from the current directory to the imageCOPY . .# build the project avoiding testsRUN ./gradlew clean build -x test# Expose port 8080EXPOSE 8080# Run the jar fileCMD ["java", "-jar", "./build/libs/demo-0.0.1-SNAPSHOT.jar"] The unusual part here are the ARG lines. They are used to pass arguments to the Docker image. They are defined in the docker-compose.yml file.
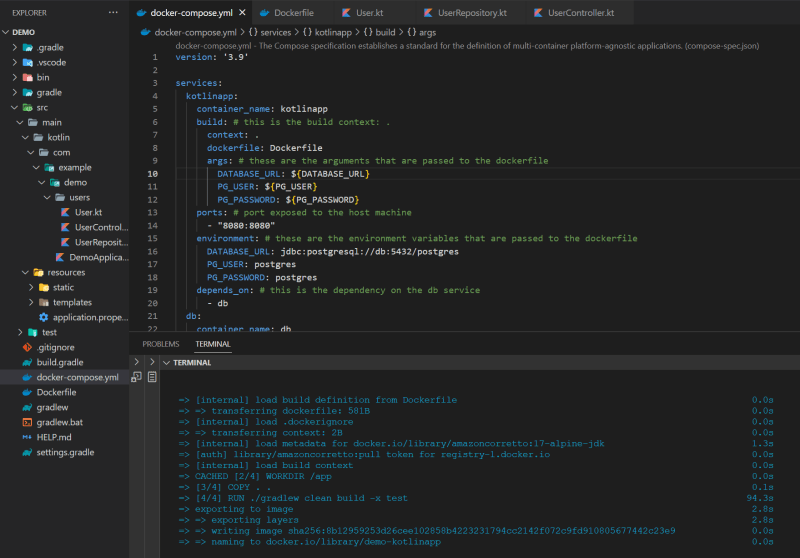
docker-compose.yml
Let's create the docker-compose.yml file at the root of the project.
Add the following content (explanation is in the comments):
version: '3.9'services: kotlinapp: container_name: kotlinapp build: # this is the build context: . context: . dockerfile: Dockerfile args: # these are the arguments that are passed to the dockerfile DB_URL: ${DB_URL} PG_USER: ${PG_USER} PG_PASSWORD: ${PG_PASSWORD} ports: # port exposed to the host machine - "8080:8080" environment: # these are the environment variables that are passed to the dockerfile DB_URL: jdbc:postgresql://db:5432/postgres PG_USER: postgres PG_PASSWORD: postgres depends_on: # this is the dependency on the db service - db db: container_name: db image: postgres:12 environment: # environment variables for the Postgres container POSTGRES_USER: postgres POSTGRES_PASSWORD: postgres POSTGRES_DB: postgres ports: # port exposed to the host machine - "5432:5432" volumes: # volume used to persist data - pgdata:/var/lib/postgresql/datavolumes: # volume creation pgdata: {}Build and run the project
Now we can build and run the project.
Run the Postgres database
First, we need to run the Postgres database.
docker compose up -d dbTo check if it's running, you can use the following command:
docker compose logsand the
docker ps -aIf the output is like the following one, you are good to go:

You should see something like that, you are good to go.
As additional test, you can connect to the database using TablePlus (or any other database client).
You can create a new connection using the following parameters:
- Host: localhost
- Port: 5432
- Database: postgres
- User: postgres
- Password: postgres
Then click on the Test Connection button. The database is connected but emptt for now.

Build the project
Let's build the project inside the Docker image.
docker compose buildAnd the output should be something like that:
Run the project
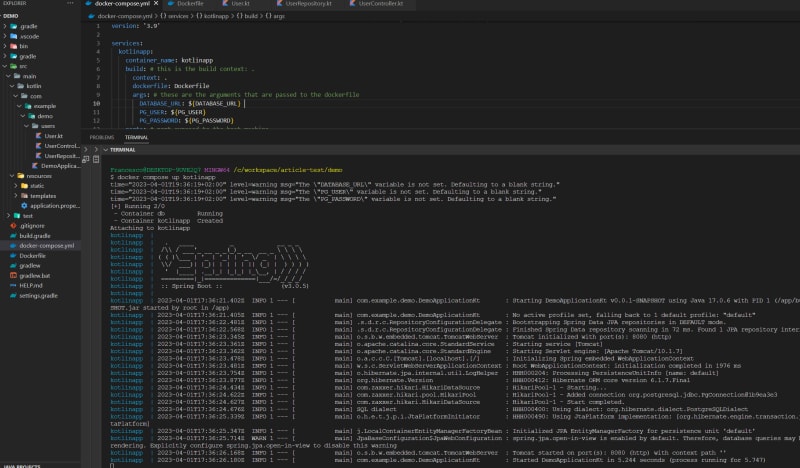
Now we can run the project.
docker compose up kotlinappAnd this should be the output:
Test the project
Now we can test the project. We will use Postman, but you can use any other tool.
Create a user
To create a new user, make a POST request to localhost:8080/api/users.
The body of the request should be like that:
{ "name": "aaa", "email": "aaa@mail"}The output should be something like that:

Let's create two more users, make a POST request to localhost:8080/api/users.
{ "name": "bbb", "email": "bbb@mail"}{ "name": "ccc", "email": "ccc@mail"}Get all users
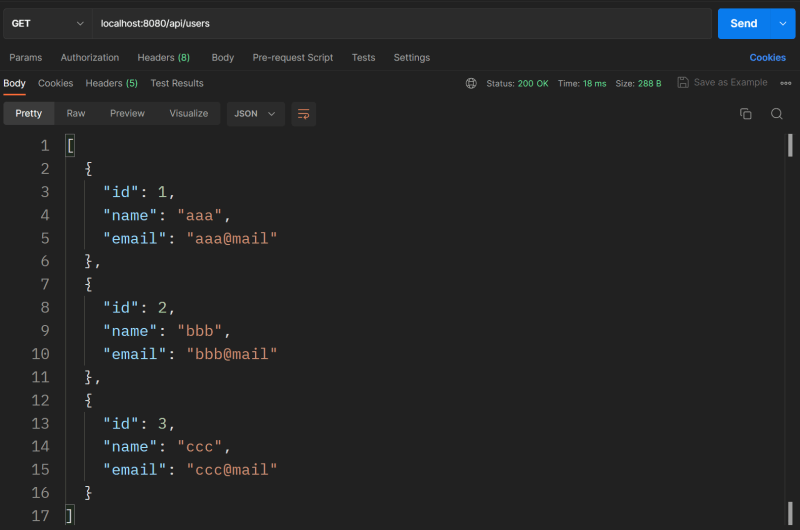
To get all users, make a GET request to localhost:8000/api/users.
The output should be something like that:
Get a user
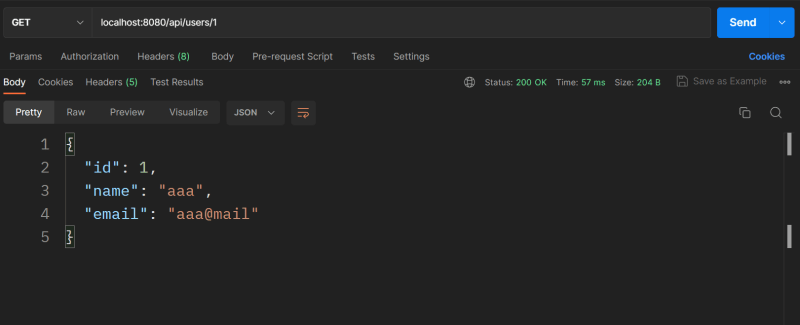
To get a user, make a GET request to localhost:8000/api/users/{id}.
For example GET request to localhost:8000/api/users/1.
The output should be something like that:
Update a user
To update a user, make a PUT request to localhost:8000/api/users/{id}.
For example PUT request to localhost:8000/api/users/2.
The body of the request should be like that:
{ "name": "Francesco", "email": "francesco@mail"}The output should be something like that:

Delete a user
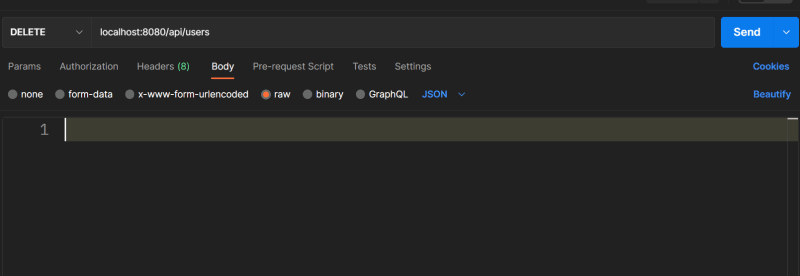
To delete a user, make a DELETE request to localhost:8000/api/users/{id}.
For example DELETE request to localhost:8000/api/users/1.
On Postman you should see something like that:
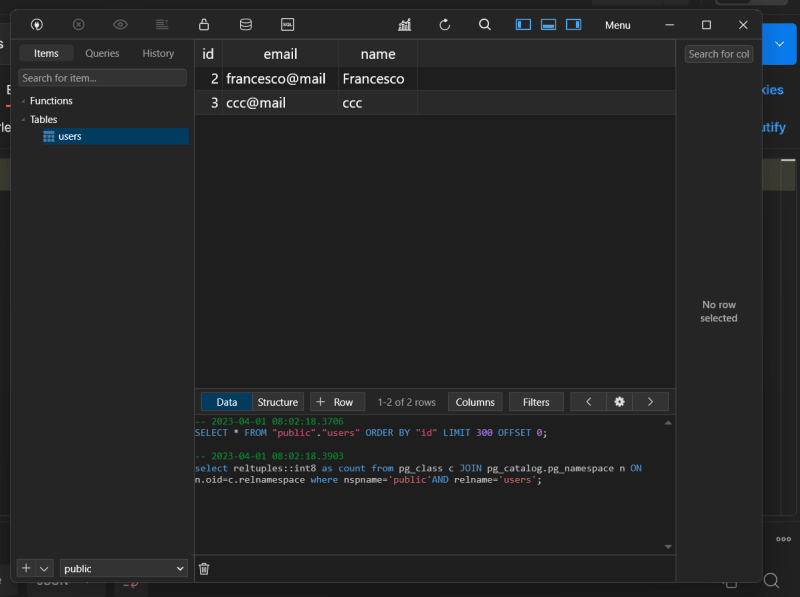
Final test
As a final test, we can check the database using TablePlus.
Conclusion
We made it! We have built a CRUD rest API in Kotlin, using:
- Spring boot
- Gradle
- Hibernate
- Postgres
- Docker
- Docker Compose
If you prefer a video version:
All the code is available in the GitHub repository (link in the video description): https://youtube.com/live/BbT1PCAOS2s
That's all.
If you have any question, drop a comment below.
Original Link: https://dev.to/francescoxx/kotlin-crud-rest-api-using-spring-boot-hibernate-postgres-docker-and-docker-compose-1cnl
Dev To
More About this Source Visit Dev To