
An Interest In:
Web News this Week
- April 3, 2024
- April 2, 2024
- April 1, 2024
- March 31, 2024
- March 30, 2024
- March 29, 2024
- March 28, 2024
Some of Our Sources
- Simplebits
- TutsPlus - Code
- Six Revisions
- Vandelay Design
- FanExtra - PSD
- Crazy Leaf Design
- Web Design Ledger
- CSS Tricks
- Freelance Switch
- Android Headlines
Help Webnuz
Referal links:
Dockerize Your Nextjs App Like a Pro: Advanced Tips for Next-Level Optimization
Creating a new application with your team and having it up and going on your teams system can be difficult because you need your app to run in different environments and yet behave the same way.
Docker, thankfully, is a great solution that streamlines the process. It guarantees that your app will function the same regardless of where it is distributed by creating a bundle containing your software code along with its dependencies and configurations. This allows you to concentrate on developing the most effective software(app) possible without being sidetracked by technological issues.
Moreover, to deploy your app to platforms like Fly.io, you need to containerize your app using Docker.
And thats where this guide will help you.
In this guide, we will walk you through the process of creating a Docker image of your Next.js application and then well look at how to optimize it. But before that, lets look at the advantages of using Docker.
Benefits of Using Docker for App Deployment
As a developer, you are aware of how critical application deployment is.
The deployment process, however, can be difficult since there are so many things to take into account, such as compatibility, scalability, portability, and rollback capabilities.
This is where Docker comes into play.
As discussed above as well, Docker makes deployment easier by integrating your applications dependencies into a single container, which provides various benefits for developers.
Improved scalability is a fundamental benefit of using Docker for deployment. You can rapidly grow your application horizontally using Docker by running several instances of your container in different servers, allowing it to handle increased traffic without affecting performance.
A container is a standalone application created from your Docker image.
By offering a consistent environment independent of the host system, Docker also makes portability easier. This implies that you can easily deploy your application across several environments, including development and production.
Making use of Docker also facilitates updates and rollbacks. Every time you update your application, all you have to do is generate a new Docker image and re-run your containers with the latest Docker image.
You can also easily roll back to an earlier version of the app by deploying an older Docker image if the current version of the app produces difficulties.
Further advantages of Docker include increased security, inexpensive infrastructure, and simpler developer collaboration. You can learn more about that by clicking here.
Now that weve learned about the benefits of using Docker, its time to install the prerequisites.
Essential Prerequisites for Creating a Docker Image
To ensure a smooth creation of the Docker image, there are a few prerequisites that need to be met:
- Node.js and NPM must be installed on your system.
- Docker needs to be installed as well.
Once these requirements are fulfilled, we can proceed with creating the Next.js app.
Creating a Blog Website
For this tutorial, its not crucial to create a new blog or e-commerce Next.js application from scratch. Instead, installing a starter app from Vercel can be a more efficient approach.
To do this, simply run the following command in your terminal on your preferred directory:
npx create-next-app --example blog-starter blog-starter-appIt will create a Next.js blog app.
To deploy your application, you must first build it based on the command specified in your package.json file. You can build a Next.js by running the following command:
npm run buildBy executing this command, a .next folder will be generated, containing all the files and assets defined in your Next.js application. The logs will also display the pages that were generated.
To run the Next.js app, execute the following command:
npm startAfter the server is ready, go to localhost:3000 to see the output. You should see a blog app similar to this. It should be noted that the scripts used here are defined by default in the package.json file.
Writing a Dockerfile
Before we begin, let us first define the terms Container and Image, and why we are building a Dockerfile.
An image, or a pre-built package containing the application code and its dependencies, is required to execute within a container. To construct an image, youll require a Dockerfile, which is a set of instructions that instructs Docker how to build the image.
Docker, in a nutshell, allows developers to simply generate, distribute, and deploy images, resulting in faster development cycles and simpler application management.
With that stated, lets make a Dockerfile in our root directory and paste the following content within it.
FROM node:16-alpineRUN mkdir -p /appWORKDIR /appCOPY . .RUN npm installRUN npm run buildEXPOSE 3000CMD ["npm", "start"]Here, we defined a base image i.e. node:16-alpine.
What exactly does it do? It will download the node:16-alpine image from the Docker Hub (with Node. js, npm, and other necessary tools pre-installed).
Afterward, as per the instruction, it creates a directory and sets it as a working directory, then copies the application files into the working directory.
The RUN npm install and RUN npm run build lines install dependencies & build the application. Finally, we expose port 3000, and start the application using the command npm start.
This was our configuration stored inside the Dockerfile.
Now, lets build an image using this.
docker build -t blog-website-1 ./We tagged(or named) this image as blog-website-1 and then specified the directory where the Dockerfile is located, which is the root directory for us.
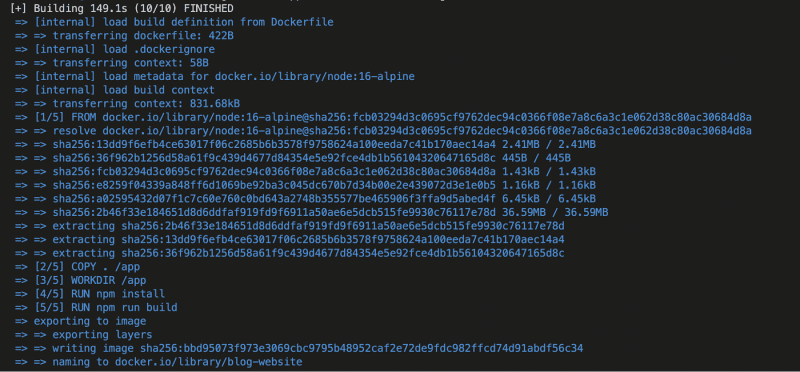
As you can see from the logs, it is retrieving the base image and then executing everything specified in the Dockerfile.
After the process finishes, it will generate a docker image, which you can see using the docker images command.

Its 622MB in size. For sure, in the next section, well see how you can reduce this number drastically.
To run this image within a container (specifying the port as 3000) use the following command.
docker run -p 3000:3000 blog-website-1You can now go to localhost:3000 and see your app running, but this time from the Docker container.
Optimizing the Docker Image
Previously, we created a simple Dockerfile and provided some basic instructions to create an image that can be run inside a container.
However, there is room for further optimization as the current image size is 622MB which is not ideal for production apps. There are various methods to optimize the image size, and we will focus on a simple approach based on the factors listed below.
- Pick a different smaller base image(its not always the case): You can use a smaller base image to reduce the image size.
- Combine commands: You may combine the RUN npm install and RUN npm run build instructions into a single RUN npm ci -quiet && npm run build command. This reduces the number of layers in the image and its size.
- Use multi-stage builds: You can divide your Dockerfile into two stages, with the first stage building your app and in the second stage you can copy only the files required. This will reduce redundant files and environments that we created in the first stage.
Here, we will primarily use multi-stage builds to demonstrate how we can easily reduce the size to roughly 100 MB.
Lets proceed with the optimization process by replacing the contents of the existing Dockerfile with the following instructions.
# Build StageFROM node:16-alpine AS BUILD_IMAGEWORKDIR /appCOPY package*.json ./RUN npm ciCOPY . .RUN npm run build# Production StageFROM node:16-alpine AS PRODUCTION_STAGEWORKDIR /appCOPY --from=BUILD_IMAGE /app/package*.json ./COPY --from=BUILD_IMAGE /app/.next ./.nextCOPY --from=BUILD_IMAGE /app/public ./publicCOPY --from=BUILD_IMAGE /app/node_modules ./node_modulesENV NODE_ENV=productionEXPOSE 3000CMD ["npm", "start"]We have divided our Dockerfile file into two sections i.e. Build Stage and Production Stage. And the commands are pretty self-explanatory and straightforward.
For the build stage, the commands are similar to the Dockerfile we created earlier. On the other hand, in the production stage, we are just copying the files that we need from the build stage and running the app.
Lets build a new app with the new Dockerfile and name this image blog-website-2.
docker build -t blog-website-2 ./And as you can see from the command docker images, the second image saved around 60MB.

You can run this image by running the command docker run -p 3000:3000 blog-website-2 as well, and you will get the same blog website.
Taking Docker Image Optimization to the Next Level
As we can see, even after optimizing images with the help of multi-stage builds, we dont see significant image optimization because smaller Docker images are easier to deploy and scale.
This is why we will be exploring other ways to further optimize our image size. For that, create a next.config.js file in the root directory and paste the below code.
/*** @type {import('next').NextConfig}*/const nextConfig = { experimental: { outputStandalone: true, }}module.exports = nextConfigAccording to the documentation, it will create a folder at .next/standalone which can then be deployed on its own without installing node_modules. It is also one of the most effective methods for optimizing the docker file. You can learn more about it here.
Lets modify the Dockerfile now.
FROM node:18-alpine as builderWORKDIR /my-spaceCOPY package.json package-lock.json ./RUN npm ciCOPY . .RUN npm run buildFROM node:18-alpine as runnerWORKDIR /my-spaceCOPY --from=builder /my-space/package.json .COPY --from=builder /my-space/package-lock.json .COPY --from=builder /my-space/next.config.js ./COPY --from=builder /my-space/public ./publicCOPY --from=builder /my-space/.next/standalone ./COPY --from=builder /my-space/.next/static ./.next/staticEXPOSE 3000ENTRYPOINT ["npm", "start"]The code in this section is mostly identical to the Dockerfile we created earlier using a multi-stage build.
As you can see, we did not use node_modules here, but rather the standalone folder, which will optimize the image to a greater extent.
Lets build a new app with the new Dockerfile and name this image blog-website-3.
docker build -t blog-website-3 ./The resulting image size has now been reduced to 187MB.

What Really Matters for Docker Image Disk Usage
In the earlier section on optimizing Docker images, we explored many aspects that might influence image size, such as using a smaller base image. However, some sources, such as Semaphore, claim that the size of the base image is irrelevant in some cases.
Instead of the size of the base image, the size of frequently changing layers is the most important factor influencing disk usage. Because Docker images are composed of layers that may be reused by other images, the link between size and disk usage is not always clear.
Two images with the same layers, for example, might have drastically different disk consumption if one of the layers changes often. As a result, shrinking the base image may be ineffective in saving disc space and may restrict functionality.
If you wish to go more into the topic, you may do so here.
Is Docker Right for You? Heres When to Consider It
Docker, as weve seen, is a great tool for managing software dependencies and providing consistent environments.
Knowing when to use Docker and when to create a Docker image is crucial in achieving the benefits of this platform.
Docker is ideal for:
- An Isolated environment (for creating and testing apps)
- Deployment purposes
- Scalability
- Continuous Integration and Deployment (CI/CD)
It goes without saying that if youre using Docker, youll need Docker images as well.
So, whether you require an isolated environment, want to deploy apps reliably and consistently, or want to ensure consistency across different environments, Docker can help.
While Docker helps with deployment and scaling, you still need a front-end ready to be deployed and turned into a full-stack app. For this, you can use the Locofy.ai plugin to generate modular, and highly extensible Next.js apps directly from your Figma & Adobe XD design files.
You can use the auto layout feature on Figma to make your designs responsive on the Locofy.ai plugin and even if your designs dont utilise auto layouts, the plugin offers a Design Optimizer feature that uses AI to apply auto layouts to your design files.
Once your designs are responsive, you can use the Auto Components feature to split your design elements into working React components, making them easy to extend.
Hope you like it.
Thats it thanks.
Original Link: https://dev.to/nitinfab/dockerize-your-nextjs-app-like-a-pro-advanced-tips-for-next-level-optimization-nb2
Dev To
More About this Source Visit Dev To