
An Interest In:
Web News this Week
- April 22, 2024
- April 21, 2024
- April 20, 2024
- April 19, 2024
- April 18, 2024
- April 17, 2024
- April 16, 2024
Some of Our Sources
- Technology Review
- The Logo Smith
- Spoon Graphics
- Smashing Magazine
- Creative Curio
- Crazy Leaf Design
- Specky Boy
- Freelance Switch
- Codrops
- Hashedout
Help Webnuz
Referal links:
How I Setup Jenkins On Docker Container Using Ansible (Part 1)
The Story
Recently, my team found themselves in a situation where they needed to have a staging or development Jenkins environment. The motivation behind the need for a new environment was that we needed a backup Jenkins environment and a place where new Jenkins users could get their hands dirty with Jenkins without having to worry about changes to the production environment and most importantly we needed to ensure that our Jenkins environment is stored as code and could be easily replicated.
For this task, I decided to pair with my padawan/mentee (@AneleMakhaba) as he was a good fit for the task (and I wanted to disseminate the knowledge as well) which had been in the backlog for a while.
I thought this meme was relevant to the task.

Our initial approach to the task was to:
- Create a Docker image that would be used for our Jenkins environment which includes all the necessary dependencies and configuration files.
- The configuration should be based on the production environment.
- Explore the "As code paradigm":
- Create and version control Jenkins Configuration using [JCaC(Jenkins Configuration as Code), which is a plugin for Jenkins that provides the ability to define this whole configuration as a simple, human-friendly, plain text YAML syntax.
- Create and version control Jenkins Job configuration using Jenkins Job Builder, which is a Python package with the ability to store Jenkins jobs in a YAML format.
- Deploy a new Jenkins instance (dev-environment) with a single command
- Future work includes the ability to backup and restores Jenkins job history to the newly deployed environment with a single command.
(@AneleMakhaba) recently gave a Lunch 'n Learn talk that summarises this post. The talk explores the following:
- Why do we need to configure Jenkins as Code?
- Managing Jenkins as Code
- Jenkins infrastructure as Code
- Jenkins Jobs as Code
- Some of the benefits of 'as code' paradigm, and a demo
This collaborated blog post is divided into 3 sections, Instance Creation, Containerization and Automation to avoid a very long post and,
In this post, we will detail the steps that we undertook to create an environment ([EC2 instance) that will host our Jenkins instance.
Note: We did not use any AWS services to host our Jenkins environment at our workplace, instead we used Proxmox containers.
Thank your @AneleMakhaba, for your collaboration in writing this post.
TL;DR
- Create an EC2 instance with the following specifications:
- Instance type:
t2.micro - Instance name:
jenkins-server - Instance key pair:
jenkins-ec2 - AMI:
ami-09d56f8956ab235b3(Ubuntu 20.04 LTS)
- Instance type:
- SSH into the instance and create an
ansibleuser withsudorights. - Copy the local ssh key to the instance and add it to the
ansibleuser'sauthorized_keysfile.
The How
This is the first post in the series of posts that will detail the steps that we undertook to create an environment (EC2 instance) for running Jenkins CI. The instance was launched via the AWS Console, a future post will detail the same steps using Terraform for deterministic orchestrations.
The Walk-through
This post-walk-through mainly focuses on instance creation. If you would like to read more about the containerization click here and here for automation walk-through.
Create an EC2 instance
To create an EC2 instance that will be used to run the Jenkins container head over to the AWS Console and create a new instance.
On console, search for EC2 and select it, then locate the "Launch Instance" button.

After selecting the "Launch Instance" button, add the name of your instance (I chose Jenkins-server) then select the "Ubuntu" option for the AMI (Amazon Machine Image).

Choose an instance of your choice (for this post we chose a
t2.micro), then select theCreate new key pairbutton (these keys will be used to SSH into our instance later)
After the instance is created we will need to wait for it to be ready and then we will be able to SSH into it by clicking on the "Connect" button and,
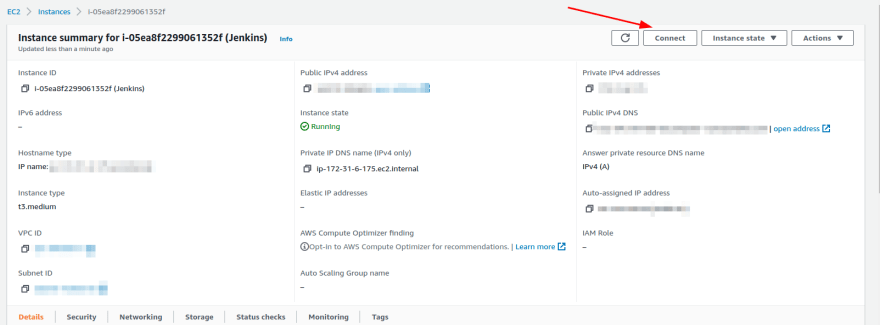
Follow the instructions to SSH into the instance.

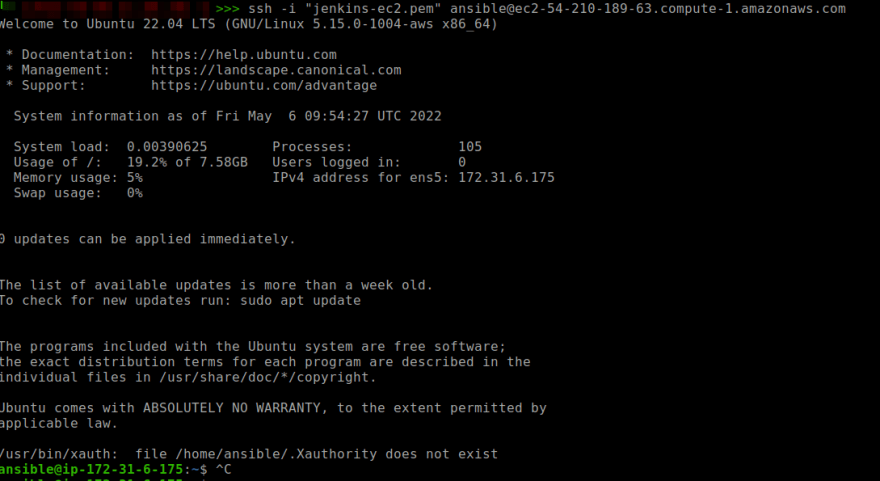
Now, open a new terminal window on the host and SSH into the instance to ensure that everything is working as expected.

Create an Ansible user
Note: This is an optional step as we can use the default EC2 user in Ansible. Due to security reasons, it is recommended to create a dedicated Ansible user with sudo rights and only authorized access to the instance.
Generate the ssh-key for your user
First, we need to generate an ssh-key for our Ansible user from our localhost. This key will help ease the SSH connection to the instance. The following command will generate an ssh-key for the user ansible on localhost:
ssh-keygen -t rsa -b 4096 -C "ansible-user"chmod 400 ~/.ssh/id_rsaWe can leave everything as default - a pair of private/public keys will be generated in ~/.ssh as id_rsa (the private key) and id_rsa.pub (the public key).
Read more about SSH Public and Private Key
We need to copy the contents of the public key - id_rsa.pub that looks like this:
cat ~/.ssh/id_rsa.pubssh-rsa AAAAB3NzaC1yc2EAAAADAQABAAABAQDAudXEIP2qNrYDOVdS5T7ZB7...............ansible-userOnce we have our ssh-key, we can SSH into the EC2 instance.
ssh -i "jenkins-ec2.pem" ubuntu@<<ec2-host-or-ip>>.compute-1.amazonaws.comThen we can create the ansible user and assign it sudo rights (I know) on the EC2 instance:
sudo su -adduser ansibleecho "ansible ALL=(ALL) NOPASSWD:ALL" >> /etc/sudoersmkdir -p /home/ansible/.sshcd /home/ansible/.sshThen paste the public key, and contents that we generated earlier on the host environment into the authorized_keys file and save.
vi authorized_keysThis will ensure that we can SSH into the instance without a password, and we can run Ansible commands without being prompted for a password each time.
Note: This is not the best security practice, but it is a good starting point.
Going back to the host environment, we can test the SSH connection to the EC2 instance using the ansible user that we just created:
Once you have a completed instance that you can SSH into, then you can create a Jenkins server on it. The post How I setup Jenkins on Docker container using Ansible Part 2 will detail the steps to create a Jenkins server on an EC2 instance.
Conclusion
Congratulations! You have successfully created an EC2 instance that will run the Jenkins environment. You can now use the instance to run Ansible playbooks and containers. Another avenue to explore is Terraform for deterministic deployment instead of relying on the AWS Console. This will be covered in future posts.
Reference
Original Link: https://dev.to/mmphego/how-i-setup-jenkins-on-docker-container-using-ansible-part-1-49po
Dev To
More About this Source Visit Dev To