
An Interest In:
Web News this Week
- April 26, 2024
- April 25, 2024
- April 24, 2024
- April 23, 2024
- April 22, 2024
- April 21, 2024
- April 20, 2024
Some of Our Sources
- Technology Review
- TutsPlus - Code
- Spoon Graphics
- Web Designer Depot
- Crazy Leaf Design
- Reencoded
- Spyre Studios
- Web Resource Source
- Android Dissected
- Codrops
Help Webnuz
Referal links:
Adding PWA to Vite Applications
Hello everyone, I just decided to add PWA ability to my website and I thought why wouldn't I write a blog post about it. I'm using Vite on my website, so I will use vite-plugin-pwa to add PWA ability on my website. This plugin makes things easier when you configure PWA, for example precaching comes with it by default, so instead of making it manually, I decide to use this plugin.
Requirements
- vite >= 3
- vite-plugin-pwa
What is PWA and Why it's Important?
PWA(aka Progressive Web Apps) is a set of abilities that your website will be like real applications. These abilities are;
- Precaching assets of the website until the next deployment.
- Sending Push Notifications from website
- Adding offline mode ability
- Update application silently on the background (While user looking around)
- Users able to install your website like applications
How Offline Mode and Silent Update Works?
PWA uses an API called serviceworkes. This serviceworkers works on another thread instead of main JS thread, so they have a set of abilities that we can not do inside main JS thread. For example, with precaching ability, they can download website assets that listed in sw.js file and save them to directly browser. That way, we can use application offline(I assume we don't make any API call inside app). Also, if you configure PWA, you can make precache your API calls too.(You can read details here)

How Serviceworkers Understand the Website Updated?
Actually, it has basic algorithm underlying of it and vite-plugin-pwa handles it for us without any configuration. When you take a build from your project, the plugin scans through your assets files and makes a list of precached files inside sw.js file. If file already exist, plugin adds random revision number to file inside to list, if its new file revision number will null. When you deploy that changes, new sw.js will change with the old one into the browser. If revision numbers are different, the browser will invalidate cache and fetch a new version of them.

Adding PWA Plugin to Project
We have a bunch of steps to add PWA into the project successfully.
- Create application icons
- Create robot.txt file
- Prepare index.html file
- Add PWA plugin to project
Create Application Icons
You should have some icons and favicons to use inside of application. They are required to have PWA. So, you should choose an icon to application, then you can convert it to icons that you will use PWA configuration. I used favicon.io to create icons for my website. End of the process you should have these icons;
- android-chrome-192x192.png
- android-chrome-512x512.png
- apple-touch-icon.png
- favicon-16x16.png
- favicon-32x32.png
- favicon.ico
You should copy these files into the public folder in the project. Lastly, we will copy some of the files with new names into the public folder. You should copy and rename these files listed below. We will use them inside the PWA configuration.
- android-chrome-192x192.png pwa-192x192.png
- android-chrome-512x512.png pwa-512x512.png
Create robots.txt File
You should have robots.txt file if you want to search bots crawl your website. Also, this file necessary if you want to use PWA. You can use seoptimer
to create this file. I will use default configuration for this file. Default configuration would be enough for most of the websites. So, if you need default configuration, you can copy the code below and paste it to robots.txt file under public folder.
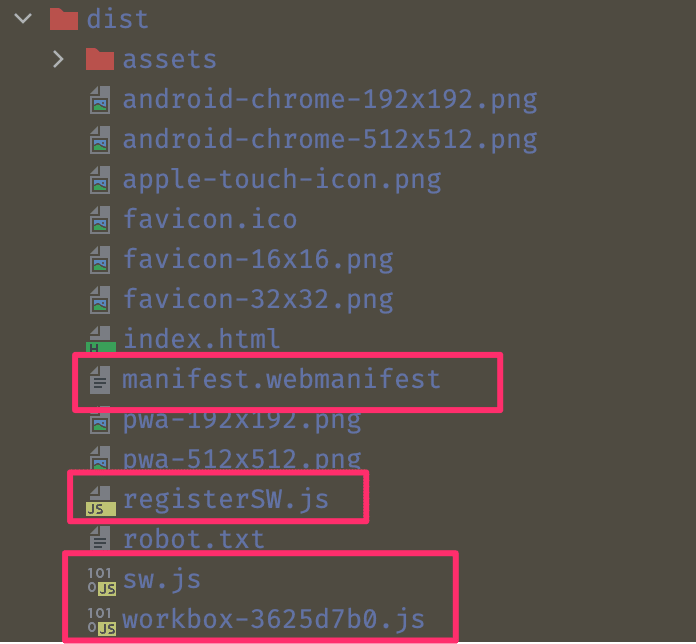
User-agent: *Disallow:After this process, you will have public folder that includes at least these files shown in the image below.

Prepare index.html File
If you want to use PWA, your website should be responsive, have icons, title, description and the manifest file. If you want to achieve this, you should add them into index.html head section. I have shown the codes you should add to the head section below. You can copy and paste to your index.html file. Don't forget to change title, and description :)
<!DOCTYPE html> <html lang="en"> <head> <meta charset="UTF-8" /> <!-- Fields you will add start --> <meta name="viewport" content="width=device-width, initial-scale=1.0" /> <title>Website Title</title> <meta name="description" content="Google search description"> <meta charset="UTF-8" /> <link rel="manifest" href="/manifest.webmanifest"> <link rel="icon" href="/favicon.ico" /> <link rel="apple-touch-icon" sizes="180x180" href="/apple-touch-icon.png"> <link rel="icon" type="image/png" sizes="32x32" href="/favicon-32x32.png"> <link rel="icon" type="image/png" sizes="16x16" href="/favicon-16x16.png"> <link rel="mask-icon" href="/masked-icon.png" color="#FFFFFF"> <meta name="theme-color" content="#ffffff"> <!-- Fields you will add end--> </head> <body> <div id="app"></div> <script type="module" src="/src/main.js"></script> </body> </html>Add PWA Plugin to Project
Lastly, you will install plugin to project and configure it, then you will ready to use PWA on the website. You can install the plugin with the command below.
npm i vite-plugin-pwa -DAfter that, you should define configurations for the plugin inside the vite.config.js. You can see my configurations below. You should add VitePWA function inside plugins array. This function takes an object as parameter which will be configuration for the PWA. Don't forget to update name, short_name and description fields according to your website.
import { defineConfig } from 'vite'; import { VitePWA } from 'vite-plugin-pwa';export default defineConfig({ plugins: [ VitePWA({ registerType: 'prompt', includeAssets: ['favicon.ico', 'apple-touch-icon.png', 'masked-icon.svg'], manifest: { name: 'websitename', short_name: 'websitename', description: 'Website description(Could be same with index.html file)', theme_color: '#ffffff', start_url: '/', icons: [ { src: 'pwa-192x192.png', sizes: '192x192', type: 'image/png', }, { src: 'pwa-512x512.png', sizes: '512x512', type: 'image/png', }, { src: 'pwa-512x512.png', sizes: '512x512', type: 'image/png', purpose: 'any maskable', }, ], }, }), ], });When you did configurations correctly, you will have manifest.webmanifes, sw.js, registerSW.js and workbox-???.js files inside to build files. If you see this files inside the build output, congratulations, you did all the settings correctly and your website have PWA
After deployment, you can check is your PWA working with the lighthouse.

Original Link: https://dev.to/_ibrahimturan/adding-pwa-to-vite-applications-1bce
Dev To
More About this Source Visit Dev To