
An Interest In:
Web News this Week
- April 2, 2024
- April 1, 2024
- March 31, 2024
- March 30, 2024
- March 29, 2024
- March 28, 2024
- March 27, 2024
Some of Our Sources
- BoingBoing
- Pearsonified
- Smashing Apps
- Vandelay Design
- You The Designer
- Fuel Your Creativity
- Reencoded
- CSS Globe
- Line 25
- CSS Tricks
Help Webnuz
Referal links:
How to Create a Full Autocomplete Search Application with Elasticsearch, Kibana and NestJS - The Concluding Part
Hello and welcome to the concluding part of this series. In the previous articles, we walked through the installation and configuration of Elasticsearch, Kibana as well as importing data into Elasticsearch and querying them with NestJS (in case you missed them check them out here.
In this article I will be walking you through how to connect a simple react application with autocomplete feature that leverages NestJS backend with elasticsearch.
Setting up a react project
You can setup a simple react app using this command (or checkout this detailed react documentation
$ npx create-react-app nest-elastic-frontendOnce you app is setup, open it in your favorite IDE, mine is VSCode.
We will need to install axios as a dependency. If you prefer npm package manager, you will have to run npm install axios but if you preferred yarn, yarn add axios.
We need to update three files
1. public/index.html
You need to add bootstrap CDN. (PS: I have removed the comments to reduce the length of the file).
<!DOCTYPE html><html lang="en"> <head> <meta charset="utf-8" /> <link rel="icon" href="%PUBLIC_URL%/favicon.ico" /> <meta name="viewport" content="width=device-width, initial-scale=1" /> <meta name="theme-color" content="#000000" /> <meta name="description" content="Web site created using create-react-app" /> <link rel="apple-touch-icon" href="%PUBLIC_URL%/logo192.png" /> <link rel="manifest" href="%PUBLIC_URL%/manifest.json" /> <link href="https://dev.to//maxcdn.bootstrapcdn.com/bootstrap/4.1.1/css/bootstrap.min.css" rel="stylesheet" id="bootstrap-css" /> <title>React App</title> </head> <body> <noscript>You need to enable JavaScript to run this app.</noscript> <div id="root"></div> <script src="//maxcdn.bootstrapcdn.com/bootstrap/4.1.1/js/bootstrap.min.js"></script> <script src="//cdnjs.cloudflare.com/ajax/libs/jquery/3.2.1/jquery.min.js"></script> </body></html>2. src/App.js
import './App.css';import axios from 'axios';import { useState } from 'react';const App = () => { const [searchResponse, setSearchResponse] = useState([]); const [totalValue, setTotalValue] = useState(); const handleChange = async e => { const { data } = await axios.post('http://localhost:8000/movies/search', { data: { title: "e.target.value," }, }); setSearchResponse(data.results); setTotalValue(data.total.value); }; return ( <div className='App'> <div className='container search-table'> <div className='search-box'> <div className='row'> <div className='col-md-3'> <h5>Search All Fields</h5> </div> <div className='col-md-9'> <input type='text' id='myInput' onChange={handleChange} className='form-control' placeholder='Search IMDB movies'></input> </div> </div> </div> <div className='search-list'> <h3> {totalValue ?? 0} {totalValue > 1 ? 'Records' : 'Record'} Found </h3> <table className='table' id='myTable'> <thead> <tr> <th>Title</th> <th>Overview</th> <th>Revenue:Budget ($)</th> </tr> </thead> <tbody> {searchResponse.map((res, idx) => ( <tr key={idx}> <td className='title'>{res.title}</td> <td> <p>{res.overview}</p> <sub>"{res.tagline}"</sub> </td> <td> <p> <sub> {res.revenue.toLocaleString()}:{res.budget.toLocaleString()} </sub> </p> </td> </tr> ))} </tbody> </table> </div> </div> </div> );};export default App;3. Lastly, src/index.css
body { margin: 0; font-family: -apple-system, BlinkMacSystemFont, 'Segoe UI', 'Roboto', 'Oxygen', 'Ubuntu', 'Cantarell', 'Fira Sans', 'Droid Sans', 'Helvetica Neue', sans-serif; -webkit-font-smoothing: antialiased; -moz-osx-font-smoothing: grayscale;}code { font-family: source-code-pro, Menlo, Monaco, Consolas, 'Courier New', monospace;}.search-table { padding: 10%; margin-top: -6%;}.search-box { background: #c1c1c1; border: 1px solid #ababab; padding: 3%;}.search-box input:focus { box-shadow: none; border: 2px solid #eeeeee;}.search-list { background: #fff; border: 1px solid #ababab; border-top: none;}.search-list h3 { background: #eee; padding: 3%; margin-bottom: 0%;}.title { word-wrap: normal; width: 200px;}Running your app
Start your react app with yarn start or npm start depending on your preferred package manager.
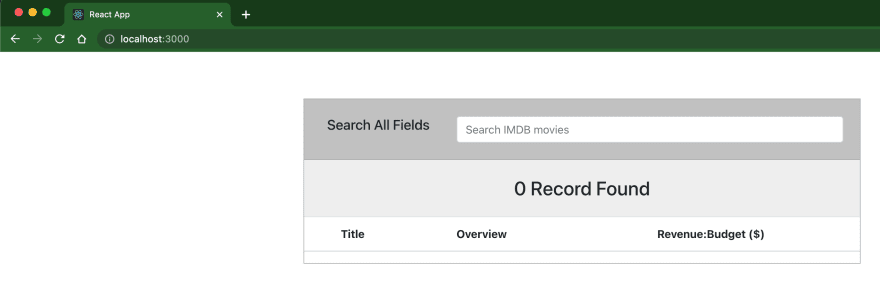
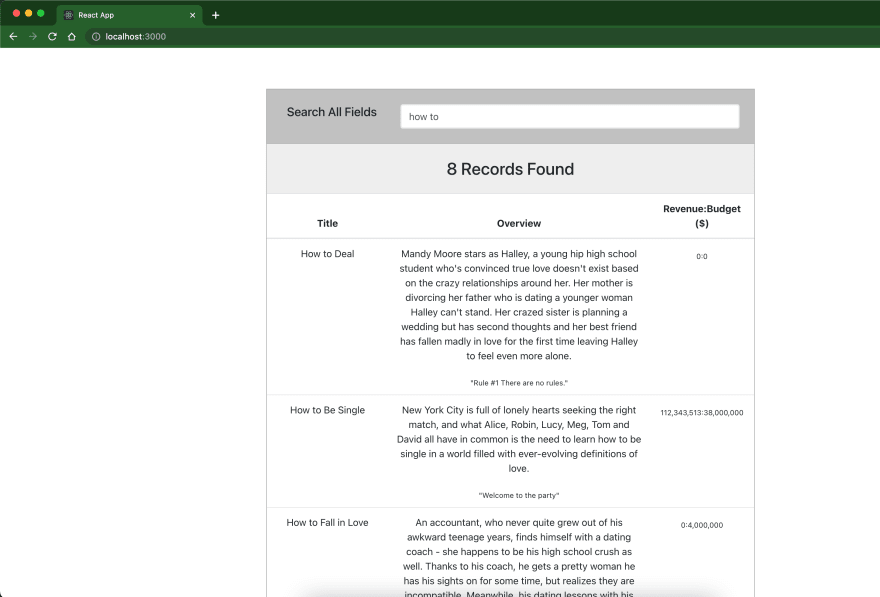
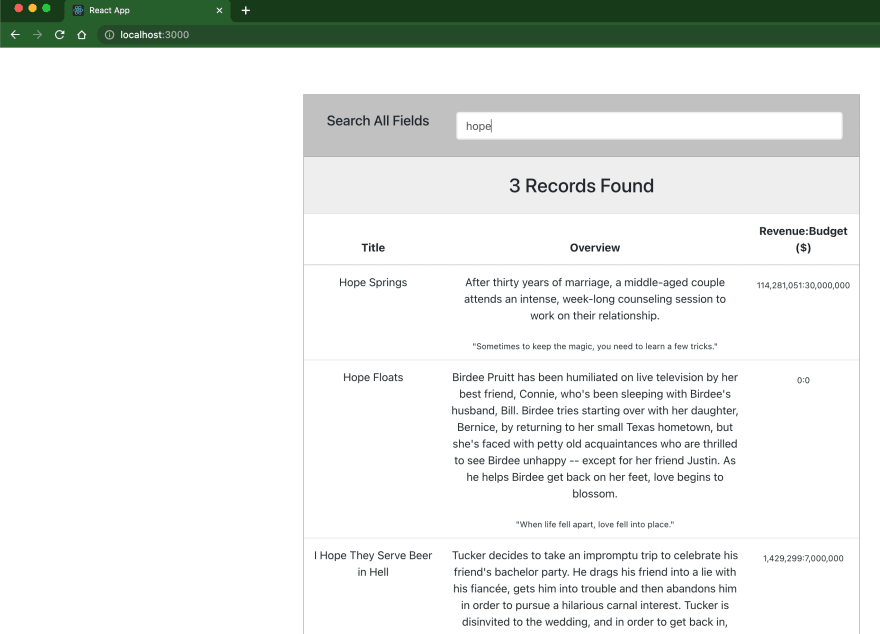
Testing your app
Summary
In this article, we are able to visualize the result of our backend app running on elasticsearch queries in our react application.
Thanks for staying tuned!
Here is the link to the source code
Original Link: https://dev.to/airscholar/how-to-create-a-full-autocomplete-search-application-with-elasticsearch-kibana-and-nestjs-the-concluding-part-23lb
Dev To
More About this Source Visit Dev To