
An Interest In:
Web News this Week
- April 2, 2024
- April 1, 2024
- March 31, 2024
- March 30, 2024
- March 29, 2024
- March 28, 2024
- March 27, 2024
Some of Our Sources
- Simplebits
- Smashing Magazine
- Abduzeedo
- Vandelay Design
- My Ink Blog
- Freelance Switch
- Design Modo
- Willems Lab
- Hashedout
- The Verge
Help Webnuz
Referal links:
How to build a real-time Auction system - Connecting Socket.io With React
Hi everybody and welcome back!
A small recap
Like an actual auction, if you bid for a product, you get counterbids from other bidders. The auction runs on the "fast" decision bid, where somebody else will win or outbid you if you don't bid fast enough.
To use online bidding, We must stick to the same principles. We must give our bidder information as soon as a new bid comes.

The previous article in this series introduced Socket.io, how to connect a React app to a Node.js server using Socket.io, and creating the user interface for the bidding system.
To read the first part of the series you can head over here:
https://dev.to/novu/how-to-build-a-real-time-auction-system-with-socketio-and-reactjs-3ble
In this final article, I will guide you through sending notifications and messages between the client and the Node.js server.
Novu - the first open-source notification architecture
Just a quick background about us. Novu is the first open-source notification infrastructure. We basically help to manage all the product notifications. It can be In-App (the bell icon like you have in Facebook - Websockets), Emails, SMSs and so on.
I would be super happy if you could give us a star! And let me also know in the comments
https://github.com/novuhq/novu

We are back! We will continue where we last stopped
Creating the JSON database file
As described in the previous article, the JSON file will serve as the database for the application. Although this is not a secure way of saving data, this is just a demo. We'll read and update the JSON file.
Navigate into the server folder and create the JSON file.
cd servertouch data.jsonAdd some products to the file by copying the code below - an array containing different products with their price, name, owner, and the last bidder.
{ "products": [ { "name": "Audi 250", "price": "500000", "owner": "admiralty20", "last_bidder": "samson35" }, { "name": "Lamborghini S50", "price": "200000", "owner": "susaske40", "last_bidder": "geraldt01" }, { "name": "Ferrari F560", "price": "100000", "owner": "samson35", "last_bidder": "admiralty20" } ]}Update the index.js file to render the data.json file. The code snippet below reads the data.json file and returns the JSON file at http://localhost:4000/api, making it easy for the web browser to fetch and display to users.
const express = require('express');const app = express();const PORT = 4000;const fs = require('fs');const http = require('http').Server(app);const cors = require('cors');const socketIO = require('socket.io')(http, { cors: { origin: 'http://localhost:3000', },});//Gets the JSON file and parse the file into JavaScript objectconst rawData = fs.readFileSync('data.json');const productData = JSON.parse(rawData);app.use(cors());socketIO.on('connection', (socket) => { console.log(`: ${socket.id} user just connected!`); socket.on('disconnect', () => { console.log(': A user disconnected'); });});//Returns the JSON fileapp.get('/api', (req, res) => { res.json(productData);});http.listen(PORT, () => { console.log(`Server listening on ${PORT}`);});Next, update the Products page from the client folder to fetch the products from the JSON file and display its contents.
import React, { useEffect, useState } from 'react';import { Link } from 'react-router-dom';import { useNavigate } from 'react-router-dom';const Products = () => { const [products, setProducts] = useState(null); const [loading, setLoading] = useState(true); const navigate = useNavigate(); const handleBidBtn = (product) => navigate(`/products/bid/${product.name}/${product.price}`); useEffect(() => { const fetchProducts = () => { fetch('http://localhost:4000/api') .then((res) => res.json()) .then((data) => { setProducts(data.products); setLoading(false); }); }; fetchProducts(); }, []); return ( <div> <div className="table__container"> <Link to="/products/add" className="products__cta"> ADD PRODUCTS </Link> <table> <thead> <tr> <th>Name</th> <th>Price</th> <th>Last Bidder</th> <th>Creator</th> <th>Edit</th> </tr> </thead> <tbody> {loading ? ( <tr> <td>Loading</td> </tr> ) : ( products.map((product) => ( <tr key={`${product.name}${product.price}`}> <td>{product.name}</td> <td>{product.price}</td> <td>{product.last_bidder || 'None'}</td> <td>{product.owner}</td> <td> <button onClick={() => handleBidBtn(product)}>Edit</button> </td> </tr> )) )} </tbody> </table> </div> </div> );};export default Products;From the code snippet above, the Products components fetch the products from the server and render them in a table.
Within the table, the Edit button has a click event listener that accepts the data related to each product and navigates to the bid page using the product's name and price.
Next, let's learn how to add products via the form in the React app to the Node.js server.
Adding products to the JSON file
We have a call to action in the Products component that links to the AddProduct page, where the user provides the name and price of the product available for bidding. The username is retrieved from the local storage.
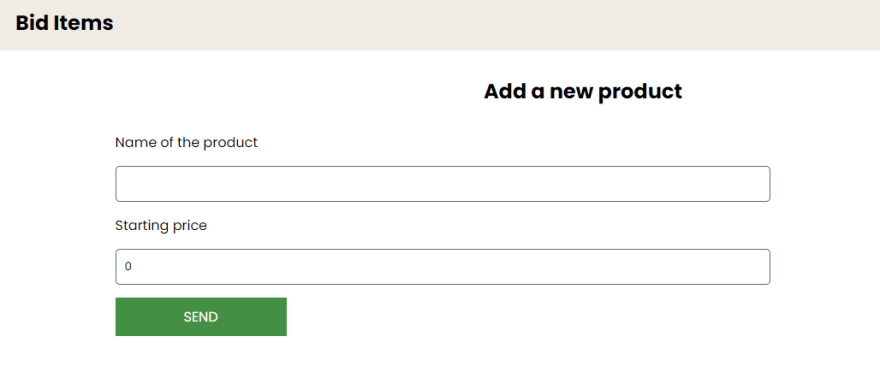
import React, { useState } from 'react';import { useNavigate } from 'react-router-dom';const AddProduct = () => { const [name, setName] = useState(''); const [price, setPrice] = useState(0); const navigate = useNavigate(); const handleSubmit = (e) => { e.preventDefault(); console.log({ name, price, owner: localStorage.getItem('userName') }); navigate('/products'); }; return ( <div> <div className="addproduct__container"> <h2>Add a new product</h2> <form className="addProduct__form" onSubmit={handleSubmit}> <label htmlFor="name">Name of the product</label> <input type="text" name="name" value={name} onChange={(e) => setName(e.target.value)} required /> <label htmlFor="price">Starting price</label> <input type="number" name="price" value={price} onChange={(e) => setPrice(e.target.value)} required /> <button className="addProduct__cta">SEND</button> </form> </div> </div> );};export default AddProduct;Next, we will send the product data to the Node.js server for storage via Socket.io. We passed Socket.io as a prop into every component from the src/App.js file.
Destructure Socket.io from the props object and update the handleSubmit function as below:
const AddProduct = ({ socket }) => { const [name, setName] = useState(''); const [price, setPrice] = useState(0); const navigate = useNavigate(); const handleSubmit = (e) => { e.preventDefault(); // console.log({ name, price, owner: localStorage.getItem('userName') }); socket.emit('addProduct', { name, price, owner: localStorage.getItem('userName'), }); navigate('/products'); }; return <div>...</div>;};export default AddProduct;From the code snippet above, the addProduct event sends an object containing the products name, price, and owner to the Node.js server via Socket.io.
Create an event on the Node.js server that listens to the addProduct message from the client.
/*The other lines of code*/const rawData = fs.readFileSync('data.json');const productData = JSON.parse(rawData);socketIO.on('connection', (socket) => { console.log(`: ${socket.id} user just connected!`); socket.on('disconnect', () => { console.log(': A user disconnected'); }); //Listens to the addProduct event socket.on('addProduct', (data) => { console.log(data); //logs the message from the client });});// ....<The other lines of code>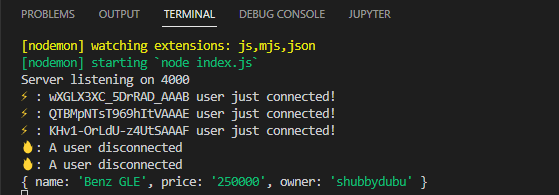
Since we've been able to access the data sent from the client, let's save the data to the database file.
/*The other lines of code*/const rawData = fs.readFileSync('data.json');const productData = JSON.parse(rawData);socketIO.on('connection', (socket) => { console.log(`: ${socket.id} user just connected!`); socket.on('disconnect', () => { console.log(': A user disconnected'); }); socket.on('addProduct', (data) => { productData['products'].push(data); const stringData = JSON.stringify(productData, null, 2); fs.writeFile('data.json', stringData, (err) => { console.error(err); }); });});// ....<The other lines of code>The addProduct event listens to messages from the client and updates the data.json file by adding the product data to the products array and saving it to the data.json file.
Congratulations, we've been able to read and save data to our JSON database. Next, let's learn how to update product prices when users bid for items.
Updating the JSON file
In this section, we'll enable users to update the price of the items in the JSON file. The changes will also be persistent even after refreshing the page.
Since the BidProduct page accepts the product's data via URL parameters, we'll need to use the useParams hook provided by React Router.
import React, { useState } from 'react';import { useNavigate } from 'react-router-dom';import { useParams } from 'react-router-dom';const BidProduct = () => { //sets the default value as the current price from the Product page const [userInput, setUserInput] = useState(price); //Destructured from the URL const { name, price } = useParams(); const navigate = useNavigate(); const handleSubmit = (e) => { e.preventDefault(); navigate('/products'); }; return <div>...</div>;};The bidProduct URL contains the name and price of the selected product from the Products page. The useParams hook enables us to destructure the name and price of the product from the URL. Then, we can set the default value of the input field (bid) to the current price from the Products page.
Update the BidProduct.js component above by adding the Socket.io prop from src/App.js to enable us to send the new bid to the Node.js server.
import React, { useState } from 'react';import { useNavigate } from 'react-router-dom';import { useParams } from 'react-router-dom';const BidProduct = ({ socket }) => { const { name, price } = useParams(); const [userInput, setUserInput] = useState(price); const navigate = useNavigate(); const [error, setError] = useState(false); const handleSubmit = (e) => { e.preventDefault(); if (userInput > Number(price)) { socket.emit('bidProduct', { userInput, last_bidder: localStorage.getItem('userName'), name, }); navigate('/products'); } else { setError(true); } }; return ( <div> <div className="bidproduct__container"> <h2>Place a Bid</h2> <form className="bidProduct__form" onSubmit={handleSubmit}> <h3 className="bidProduct__name">{name}</h3> <label htmlFor="amount">Bidding Amount</label> {/* The error message */} {error && ( <p style={{ color: 'red' }}> The bidding amount must be greater than {price} </p> )} <input type="number" name="amount" value={userInput} onChange={(e) => setUserInput(e.target.value)} required /> <button className="bidProduct__cta">SEND</button> </form> </div> </div> );};export default BidProduct;From the code snippet above, the handleSubmit function checks if the new value provided by the user is greater than the default price. If so, it triggers the bidProduct event that sends an object containing the user input (new price), the name of the product, and the last bidder to the Node.js server. Otherwise, React displays an error message to the user.
Next, let's create the bidProduct event listener on the server to accept the data sent from the client. Update the Socket.io code block in the index.js file on the server as below:
socketIO.on('connection', (socket) => { console.log(`: ${socket.id} user just connected!`); socket.on('disconnect', () => { console.log(': A user disconnected'); }); socket.on('addProduct', (data) => { productData['products'].push(data); const stringData = JSON.stringify(productData, null, 2); fs.writeFile('data.json', stringData, (err) => { console.error(err); }); }); //Listens for new bids from the client socket.on('bidProduct', (data) => { console.log(data); });});Update the price of the selected product and save it in the data.json file by copying the function below:
function findProduct(nameKey, productsArray, last_bidder, new_price) { for (let i = 0; i < productsArray.length; i++) { if (productsArray[i].name === nameKey) { productsArray[i].last_bidder = last_bidder; productsArray[i].price = new_price; } } const stringData = JSON.stringify(productData, null, 2); fs.writeFile('data.json', stringData, (err) => { console.error(err); });}The function accepts the list of products, name, last bidder, and the new price of the product then loops through every object in the array until it finds a matching product name. Then, it updates the last bidder and price of the product in the data.json file.
Call the function within the Socket.io code to set the price and last bidder of the selected product.
........ socket.on('bidProduct', (data) => { //Function call findProduct( data.name, productData['products'], data.last_bidder, data.amount ); });});Congratulations, users can now bid for items on the web application. Next, we will learn how to notify users when an item is added or put up for action.
Sending notifications to users via Socket.io
In this section, we'll connect the Nav component to the Node.js server, so whenever a user adds a product and places a bid, the server sends a message to the React app.
Update the Socket.io code block in the index.js file as below:
socketIO.on('connection', (socket) => { console.log(`: ${socket.id} user just connected!`); socket.on('disconnect', () => { console.log(': A user disconnected'); }); socket.on('addProduct', (data) => { productData['products'].push(data); const stringData = JSON.stringify(productData, null, 2); fs.writeFile('data.json', stringData, (err) => { console.error(err); }); //Sends back the data after adding a new product socket.broadcast.emit('addProductResponse', data); }); socket.on('bidProduct', (data) => { findProduct( data.name, productData['products'], data.last_bidder, data.amount ); //Sends back the data after placing a bid socket.broadcast.emit('bidProductResponse', data); });});Socket.io sends a response to the React app whenever a user performs one of the actions.
Now, you can create an event listener on the client and display the data as a notification.
import React, { useState, useEffect } from 'react';const Nav = ({ socket }) => { const [notification, setNotification] = useState(''); //Listens after a product is added useEffect(() => { socket.on('addProductResponse', (data) => { setNotification( `@${data.owner} just added ${data.name} worth $${Number( data.price ).toLocaleString()}` ); }); }, [socket]); //Listens after a user places a bid useEffect(() => { socket.on('bidProductResponse', (data) => { setNotification( `@${data.last_bidder} just bid ${data.name} for $${Number( data.amount ).toLocaleString()}` ); }); }, [socket]); return ( <nav className="navbar"> <div className="header"> <h2>Bid Items</h2> </div> <div> <p style={{ color: 'red' }}>{notification}</p> </div> </nav> );};export default Nav;Congratulations on making it this far!
Conclusion
Socket.io is a great tool with excellent features that enables us to build various real-time applications like chat apps, forex trading applications, and many others. Socket.io creates lasting connections between web browsers and a Node.js server.
This project is a demo of what you can build with Socket.io; you can improve this application by adding authentication and creating categories for the products.
The complete code for this tutorial isavailable on GitHub.
Help me out!
If you feel like this article helped you understand WebSockets better! I would be super happy if you could give us a star! And let me also know in the comments
https://github.com/novuhq/novu
Thank you for reading!
Original Link: https://dev.to/novu/how-to-build-a-real-time-auction-system-connecting-socketio-with-react-20kh
Dev To
More About this Source Visit Dev To