
An Interest In:
Web News this Week
- April 27, 2024
- April 26, 2024
- April 25, 2024
- April 24, 2024
- April 23, 2024
- April 22, 2024
- April 21, 2024
Some of Our Sources
- BoingBoing
- Simplebits
- Team Treehouse
- The Logo Smith
- Smashing Magazine
- Creative Curio
- My Ink Blog
- Wal You
- Spyre Studios
- Freelance Switch
Help Webnuz
Referal links:
How to Fix a Moir Pattern inPhotoshop


In this tutorial, you'll learn how to remove a moiré pattern in Photoshop. I'll explain everything in so much detail that everyone can fix moiré in Photoshop, even those who have just opened Photoshop for the first time.
Would you like to check out some photo retouching PS actions? Check out this Retouch Effect Photoshop Action over on Envato Elements, where you can find over 1,000 awesome actions!


What You'll Learn in This Moiré Removal Photoshop Tutorial
- What is moiré?
- Why does a moiré pattern appear in photos?
- How to remove a moiré pattern in Photoshop
- How to make Photoshop moiré removal easy
What You'll Need
To recreate the design above, you will need the following resources:
1. What Is Moiré?
The moiré pattern is something you have probably come across when you worked with digital photography, but you probably didn't know that noise/glitch in a photo is a moiré pattern. The pattern usually looks like the image below:


2. Why Does a Moiré Pattern Appear?
What actually happens is that the camera sensor interferes with the pattern in the image, creating the moiré pattern. That is why moiré usually appears when photographing something that has a pattern, like a shirt or tie. If you open the texture photo below in Photoshop, you will see it has moiré. And as you start zooming in and out, you will see a moiré pattern becoming more visible.


3. How to Avoid Moiré
You can try taking your photo from a different angle, using a smaller aperture, or changing the distance from the object. What you can also do is to fix moiré in Photoshop, which is exactly what we are going to do using the photo below as an example:


4. How to Start Removing Moiré in Photoshop
First, open the photo that you want to work with. To open your photo, go to File > Open, choose your photo, and click Open. Then, choose the Zoom Tool (Z), and zoom in on the moiré area.


5. How to Remove Moiré in Photoshop
Step 1
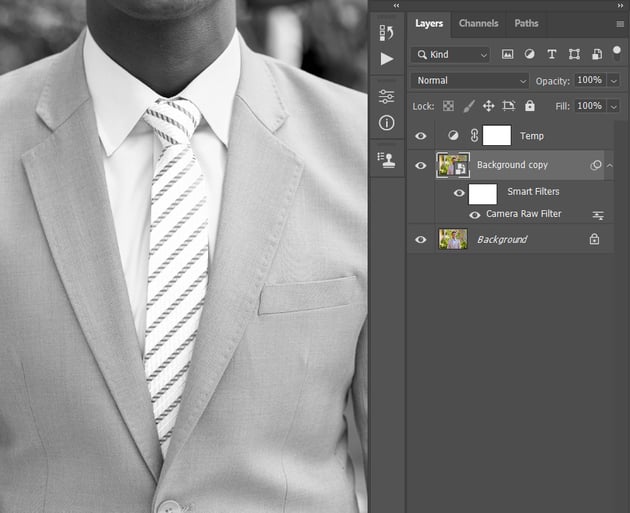
In this section, we are going to make a moiré reduction in Photoshop. The moiré in our example photo is pretty subtle, so to make sure we don't miss removing any moiré, we are going to make the moiré more prominent. Go to Layer > New Adjustment Layer > Channel Mixer to create a new channel mixer adjustment layer, and name it Temp.


Step 2
Now Double-click on this layer thumbnail and, in the Properties panel, set the Preset to Black & White with Blue Filter (RGB). This layer will now make the moiré pop out if there is any. Feel free to experiment with other Preset settings and see which one works best for your photo.


Step 3
We are going to remove the moiré on a separate photo layer, so select the Background layer and press Control-J on your keyboard to duplicate this layer. Then, Right-click on this new layer and choose Convert to Smart Object.


Step 4
Now go to Filter Gallery > Camera Raw Filter, and choose the Adjustment Brush (K). Make sure that all settings are set to 0, and set the Moiré Reduction to 100. Then, brush over the areas that have moiré, and after you finish, choose OK. You can experiment with using lower Moiré Reduction values—the lower the value you can use to successfully remove the moiré, the better.


Step 5
Check if you have missed any moiré, and if you did, double-click on the Camera Raw Filter of the Background copy layer, and repeat the previous step to remove the skipped moiré.


Step 6
Now name this layer Moiré Removal. Then, Right-click on the Temp layer and choose Delete Layer.


You Made It!
Congratulations, you've succeeded! You've now learned how to fix moiré in Photoshop. Here is our final Photoshop moiré removal result:


5 Photo Retouching Photoshop Actions From Envato Elements
Would you like to check out some photo retouching PS actions? Check out this list of Photoshop actions from Envato Elements, where you can find over 1,000 awesome actions!
Retouch Effect Photoshop Action (ATN)
This set includes ten Photoshop actions that you can use to add retouching effects to your photos. If you need any help using the product, there is a user guide included!
50 Retouching Photoshop Actions (ATN)


With these 50 retouching Photoshop actions, you can add effects to your photos with a single click! The actions are easy to use, so beginners can use them too.
Ultimate Retouch Tool Photoshop Script (ATN)


Using this Photoshop script, you can retouch skin and make color, brightness, and contrast corrections. The script requires no skills, and there are both written and video tutorials included!
Black White Photoshop Actions (ATN)


Would you like to add some black and white effects to your photos? Check out this set of 31 black and white Photoshop actions!
50 Portrait Retouch Photoshop Actions (ATN)


This pack of Photoshop actions will help you make many different edits to your photos. And everything is done in just a couple of minutes!
Did you like this tutorial on removing moiré in Photoshop? Then you may also like:


How to Fix Red Eye in Photoshop


How to Make a Frequency Separation Photoshop Action


How to Realistically Change Hair and Fur Color in Adobe Photoshop


How to Change Eye Color in Photoshop


How to Make a Watermark in Photoshop


How to Sharpen an Image in Photoshop
Original Link: https://design.tutsplus.com/tutorials/how-to-fix-moire-pattern-in-photoshop--cms-41614
TutsPlus - Design
More About this Source Visit TutsPlus - Design