
An Interest In:
Web News this Week
- April 27, 2024
- April 26, 2024
- April 25, 2024
- April 24, 2024
- April 23, 2024
- April 22, 2024
- April 21, 2024
Some of Our Sources
- Slashdot
- Techcrunch
- Joshua Blankenship
- Inspiredology
- Crazy Leaf Design
- CSS Globe
- Line 25
- Wal You
- Design Modo
- Web Resource Source
Help Webnuz
Referal links:
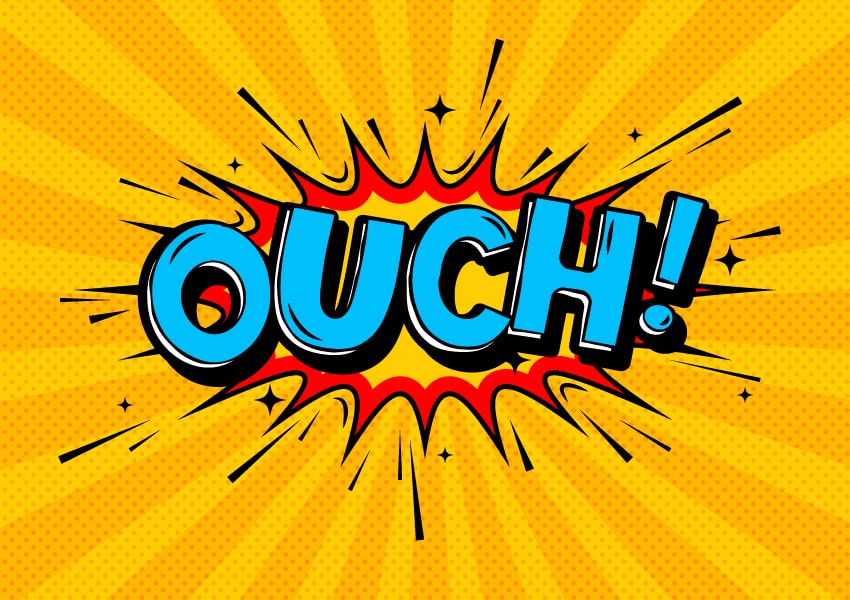
How to Create a Comic Book Text Effect in Illustrator


Are you a fan of comic-style illustration? If you've ever wanted to make your own comic book text box, this tutorial is for you.
In the following steps, you'll learn how to create a comic book text effect in Adobe Illustrator. But if you don't have the time to do it from scratch, there's a solution: Envato Elements. This subscription-based marketplace has over 2,000 Illustrator add-ons you can download without restrictions! You can get cool comic book text effects like this, and more:


And if you prefer video tutorials, don't forget to visit the Envato Tuts+ YouTube channel. There you can watch hundreds of video tutorials, like this new video on how to make a comic book text box effect in Illustrator:
What You'll Learn in This Adobe Illustrator Text Effect Tutorial
- How to create a new document in Illustrator
- How to set up a grid in Illustrator
- How to access default patterns in Illustrator
- How to apply a pattern in Illustrator
- How to use the Transform effect in Illustrator
- How to use the Appearance panel in Illustrator
- How to create a cartoon text effect in Illustrator
What You Will Need
You will need the following resource in order to complete this comic text effect:
BoldenVan comic font
1. How to Create a New Document and Set Up a Grid
Hit Control-N to create a new document. Select Pixels from the Units drop-down menu, enter 850 in the width box and 600 in the height box, and then click that More Settings button. Select RGB for the Color Mode, set the Raster Effects to Screen (72 ppi), and then click Create Document.
Enable the Grid (View > Show Grid) and the Snap to Grid (View > Snap to Grid). You will need a grid every 10 px, so simply go to Edit > Preferences > Guides & Grid, and enter 10 in the Gridline every box and 1 in the Subdivisions box. Try not to get discouraged by all that grid—it will make your work easier, and keep in mind that you can easily enable or disable it using the Control-" keyboard shortcut.
You can learn more about Illustrator's grid system in this short tutorial from Andrei Stefan: Understanding Adobe Illustrator's Grid System.
You should also open the Info panel (Window > Info) for a live preview with the size and position of your shapes. Don't forget to set the unit of measurement to pixels from Edit > Preferences > Units. All these options will significantly increase your work speed.


2. How to Create the Background
Step 1
Pick the Rectangle Tool (M) and focus on your toolbar. Remove the color from the stroke, and then select the fill and set its color to R=254 G=205 B=4. Move to your artboard and simply create an 870 x 620 px shape—the grid and the Snap to Grid feature should make it easier.
Go to the Swatches panel (Window > Swatches), open the fly-out panel, and go to Open Swatch Library > Patterns > Basic Graphics > Basic Graphics_Dots.
Make sure that your yellow rectangle is selected, go to the Appearance panel (Window > Appearance), and add a second fill using the Add New Fill button. Select it, apply the 10 dpi 30% pattern, and change its Blending Mode to Soft Light.


Step 2
Using the Rectangle Tool (M), create an 80 x 540 px shape and place it as shown in the first image. Fill it with black (R=0 G=0 B=0) and switch to the Direct Selection Tool (A). Select the bottom anchor points and go to Object > Path > Average. Check the Both box and click OK. This will turn your rectangle into a triangle, as shown in the second image.


Step 3
Make sure that your triangle is still selected, lower its Opacity to 50%, change the Blending Mode to Soft Light, and then go to Effect > Distort & Transform > Transform. Set the Angle to -15 degrees, enter 23 in the Copies box, check the bottom-middle reference point, and then click OK.


3. How to Create the Spark
Step 1
Pick the Ellipse Tool (L), create a 510 x 260 px shape, fill it with black, and place it as shown in the first image. Make sure that this shape stays selected, and focus on the Appearance panel.
Select the existing fill and go to Effect > Distort & Transform > Zig Zag. Enter the attributes shown below, click OK, and go to Effect > Distort & Transform > Pucker & Bloat. Drag the slider to -35% and click OK.


Step 2
Make sure that your black ellipse is still selected, and keep focusing on the Appearance panel.
Select the fill and duplicate it using Duplicate Selected Item. Select the newly added fill, change its color to R=254 G=0 B=2, and go Effect > Path > Offset Path. Enter a -5 px Offset and click OK.


Step 3
Make sure that your ellipse is still selected, and keep focusing on the Appearance panel.
Select the red fill, and duplicate it using Duplicate Selected Item. Select the newly added fill, change its color to R=254 G=205 B=4 and open the existing Offset Path effect. Increase the Offset to -10 px and click OK.


4. How to Create the Illustrator Text Effect
Step 1
Pick the Type Tool (T), click on your artboard, and open the Text panel (Window > Type > Character).
Select the BoldenVan font (or another comic font) and set the size to 200 px. Type the "OUCH!" text and make it white (R=255 G=255 B=255).


Step 2
Open the fly-out menu of the Character panel and go to Show Options. Make sure that the Type Tool (T) and your text are still selected.
Select only the "O" and go to the Character panel. Set the Baseline shift to -10 px and the Character Rotation to 5°. Then edit the rest of the letters as follows:
- Select the "U", and set the Character Rotation to -10°.
- Select the "C", and set the Baseline shift to 5 px and the Character Rotation to -5°.
- Select the "H", and set the Baseline shift to 10 px and the Character Rotation to -10°.
- Select the "!", and set the Baseline shift to 20 px and the Character Rotation to -15°.


Step 3
Reselect your entire piece of text, go to the Character panel, and set the Tracking to -200.
Move to the Swatches panel and click that [None] swatch to remove the existing text color. This should make your text invisible, but don't worry—we'll fix it immediately. Go to the Appearance panel and add a new fill using the Add New Fill button. Select this new fill and set its color to black.


Step 4
Make sure that your text stays selected, and focus on the Appearance panel. Add a second fill using the Add New Fill button and select it.
Set the color to white and go to Effect > Distort & Transform > Roughen. Enter the attributes shown below, click OK, and go to Effect > Path > Offset Path. Enter a -9 px Offset and click OK.


Step 5
Make sure that your text is still selected, and keep focusing on the Appearance panel. Add a third fill using the Add New Fill button and select it.
Set the color to black, and go to Effect > Distort & Transform > Roughen. Enter the attributes shown below, click OK, and go to Effect > Path > Offset Path. Enter a -7 px Offset, click OK, and go to Effect > Distort & Transform > Transform. Enter the attributes shown in the following image, and click OK.


Step 6
Make sure that your piece of text is still selected, and keep focusing on the Appearance panel. Add a fourth fill using the Add New Fill button and select it.
Set the color to R=0 G=191 B=251 and go to Effect > Distort & Transform > Roughen. Enter the attributes shown below, click OK, and go to Effect > Path > Offset Path. Enter a -10 px Offset, click OK, and go to Effect > Distort & Transform > Transform. Enter the attributes shown in the following image, and click OK.


Step 7
Make sure that your text is still selected, and keep focusing on the Appearance panel. Add a fifth fill, select it, and drag it to the bottom of the panel.
Set the color to black, and go to Effect > Distort & Transform > Roughen. Enter the attributes shown below, click OK, and go to Effect > Distort & Transform > Transform. Enter the attributes shown in the following image, and click OK.


5. How to Add Highlights to the Vector Text Effect
Step 1
Disable the Snap to Grid (Control-"). Pick the Pen Tool (P) and create a simple path, as shown in the first image. Make sure that it stays selected, and focus on the Appearance panel.
Remove the fill color and select the stroke. Set the color to black, and then open the Stroke fly-out panel. Increase the Weight to 8 px and select Width Profile 4 from the Profile drop-down menu. Add a bunch of new paths, as shown in the second image, and use the same Appearance attributes.
Add a second set of paths, as shown in the third image. Use the same Appearance attributes, but lower the stroke Weight to 4 px.


Step 2
Enable the Snap to Grid (Control-"). Create a 20 px circle and a 10 px circle. Fill both shapes with black and go to Effect > Distort & Transform > Pucker & Bloat. Drag that slider to -60% and click OK. Multiply these two shapes and spread the copies around your text effect, as shown in the third image.


Step 3
Disable the Snap to Grid (Control-"). Pick the Pen Tool (P) and create a curved path, as shown in the first image. Make sure that it stays selected, and focus on the Appearance panel.
Remove the fill color and select the stroke. Set the color to black, and then open the Stroke fly-out panel. Increase the Weight to 4 px, and select Width Profile 1 from the Profile drop-down menu. Add more curved paths, as shown in the following image, and use the same Appearance attributes.


Congratulations! Your Comic Book Text Effect Is Complete!
Here's how your cartoon text effect should look. I hope you've enjoyed this Illustrator text effect tutorial and can apply these techniques in your future projects.
Feel free to adjust the final cartoon text effect and make it your own. You can find some great sources of inspiration at Envato Elements, with interesting solutions to improve your vector comic text box.


5 Top Comic Book Text Styles From Envato Elements
Need a faster way to create a comic text effect or a comic book text box? Then check out our awesome selection of comic text effects available on Envato Elements.
Comic Book Text Styles (EPS, AI)


If you're looking for a Superman text effect Illustrator add-on, this is a cool option. These graphic styles allow you to change the look of any object with one click. They work with text or vector shapes. In this pack, you get 11 text effects plus splashes, speech bubbles, and an explosion—all as layered vectors.
The Retro Comic Book Tool Kit (EPS, AI)


This highly versatile illustration comic-style toolkit is great for creating an amazing comic book text effect in a moment in Illustrator. Try these effects out for yourself if you're looking to give a retro look to your comic text box design.
Vintage Comic Creator (ASL, PAT, PSD)


This comic style illustration pack contains a selection of layer styles designed to help you create vintage comic book text effects. You can apply these styles to text, shapes, and vector images with one click. The effects used in the comic text box styles can be easily scaled and edited after application.
Comic Book Styles for Illustrator (AI)


You can choose from ten comic book text effects made in Adobe Illustrator. The illustration comic styles are suitable for any type of project: posters, book covers, logos, typography, banners, or illustrations.
Comic Book Styles for Illustrator V3 (AI)


Choose from ten comic book text effects, and create your own Superman text effect in Illustrator in a matter of seconds. The illustration comic styles are fully vector text effects, so you can resize them without losing quality.
Want to Learn More Illustrator Text Effects?
Check out the following Illustrator text effect tutorials:

 New Course: Create an Isometric Text Effect in Adobe Illustrator


 How to Create a Wrapped Ribbon Text Effect in Adobe Illustrator


 How to Create a Cool Cut-Out Text Effect in Illustrator
 How to Create an Isometric Text Effect in Adobe Illustrator
 How to Create a Russian Text Effect in Adobe Illustrator


 How to Create a Spain-Inspired Text Effect in Adobe Illustrator
 How to Create a Coconut Text Effect in Adobe Illustrator
 How to Make a Tentacle Art Brush in Adobe Illustrator
 How to Create a Spanish 3D Text Effect in Adobe Illustrator
 How to Create a Cool Bubble Font Text Effect
Original Link: https://design.tutsplus.com/tutorials/how-to-create-a-comic-book-text-effect-in-illustrator--cms-34746
TutsPlus - Design
More About this Source Visit TutsPlus - Design