
An Interest In:
Web News this Week
- April 2, 2024
- April 1, 2024
- March 31, 2024
- March 30, 2024
- March 29, 2024
- March 28, 2024
- March 27, 2024
Some of Our Sources
- Engadget
- Mashable
- Team Treehouse
- Smashing Magazine
- Crazy Leaf Design
- My Ink Blog
- Line 25
- Design Modo
- Hashedout
- TechPowerUp
Help Webnuz
Referal links:
Quick and Easy Authentication with Supabase
Supabase is an open source Firebase alternative that provides all of your backend services for your projects. You can use any of its services independently from each other. Today we'll explore how to integrate Authentication for our React applications.
This post is written based on the sample project: Social Providers which I've personally built to experiment with Supabase Authentication.
Before we dive in, let's discuss why do we need an authentication system?
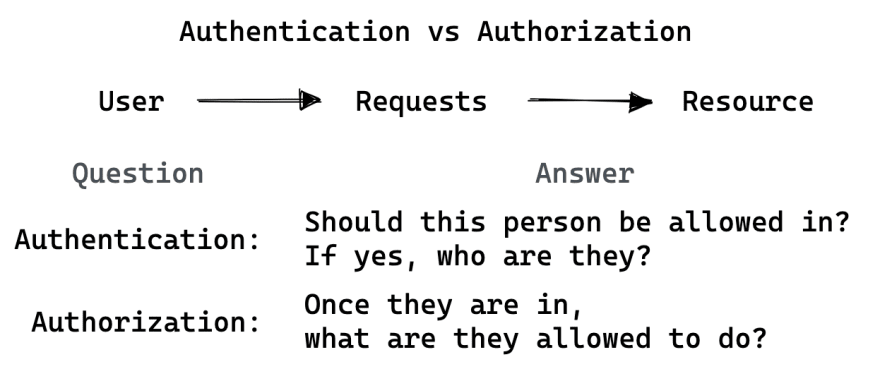
Authentication vs. Authorization
At the most fundamental level, when a User requests a resource from our website or application (this can be as simple as visiting a page), we need to know (a) who this person is and (b) what are we going to allow them to do? In a nutshell, that is the difference between authentication and authorization.
Broadly speaking, we can/should determine what our users can do based on who they are, and the easiest way to achieve that is by implementing an authentication service to help us with part of the process. Therefore, I wanted to give Supabase Authentication a shot using its support for Social Providers in a React application built using Next.js.
Getting started with Supabase
First thing is first. Once we have our application ready. We only need one dependency, installed by the following command: npm i @supabase/supabase-js. Then you need to initialize a new Supabase client using the createClient() method.
You need to pass in two parameters: (1) your Supabase Url and (2) your Supabase Key. I've extracted this to a separate file:
import { createClient } from "@supabase/supabase-js";export default createClient( `${process.env.NEXT_PUBLIC_SUPABASE_PROJECT_URL}`, `${process.env.NEXT_PUBLIC_SUPABASE_API_KEY}`);Signing up users
By default, Supabase uses third-party OAuth providers using the signIn() method. The method gives you access to a user, session, and error object. Here's the code you'll need for that:
const { user, session, error } = await supabase.auth.signIn({ // provider can be 'github', 'google', 'gitlab', and more provider: 'github'})Additionally, if you would like to redirect users to a /welcome page, you can pass in a second parameter type object to the signIn() method containing the url: { redirectTo: '/' }.
You can take a look at the demo project: Social Providers to see how I've set up this.
Using React and Supabase
In the sample project, I've added a button with an onClick function that handles the signIn() method like this:
<button onClick={() => auth("google")}> Continue with Google</button><button onClick={() => auth("github")}> Continue with Google</button>I've repurposed the function to change the provider depending on the authentication option that the user clicks. The handler function looks like this:
/* I've chosen not to add the user, session and error objects for simplicity */const auth = async (provider: Provider) => { await supabase.auth.signIn({ provider: `${provider}`, });};Once the user has successfully authenticated, they will get redirected to either the URL configured within Supabase as your project's URL OR the one configured in your signIn() method.
To capture and load the user information, I've added a handler function using the user() method that gathers the information for our application and store it in state:
useEffect(() => { const getUser = () => { const supabaseUser = supabase.auth.user(); setUser(supabaseUser); }; window.addEventListener("hashchange", function () { getUser(); }); getUser();}, [user]);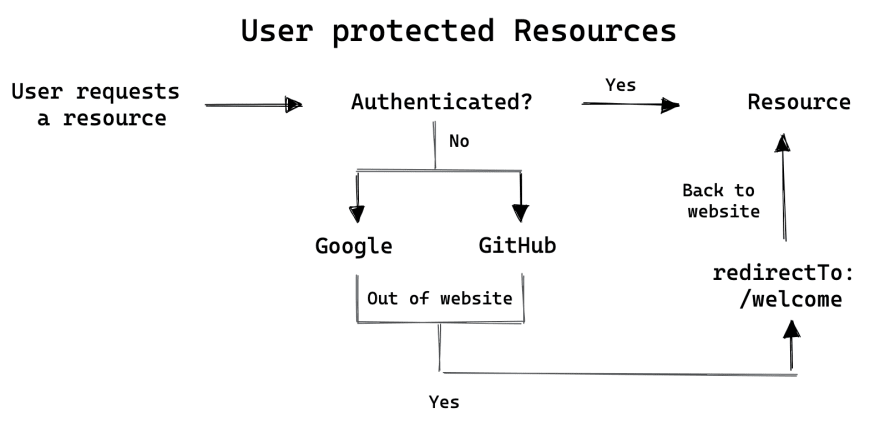
So what are they using?
It depends on the Authentication service and provider. The sample project is using Supabase to handle authentication and surprisingly enough it captures very little information regarding the User compared to other authentication services. Here is an example of what the user_metadata object would look like:
{ avatar_url: "https://avatars.githubusercontent.com/u/{..}", email: "[email protected]", email_verified: true, full_name: "Hector Sosa", iss: "https://api.github.com", name: "Hector Sosa", preferred_username: "ekqt", provider_id: "{...}", sub: "{...}", user_name: "ekqt",}Conclusion
There are many authentication services out there. It's best to experiment, see how well they integrate with your application, how good of a developer experience they are for you and see what fits best with your project needs.
Some of the most popular solutions out there are: Google's Firebase, Auth0, Next-Auth , Magic so give their docs a look and happy authenticating!
Original Link: https://dev.to/ekqt/quick-and-easy-authentication-with-supabase-35a5
Dev To
More About this Source Visit Dev To