
An Interest In:
Web News this Week
- April 23, 2024
- April 22, 2024
- April 21, 2024
- April 20, 2024
- April 19, 2024
- April 18, 2024
- April 17, 2024
Some of Our Sources
- BoingBoing
- Simplebits
- Web Designer Wall
- Smashing Apps
- TutsPlus - Design
- CSS Globe
- Stylized Web
- Design Modo
- Hashedout
- TechPowerUp
Help Webnuz
Referal links:
Adding Two-Factor Authentication Layer To Appsmith Using TypingDNA
This article is a detailed guide on adding a layer of protection to your Appsmith applications, using TypingDNA to prevent malicious sign-in attempts into your applications.
Two-factor authentication comes in many folds, and you most likely have had to validate your sign-in using an OTP (one-time-passphrase) sent via SMS or perhaps via email. All of these classify as two-factor authentication since they add one extra level of protection to resources on the web. This article will look at a "not so common" way of adding two-factor authentication to Appsmith applications.
What is TypingDNA?

TypingDNA provides behavioral typing biometrics authentication using sophisticated machine learning algorithms to monitor and verify end-users based on their "typing pattern." Using TypingDNA, we can "recognize" users by how they type.
TypingDNA monitors the typing pattern of whoever is trying to log into a system and can tell whether or not it's the same user trying to log in or if the user is being impersonated by observing their unique typing pattern.
This authentication method makes for an excellent 2FA option since we can pick bad heads right from when they're typing in to get access to our application. It's also cheaper to implement than regular 2FA that involves SMS (which, as you can imagine, would involve SMS charges).
Table of Contents
- Getting Started With TypingDNA
- Pre-requisites
- Building A Backend Server Using Flask and Heroku
- Interfacing With Appsmith
- Testing
- Conclusion
Getting Started With TypingDNA
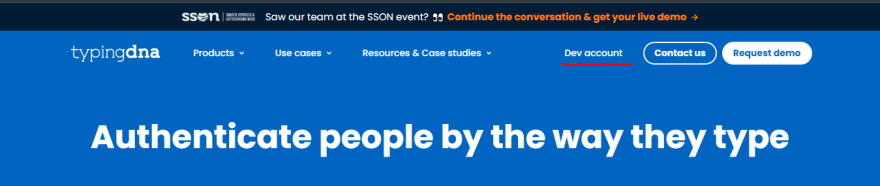
To use the functionalities that TypingDNA provides, we must first create an account with them and retrieve access keys that will allow us to interact with the TypingDNA API. To sign up for a new account, simply head to the TypingDNA website and click on the Dev Account option.
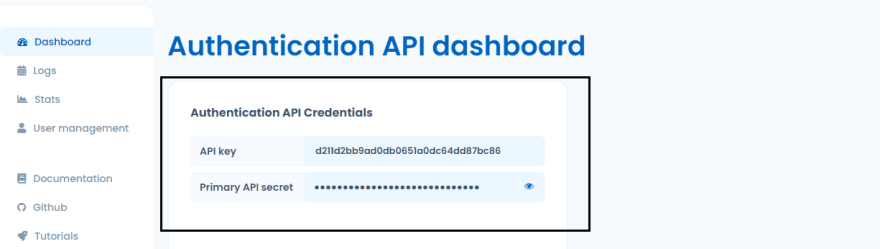
Once you're all set up, log in to your dashboard, and take note of the Authentication API Credentials section, which contains essential keys that we will be using in the following sections to interact with the TypingDNA API.
For demonstration, we will build a simple authentication flow that involves sign-up, sign-in, and the second layer of authentication using TypingDNA on a simple dashboard built on Appsmith.
More specifically, a user, who is logged into the platform, has to take the typing biometrics test before they are allowed to be logged onto the platform.
TypingDNA provides two effective options for typing pattern matching:
Same Text: this option allows us to verify how the user types given that they type the same text each time they try to authenticate, as opposed to just generally observing their typing pattern across different texts. An example would be to monitor their typing pattern as they type their email and password (which is unique) and would be the same for every login attempt they make. Pattern matching over the same text allows for even more streamlined authentication wherever it is possible to use it. So when a user's typing pattern is first "enrolled" with TypingDNA using this option, their subsequent typing patterns are checked against their typing pattern for the same text, so trying to log in with an unrecognized credential would fail.
Any text: with this option the user's typing pattern is observed as they type various kinds of texts, and is not particular to any kind of text (as is the case with SameText). Here the text used to enroll a user's typing pattern need not be the same as their subsequent typing patters for authentication.
For demonstration in this article, we will be using the SameText option to verify users' typing patterns by observing how they type in their "email" and "password."
Pre-requisites
To follow along with this guide, you will need to have the following set up:
Python3: Working python installation of versions below v3.9 .
TypinDNA account: You need to create a TypingDNA account to be able to interact with its API - look at the previous section for instructions on how to do this.
Appsmith account: You can create an account with appsmith via this link
Heroku account and CLI: You will also need to have an account with Heroku, which is where we'd be deploying the backend server to, as well as its command line interface tool. You can sign up for a free account via this link. Follow these instructions to install the heroku cli tool
Building A Backend Server Using Flask and Heroku
We'll start by creating a new folder to host our backend application; you can call this whatever you want - mine is called demo. Navigate to this folder from the terminal and create the following files
app.py: this is where we will write all of our server's code including things like route declaration, and configuration of the server.Procfile: the Procfile is a requirement for deploying applications to Heroku, and we will be making some specifications about the kind of application we want to deploy inside of it.models.py: here is where we'll be defining database models for our backend application.sendtp.py: this file contains a helper function that sends requests to TypingDNA API on our behalf.runtime.txt: this file holds specification for the version of python that we want Heroku to use in running our application in the cloud.
We'll also add two subfolders inside of the project directory templates and static. The templates folder will hold HTML files and the staic folder will contain script files essential to the operation of the server. Inside of the templates subfolder create the following:
index.html: this file will contain a simple form, that will help us record the user's typing pattern once they type inside of it, and is served by the backend server inapp.py. It will be displayed whenever the user tries to login to the Appsmith application.404.html: this file is displayed whenever we can't find a certain resource on our server. Its purpose will be made apparent in the later parts of this tutorial.
Next, we have the static sub-folder which contains javascript files as follows:
typing-visualizer.js: from TypingDNA this file is a dependency for certain UI interactions on the typing biometrics form. Copy and paste the code for this file from hereautocomplete-disabler.js: from TypingDNA, this file disables autocomplete on the typing biometrics form, because we of course always want to record the users typing pattern and using autocomplete defeats that purpose, which is why this is important. Copy and paste the code for this file from heretypingdna.js: from TypingDNA, this file is the main dependency for this project, and actually contains the typing pattern recorder as well as other methods that make typingDNA work on the form. Copy and paste the code for this file from hereindex.js: in this file is where we will make use of these dependencies to make our form interactive, and use it to record typind patterns and send them to our server to process and send to TypingDNA API.
after doing this your project folder should look like the following:
core/|__templates/| -index.html| -404.html|__static/| -typing-visualizer.js| -autocomplete-disabler.js| -typingdna.js| -index.js|__app.py|__models.py|__sendtp.py|__Procfile|__runtime.txtWhile we're in this folder from the terminal, let's create a new virtual environment using the python package virtualenv
virtualenv envOnce this is done, activate the virtual environment as follows:
source server/bin/activateor if you're on windows:
.\server\scripts\activateOnce you do this you should see your current file path on the terminal prefixed with the name of the virtual environment in parentheses.

The next thing we want to do is to install a number of python dependencies for this project, and we can do that from the terminal using the pip package manger as follows:
pip install flask flask-sqlalchemy psycopg2 gunicorn flask-corsThis will install all of the libraries we've listed out in order. Once they're installed, we can begin to add some code for our server inside the app.py file. Open the file and add the following lines of code to it.
from flask import Flask, render_template, requestfrom flask_sqlalchemy import SQLAlchemyfrom sqlalchemy.exc import IntegrityErrorfrom werkzeug.security import check_password_hashfrom flask_cors import CORSfrom sendtp import send_typing_dataimport osbase_dir = os.path.abspath(os.getcwd())app = Flask(__name__)app.config['SQLALCHEMY_DATABASE_URI'] = f"sqlite:///{base_dir}/database.db"app.config['SQLALCHEMY_TRACK_MODIFICATIONS'] = Falseapp.config['SECRET_KEY'] = os.getenv('secret')CORS(app)db = SQLAlchemy(app)from models import *db.create_all()@app.route('/sign-up', methods=['POST'])def register(): data = request.get_json(force=True) new_user = User(data) try: db.session.add(new_user) db.session.commit() resp = { 'status': 'success', 'msg': 'user created successfully' }, 201 except IntegrityError: resp = { 'status': 'error', 'msg': 'User with email {} already exists'.format(data['email']) }, 400 return resp@app.route('/sign-in', methods=['POST'])def login(): data = request.get_json(force=True) # find user user = User.query.filter_by(email=data['email']).first() if not user: return { 'status': 'error', 'msg': f"No user with email {data['email']}" }, 400 if not check_password_hash(user.password, data['password']): return { 'status': 'error', 'msg': f"Password incorrect" }, 401 return { 'status': 'success', 'msg': 'Logged in successful' }, 200@app.route('/sendtypingdata', methods=['POST'])def sendtypingdata(): data = request.get_json(force=True) res = send_typing_data(data['user_tid'], data['pattern']) return res@app.route('/2fa/<email>')def twofa(email): # find user with email user = User.query.filter_by(email=email).first() if user: return render_template('index.html', user_tid=user.typing_id) else: return render_template('404.html', email=email)if __name__ == '__main__': app.run()Here we have declared four routes, including the ones for sign-up and sign-in, as well as the /sendtypingdata route which simnply sends a request to TypingDNA using the helper function in sendtp.py file which we will see in a moment.
The other important route in this is the 2fa/<email> route - this route simply renders a page called index.html from the server and passes the user's typing id as a context variable to the page.
We will see why we need to do this in a moment, when we're building the Appsmith application.
Note : Implementing TypingDNA doesn't imply that we don't need regular authentication in our backend system, even though it is possible to use it that way. However, it is advised to use it as a second layer of authentication (2FA) after you must have first validated a user's login credentials from your server, which is why we, of course, still need to add sign-up/sign-in endpoints to our server as in the code snippet above.
Next we'll add the following to the models.py file to define the database model for a user.
from app import dbfrom werkzeug.security import generate_password_hashimport uuidclass User(db.Model): id = db.Column(db.Integer, primary_key=True, nullable=False) name = db.Column(db.String()) email = db.Column(db.String(100), unique=True) password = db.Column(db.String()) typing_id = db.Column(db.String(), default=str(uuid.uuid4())) def __init__(self, *args) -> None: super().__init__() if args: params = args[0] for key, val in params.items(): if key.lower() == 'password': setattr(self, key, str(generate_password_hash(str(val)))) else: setattr(self, key, val)Next, we'll add the code for the sendtp.py file which just contains a helper function that sends a request to TypingDNA on our behalf.
import urllib.requestimport base64import osimport jsonbase_url = 'https://api.typingdna.com'apiKey = os.getenv('tpkey')apiSecret = os.getenv('tpsecret')def send_typing_data(user_id, pattern):    authstring = f"{apiKey}:{apiSecret}"    base64string = base64.encodestring(        authstring.encode()).decode().replace('
', '')    data = urllib.parse.urlencode({'tp': pattern})    url = f'{base_url}/auto/{user_id}'    request = urllib.request.Request(url, data.encode('utf-8'), method='POST')    request.add_header("Authorization", f"Basic {base64string}")    request.add_header("Content-type", "application/x-www-form-urlencoded")    res = urllib.request.urlopen(request)    res_body = res.read()    return json.loads(res_body.decode('utf-8'))
This is the function that is called in the /sendtypingdata route from the code in the app.py file as shown below:
@app.route('/sendtypingdata', methods=['POST']) # code omitted for brevity # .. res = send_typing_data(data['user_tid'], data['pattern']) # ..The function takes in two arguments, a user's "typing id" and a the user's typing pattern. Every user is given a unique "typing id" upon signing up. This is done so that we can safely and uniquely match each typing pattern with the corresponding user.
So whenever we send a request to TypingDNA API to verify a user based on their typing pattern, we must send along this typing id that's associated with the user, that way TypingDNA can check to see if the pattern we're sending matches with the previously saved pattern for that particular "typing id", and if it does, we will get a positive response from the API, and we can then allow the user to access the application.
Building The Typing Biometrics Form
Let us now add the code for the typing biometrics form, which will contain two fields asking for email and password from the user who has just attempted to log in or is just signing up.
In the index.html file in the templates/ folder we created earlier on, add the following:
<!DOCTYPE html><html lang="en"><head> <meta charset="UTF-8"> <meta http-equiv="X-UA-Compatible" content="IE=edge"> <link rel="stylesheet" href="https://stackpath.bootstrapcdn.com/bootstrap/4.4.1/css/bootstrap.min.css" integrity="sha384-Vkoo8x4CGsO3+Hhxv8T/Q5PaXtkKtu6ug5TOeNV6gBiFeWPGFN9MuhOf23Q9Ifjh" crossorigin="anonymous" /> <link rel="stylesheet" href="https://stackpath.bootstrapcdn.com/font-awesome/4.7.0/css/font-awesome.min.css" crossorigin="anonymous" /> <meta name="viewport" content="width=device-width, initial-scale=1.0"> <script type="module" src="{{url_for('static', filename='index.js')}}"></script></head><body> <form id="typing-patterns-form" style="width:80%;margin:0 auto"> <h3 align="center">Typing Biometrics 2FA</h3> <p align="center">Please type your username and password again.</p> <div class="form-group"> <label for="email">Email Address</label> <input type="email" class="form-control disable-autocomplete" id="email" name="email" placeholder="Enter email" /> </div> <div class="form-group"> <label for="password">Password</label> <input type="password" class="form-control disable-autocomplete" id="password" name="password" placeholder="Enter password" /> </div> <br /> <button type="button" id="typing-patterns-btn" class="btn btn-primary"> Submit </button> </form> <input type="hidden" id="user_tid" value="{{ user_tid }}"> <script> var id = document.querySelector("#user_tid").value; console.log(id); localStorage.setItem('user_tid', id); </script></body></html>Observe that I have linked the index.js script to this HTML file at the top so that we can use the TypingDNA libraries to interact with the form on this page and record the user's typing pattern.
I have also embedded/stored the user's typing id from the server onto a hidden "input" tag and local storage; this will allow the user to reference the user's way of typing every time the user's typing pattern is being sent to the TypingDNA API.
Note: The index.html page is going to be loaded into an iframe on Appsmith and since it is being rendered from our server as opposed to Appsmith which is of a different domain, the localstorage of the iframe would be different from that of our Appsmith application, and we won't be able to store or retrieve anything from it using Appsmith store object. Which is why I am setting the localstorage from inside the index.html file which is on the same domain as my server, that way I can access it from within the iframe later on.
Next, add the following to the 404.html file:
<!DOCTYPE html><html lang="en"><head> <meta charset="UTF-8"> <meta http-equiv="X-UA-Compatible" content="IE=edge"> <meta name="viewport" content="width=device-width, initial-scale=1.0"> <title></title></head><body> <h1>NOT FOUND</h1> <p> user with email {{email}} was not found. </p></body></html>This is displayed whenever a user attempts to login with an email that hasn't been registered yet.
Next in the index.js add the following lines of code:
import { TypingDNA } from "./typingdna.js";import { AutocompleteDisabler } from "./autocomplete-disabler.js";const tdna = new TypingDNA();const autocompleteDisabler = new AutocompleteDisabler({ showTypingVisualizer: true, showTDNALogo: true,});autocompleteDisabler.disableAutocomplete();autocompleteDisabler.disableCopyPaste();const typingPatternsButton = document.getElementById("typing-patterns-btn");const email = document.getElementById("email");const password = document.getElementById("password");const id_obj = document.querySelector("#user_tid").value;const frm = document.getElementById('typing-patterns-form');var payload = {};typingPatternsButton.addEventListener("click", () => { const text = email.value + password.value; tdna.addTarget("email"); tdna.addTarget("password"); sendPattern(text);});function sendPattern(text){ const pattern = tdna.getTypingPattern({ type: 1, text: text }) if (id_obj.length > 0){ payload = {pattern: pattern, user_tid: id_obj}; } else { console.log(id_obj); console.log(id_obj.length); payload = {pattern: pattern, user_tid: localStorage.getItem('user_tid')}; } console.log(payload); fetch("/sendtypingdata", { method: "POST", headers: {"Content-Type": "application/json"}, credentials: 'include', body: JSON.stringify(payload) }) .then((response) => response.json()) .then((data) => { console.log(data); if (data.message_code == 10) { alert( "In order to verify your identity, you will be required to fill this form a couple of times." ); frm.reset(); } else { if (data.result == 1) { alert( "TypingDNA indicated that there was HIGH confidence in your login pattern" ); window.parent.postMessage('Verified', '*'); } else { alert( "TypingDNA indicated that there was LOW confidence in your login pattern" ); } } }); tdna.reset();}Here we take the inputs from the two fields and then concatenate the two strings into one and pass them to the TypingDNA.getTypingPattern() method. This method is responsible for recording the typing pattern of the user and takes in two arguments:
type: which specifies the type of pattern matching we want to use, which in this case is "SameText", we specify this using the value of 1 (for SameText), and 0 for "anyText" matching.
text: the typed string that we want the typing pattern for, which is .
This function generates the pattern in a data form that the TypingDNA API can understand. We then pass this pattern to our flask server on the "/sendtypingdata" endpoint, which utilizes the helper function in sendtp.py to send a request to TypingDNA to record and validate the user's typing pattern.
We also send the user's typing id, which can be retrieved from the hidden input tag on the form page or local storage.
Deploying To Heroku
The next thing we have to do is to deploy the server to Heroku, to do this we must make some specifications for the deployment first however. In the Procfile file, add the following:
web: gunicorn app:appThis tells Heroku how to run our application. Here, we have specified that to run our application Heroku needs to use the "gunicorn" command and use the name "app" to reference the target application, which is indeed called "app.py."
The Procfile deployment specification follows the format of
[process_type]: [command]The next thing is to specify the python version we want to use using the runtime.txt file. Head over to your cmd or terminal and type:
python --versionor
python3 --versionThis will show you the python version you currently have installed, and in my case, this is shown below:

Here it shows that I currently have python version 3.8.8 installed. It may or may not be different in your case, but you need to take note of the version number, so that we can use it to specify what version you want to use to deploy your application.
Important: Make sure you're using a python version lower than v3.9+. This is because one of the functions from a library used in the code snippet for sendtp.py has been deprecated in versions 3.9+. This is the
base64.encodestring()method, and has been deprecated in 3.9+, you can of course find a work around, but for the purposes of demonstration, we will just use the library as it is.
Head over to the runtime.txt and specify your python version as follows:
python-<your.version.number>Make sure to specify all the three version number components (major, minor, and patch), the letters are case sensitive and no spaces should be in between the version numbers. Once you're done your runtime specification, should look like the one shown below:
python-3.8.8Creating A Heroku Application
Once you have the Heroku cli tool installed, open up a new terminal and navigate to the project directory, and login using the command:
heroku loginThis would prompt you to open your browser and log you in from there, by the time its done you should be logged in from the terminal as well, you can now create a new heroku app as follows:
heroku create tpdemoI called mine tpdemo, you can give yours any name as well. Since Heroku doesn't allow shared names you might have to come up with a much cooler name than mine.
Another important thing we must do is to set some environment variables to hold our TypingDNA credentials from earlier. We can directly set environment variables into our Heroku application from the cli as follows:
heroku config:set <ENV_NAME>=<ENV_VALUE>Using this format, we must set two environment variables, which is required to send API requests to TypingDNA. Copy your TypingDNA "api key" and set it as the value to an environment variable called "tpkey", copy the "API secret" as well and set it as the value for an environment variable called "tpsecret".
heroku config:set tpkey=jheyu123****khd54***jhBefore we finally deploy we must tell Heroku, of the things it needs to install before running the application, and this is done using a requirements.txt file which Heroku will automatically look for during deployment.
We can easily append the requirements from our virtual environment using pip as follows:
pip freeze>requirements.txtThis will take all of the installed dependencies in our virtual environment and add them to a file called requirements.txt, so you should find that it created a new file for you by that name that has the following contents, or at least similar contents:
certifi==2021.10.8charset-normalizer==2.0.12click==8.0.4colorama==0.4.4Flask==2.0.3Flask-Cors==3.0.10Flask-SQLAlchemy==2.5.1greenlet==1.1.2gunicorn==20.1.0idna==3.3itsdangerous==2.1.1Jinja2==3.0.3MarkupSafe==2.1.1psycopg2==2.9.3PyYAML==6.0requests==2.27.1six==1.16.0SQLAlchemy==1.4.32urllib3==1.26.9Werkzeug==2.0.3To deploy the application, we will be using git, so head back to the terminal and initialize a git repository in the project folder using the init command, and then add and commit the changes to version control history.
Now we will add a remote origin for the Heroku application, so that we can push and in effect deploy the application from the terminal using git.
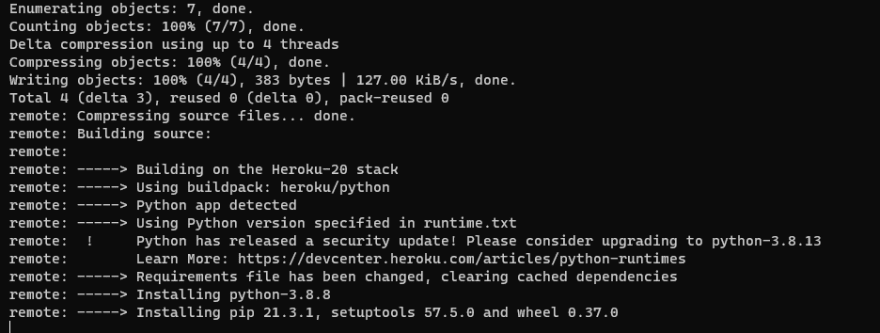
heroku git:remote -a <Your-heroku-app-name>This will create a private repository on heroku that your updates will be pushed to when you push your changes to Heroku. Now we can finally deploy our application by pushing the committed code as follows:
git push heroku mainThis would begin the deployment operation with logs similar to these:
Once its done it should give you a link to the application instance, this link is usually of the format: (your-app-name).herokuapp.com. Copy this link and paste it in a browser, and add any of the url prefix for any of the endpoints on the server like /sign-up for example
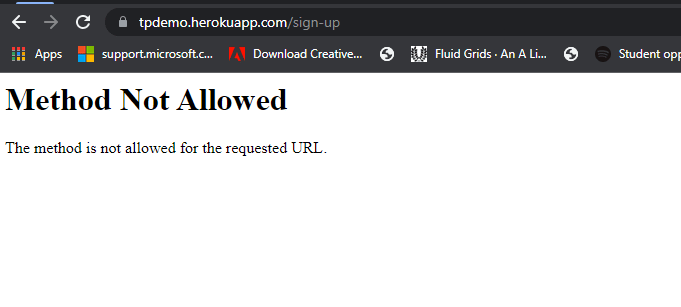
We see that the request goes through, and this is sign that the server is up and running and is accessible publicly. Now let's head over to appsmith and build the interface for our authentication.
Interfacing With Appsmith
To begin with you want to login to your Appsmith dashboard and create a new application, this should bring you to the development environment like the one shown below:
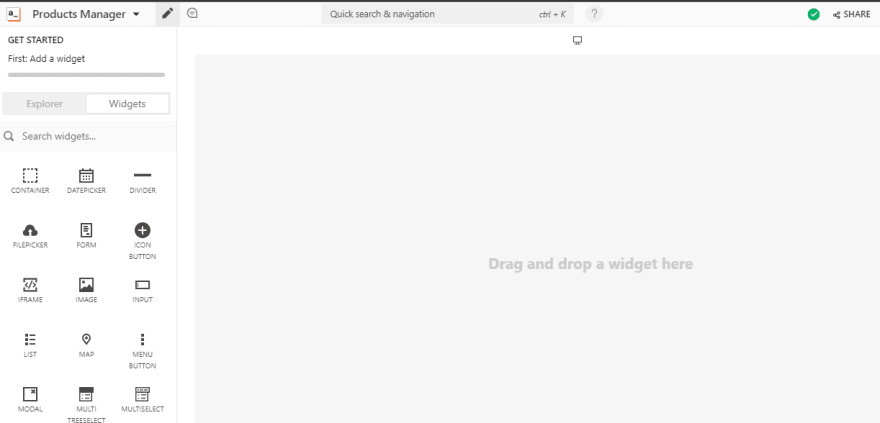
This environment is where we'd be building our "application," and it's mostly a drag and drops environment with widgets and other build tools on the left pane, and the broader space to the right is the development area where you drag widgets on.
Drag and drop a tab widget onto the right pane, and resize it to your taste. The tab widget has two tabs inside it by default called "Tab1" and "Tab2". We're going to be using them for the sign-up and sign-in interfaces, so rename them to "sign-up" and "sign-in" so that your tab widget looks like the one shown below:
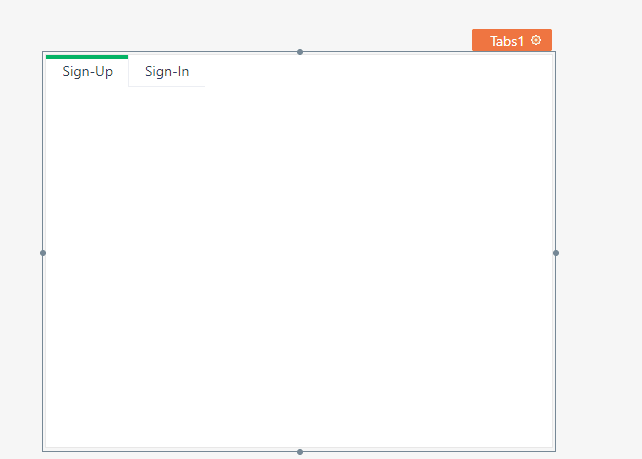
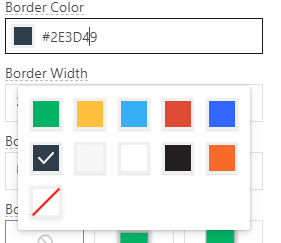
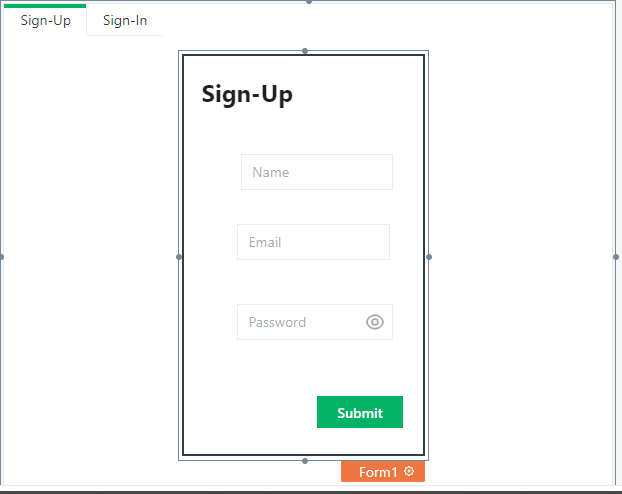
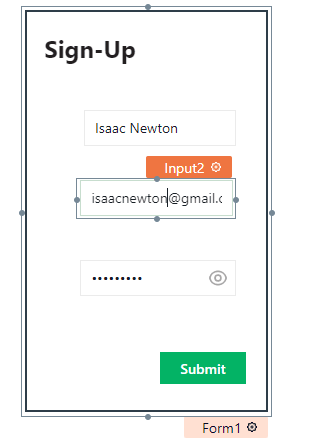
Next we will create a form using the form widget for the "sign-up" tab, this form will allow new users to sign-up for an account with the application just like every normal application. Remove one of the two buttons that come with the form, since we only need to use one button to submit a sign up. You can also adjust the "border color" as well as the "border width" of the form, to make it more visible.
Drag the form widget onto the sign-up tab. On the form widget we'll drag and drop input widgets onto it to collect the information we need for sign-up including Name, Email, and Password.
For each of these input widgets we can edit the properties using the settings option on each widget, on the right side of the window. Look for the option that says "Data Type" and change the data type for email and password input fields to "email" and "password" respectively.

Also use the placeholder property to set a placeholder text for each input field.
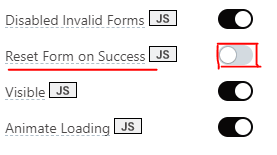
Set the "Reset Form on Success" property on the form submit button to false, by toggling the switch. This will allow us access the form data for further use after sign-up as we will later on see, when we add the iframe widget.
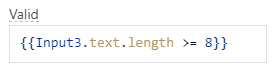
Lastly, we want to make sure that the length of the password entered is long enough, and we do this to make sure that TypingDNA has enough data to monitor. According to the TypingDNA documentation it is recommended that the total length of characters in both the email and password be 30 or more characters in length for "SameText" pattern matching. We can't control what the email length is, but we can with the password.
![]()
We can control this by using the "Valid" property on the input widget setting on the right side of the window. Inside this property we will write the following moustache syntax to specify that we want the length of whatever password is typed to be greater than or equal to 8.
{{Input3.text.length >= 8}}Add this inside the "Valid" option field, and it will automatically raise an error if the password is less than eight characters in length.
After all this is done your form should look something like the one below:
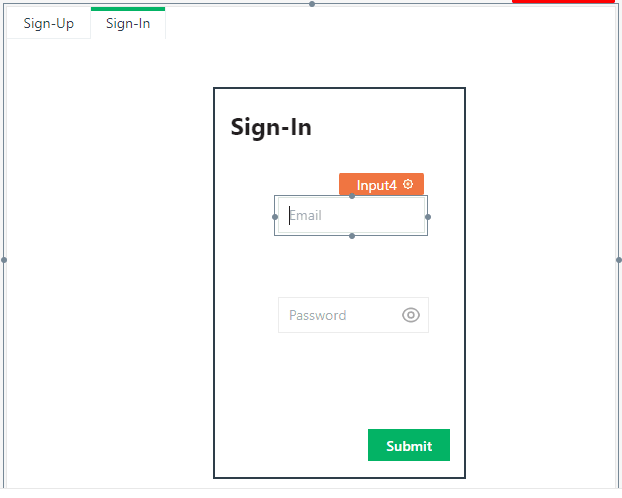
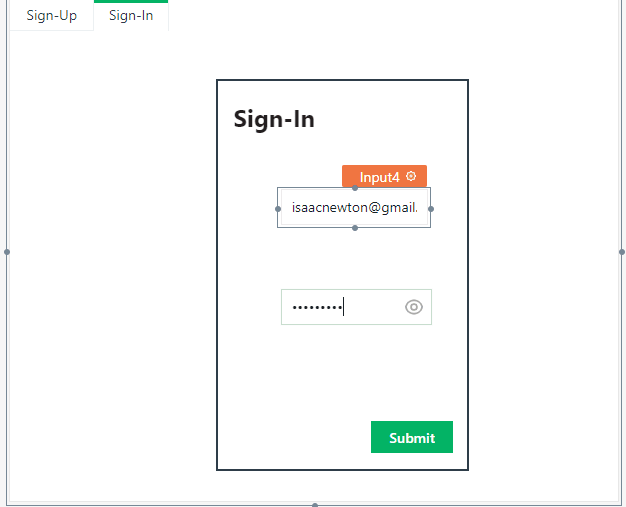
Click on the "sign-in" tab and create a sign in form with input fields for "email" and "password" only. Add similar properties for these fields as with the email and password from sign up form. Make sure to also set the "Reset Form on Success" property on the sign-in form submit button to false, by toggling the switch.
Adding Two-Factor Authentication Modal
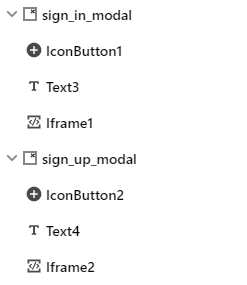
While you're still on the sign-in tab, drag another widget onto the drawing area - a modal widget. This widget is like a pop-up that will show up whenever a user has just finished signing up or is trying to login, inside of this modal is where we prompt them to take the Typing biometrics test. Remove the two buttons in the modal since we won't be using them.
Rename the modal to "sign_in_modal" we will use this name to reference it later on. Also change the title inside it to Typing Biomnetrics or anything you want really.
Inside of the modal we will now add an iframe widget which will load the typing biometrics form, and record their typing pattern. You may want to increase the size of your modal to fully accomodate the iframe widget, adjust it accordingly so that it looks like this:

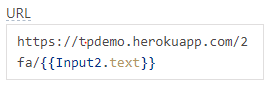
Modify the Iframe url to point to the Heroku server url instead on the /2fa/<email> endpoint. The part will come from whatever email the user typed into the email field which is why we disabled the form reset on submit earlier on. We can specify this using Appsmith's moustache syntax as follows:
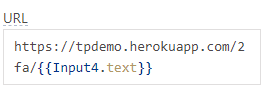
Input4 is the email field for the sign-in form which we're currently on.
Next we want to add an onMessageReceived handler to the iframe's properties. What this will help us do is to automatically redirect the user to the protected application once TypingDNA API verifies the typing pattern.
This is possible because in the index.js file we have also specified that the iframe send a message to the parent page (the page on which the iframe sits on ) once we get a positive feedback indicating a match with the user's typing pattern.
// code omitted for brevity// ..if (data.result == 1) { alert( "TypingDNA indicated that there was HIGH confidence in your login pattern" ); window.parent.postMessage('Verified', '*');}// ..Appsmith can listen for this message and we can setup a handler for when this event happens, or more specifically when the iframe sends a message. We do this using the onMessageReceived handler in the iframe's properties. Click on the dropdown and choose the option to
"navigate to" a different page.

Here I specified a page called "App" which we will create in a moment.
Once you're done with this head back to the sign-up tab and create a similar modal call this one "sign_up_modal", with its own iframe, and url set to your heroku url followed by the "/2fa/" route, for which the part of this route should correspond to the email typed into the email field on the sign-up form which in my case is "Input2.text".
Also add the same onMessageReceived handler for this iframe as with the first one. At the end you should have two modals in your widgets section as shown below:
Implementing Form Handlers On Appsmith
Let us now add some handlers for the sign-up and sign-in forms that we've just created. Head over to the explorer tab and under the Queries/js section click the plus icon to create a new query or javascript object. We will be creating two API objects and a javascript object in this case.

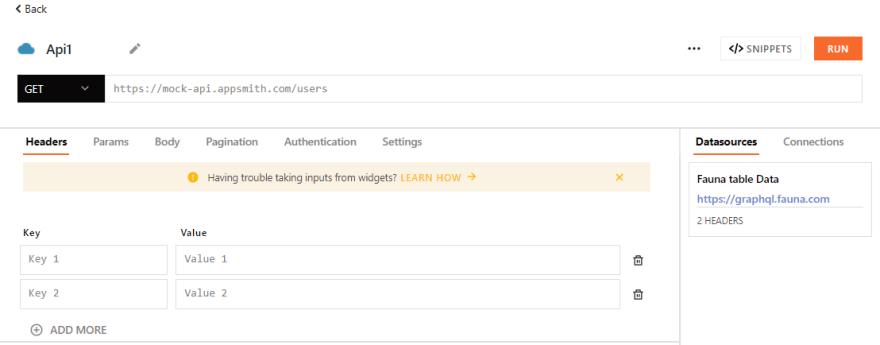
Select the "New Blank API" option to create a new API. It should take you to a new screen where you can edit the properties sof your API as shown below:
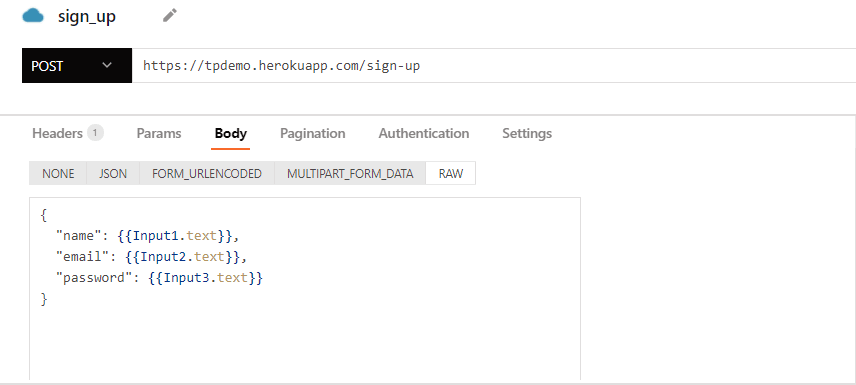
Edit the API name to "sign-up", and change the request type from "GET" to "POST", also paste in your Heroku url, and append the suffix route which is "/sign-up" as defined in our flask server. In the body of the request add following to create a payload that contains data from the sign-up form.
{ "name": {{Input1.text}}, "email": {{Input2.text}}, "password": {{Input3.text}}}Once you're done the API should look like mine below:
Create a second API, this time called "sign_in", with a "POST" request and the url should be /sign-in, similar to how it was with the sign-up API. The body for this request should be as follow:
{ "email": {{Input4.text}}, "password": {{Input5.text}}}Note: If for some reason your input fields aren't numbered in order like with mine, use the correct input widget labels for your case instead of the ones shown. For example if in the sign-in form, your password field is numbered as "inpur7", then you must use input7.text in your request body for the "password" value.
Finally head back to the "Queries/Js" section in the explorer pane again, but this time select the "New Js object" option from the options showed, to create a new javascript object.
This should bring you to an edit screen, where you can edit the code for your javascript object. Replace the default code snippets in there with the following:
export default { sign_up: async () => { return sign_up.run() .then(() => showModal('sign_up_modal')) .catch(e => showAlert(e.message, 'error')) }, sign_in: async () => { return sign_in.run() .then(() => showModal('sign_in_modal')) .catch(e => showAlert(e.message, 'error')) }}Inside this JS object, I have defined two functions "sign_up" and "sign_in", which just execute the APIs whenever either one is called, and if we get a positive response from the server it opens up the modal, where we can see the iframe that prompts us to take the typing biometrics test.
Notice that the sign_up function calls the "sign_up" and the "sign_in" function calls the "sign_in" API as well, each one opens up its own modal using the names we gave them earlier on, accordingly also.
Head back to the sign-up form and click on the "submit" button to bring up its widget properties on the right pane. Navigate to the "onClick" option and from the list of options under it choose "Execute a JS Function", choose the "sign_up" function from the subsequent drop downs displayed.

Click on the sign-in tab and on the submit button for the sign-in form there, choose to "Execute a JS Function" as well, but this time select the "sign_in" function for the sign_in button instead.
Adding a protected page
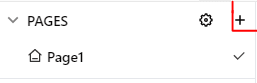
One last thing we must do before we test this, is to add a new page which we will redirect the user to after a successful login, this is in effect the "protected" page that requires successful authentication before it can be accessed.
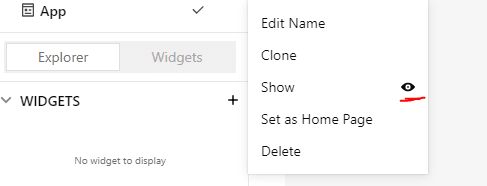
Head over to the "pages" section and click the plus icon to create a new page, and rename it to "App". Since we have already added that to the onMessageReceived handler on the iframe earlier on.
On this new page, you can create anything you want, since the dashboard isn't the focus of this tutorial. I made a simple dashboard UI (supposedly), thats shown below:
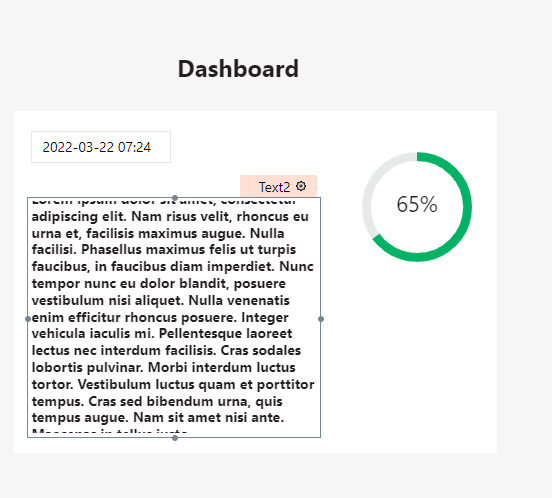
We also want to make sure that we hide the page by default so that when we deploy the application its not visible unless users are navigated to it from completing authentication.
Testing
Finally lets test the authentication flow. Head back to the sign-up form and create a new user.
Once we press the sign-up button, the 2FA modal shows up and shows us the TypingDNA biometrics test

Here, the user will be prompted to type his login credentials again. Still, this time not to validate the details that the backend server had already done, and the two-factor modal wouldn't even show up if any of the login credentials were incorrect.
This time, the user types their credentials for TypingDNA to record and save their typing pattern. We're using the "SameText" pattern matching, which observes a typing pattern for a specific text, the user's login credentials, not just any text. The user could even make mistakes while typing these, and it won't matter because TypingDNA is only observing the user's typing pattern at this point.
So we will type in our login credentials into this form as well and submit it.
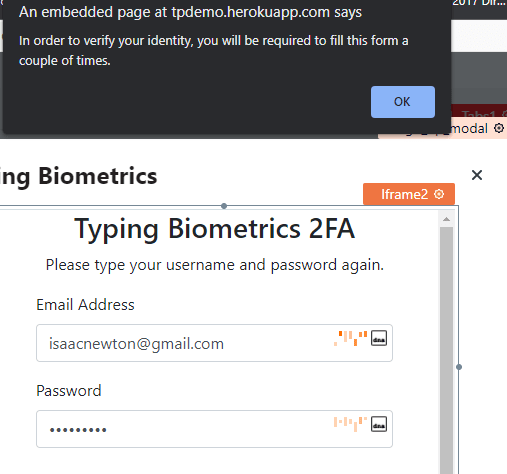
After our first submission, we get a prompt telling us that TypingDNA needs to observe our pattern some more, to properly identify the user's typing pattern. This is because the user has just signed up, as such TypingDNA can tell using the user's typing id that this user's typing pattern hasn't been recorded yet, and it tries to record and save it by asking the user to fill the form a couple of times.
According to the TypingDNA documentation, first time pattern recording can require up to 3 or 4 additonal submissions asides the first one. We want to also make sure to type as naturally as possible to avoid having to fill the typing biometrics form for longer.

Eventually, on the third or fourth round we get the prompt letting us know that TypingDNA has recorded and verified the user's typing pattern. Click the "Ok" on the alert and it will redirect you to the application.
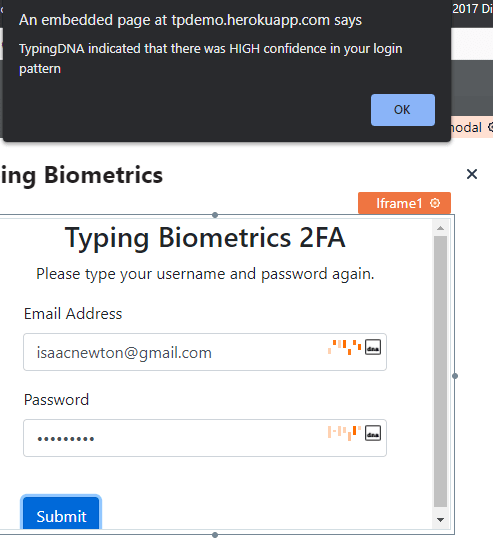
Let us also try to sign-in to the application from the sign-in tab, using the details of the user we just created, and see how TypingDNA responds.
The prompt shows up once again, however this time the test immediately recognizes the user's typing pattern since it has recorded it by observing the user's typing pattern over multiple submissions.
Conclusion
This has been quite the run. In this article, we have covered some details about what two-factor authentication is and a brief overview of TypingDNA. We then built a simple authentication flow using Flask and TypingDNA to add an extra layer of protection to a sample Appsmith application. The example used in this article is a relatively simple one, and this model could be adapted to whatever kind of application you plan to build using Appsmith in the future; whether they be slightly more sophisticated than this or even much more complex, you can be sure that you can make it work using the things you've learned from this tutorial.
The code for this application can be found on my GitHub
here
Original Link: https://dev.to/appsmith/adding-two-factor-authentication-layer-to-appsmith-using-typingdna-3lpa
Dev To
More About this Source Visit Dev To