
An Interest In:
Web News this Week
- April 27, 2024
- April 26, 2024
- April 25, 2024
- April 24, 2024
- April 23, 2024
- April 22, 2024
- April 21, 2024
Some of Our Sources
- TutsPlus - Code
- Pearsonified
- The Logo Smith
- Smashing Magazine
- Vandelay Design
- You The Designer
- FanExtra - PSD
- My Ink Blog
- CSS Globe
- 24 Ways
Help Webnuz
Referal links:
Implement Quick Blog Comments in VueJS
Blogs share information via written pieces of content. Blog comments can drive engagement or solicit feedback depending on the content domain.
This post teaches how to add a comment section to blog posts. We will be able to add, view, edit, and delete each comment. Also important to note is that we dont need a custom backend server to implement this feature.
For the complete source code, check out this GitHub repository.
This project is completed and written in Vue.js. Vue is an open-source JavaScript front-end framework for building user interfaces and single-page applications with HTML, CSS, and JavaScript.
View the final product and see the finished look
Prerequisites
To complete the tutorial, you need the following:
- Basic JavaScript knowledge
- Install Docker Desktop on your local machine. Run this command
docker -vto confirm if you have it installed; otherwise, install it through the docker products page - Knowledge of Vue.js
- A locally running Appwrite instance. Follow this documentation to install it.
Appwrite is an open-source backend-as-a-service platform that allows developers to build modern backend APIs faster. Appwrite abstracts the complexities involved with building and managing complex backend services. We dont require a custom server for this project, and we focus on building the interface.
Getting Started with Vue
We use the Vue CLI terminal command to scaffold a new project having Vue 3, Babel, and ESLint.
vue create blog-commentsAfter installation, we change the directory and start a local development server on localhost:8080 using:
cd blog-comments && yarn serve# orcd blog-comments && npm run serveCreating a blog page
We import the src/components/Blog.vue component in the App.vue file in the project folder.
components/Blog.vue
https://gist.github.com/Chuloo/68921c6b9729ca2da7ee03fab1dab60c
The code above gives us a page containing a text body, post title, and publisher name, which occurs with the stored blog data as state variables in vue.
We also added scoped styles using the <style> tags for the component.
Next, we import the Blog component to the root component App.vue.
<template> <div class="container"> <Blog /> </div> </template> <script> import Blog from '@/components/Blog.vue'; export default { name: 'App', components: { Blog, }; </script> <style> [component styles go in here] </style>Heres the complete code snippet of the home page.
https://gist.github.com/Chuloo/c6d23d0b7503228b553df180067c2e43
The blog comments page looks like this now:

Creating the comment input forms
Next, we create input fields with which readers can enter comments.
In the components folder, we create a new file, AddComment.vue, with the following content:
<template> <div class="form"> <form> <div class="form__group"> <label>Leave a comment</label> <textarea v-model="newComment" rows="10" required cols="50" placeholder="type in your comment" /> <button>Submit</button> </div> </form> </div> </template> <script> export default { data() { return { newComment: '', }; }, }; </script> <style scoped> .form { margin-top: 1.5em; } label { display: block; margin-bottom: 1em; font-weight: 700; font-family: Padauk, sans-serif; } textarea { width: 100%; margin-top: 0.5em; } button { border: unset; background: #79b791; color: #230c0f; font-weight: 700; padding: 1em 2.5em; margin-top: 1em; } </style>The code above has a data property newComment set to an empty string. This property is bound to the <textarea> field using the v-model directive.
With this in place, let's import the AddComment component into the App.vue component with the following code:
<template> <div class="container"> <Blog /> <!-- add this --> <add-comment /> </div> </template> <script> // other import component import AddComment from '@/components/AddComment.vue'; // add this export default { name: 'App', components: { // blog component AddComment // add this }; </script> <style> /* styles for the page */ </style>The result of the blog should look like this:

Next, we will list all comments created under a post. We will also include options to update or delete a comment.
We create a file, Comment.vue, in the components folder with the following content:
<template> <div class="comment"> <div class="comment__flex"> <p>I found this article helpful</p> <div class="comment__flex-btn"> <button class="update">Update</button> <button class="del">Delete</button> </div> </div> </div> </template> <style> [Styles go in here] </style>You can see the complete component with styles in this gist.
https://gist.github.com/Chuloo/0edc8d42d8c69221b6cac39eafa93204
Finally, let's include the Comment component in the App.vue file.
<template> <div class="container"> <Blog /> <!-- add this --> <div class="comment-space"> <p>Comment (1)</p> </div> <div> <comment class="message" /> </div> <add-comment /> </div> </template> <script> // other import component import Comment from '@/components/Comment'; export default { name: 'App', components: { // other components Comment // add this }, }; </script>All the data on the page is static, and the page looks like the image below.

Next, well add interactivity to the page.
Appwrite project setup
To use Appwrite in this Vue application, we install the Appwrite client-side SDK with the command.
yarn add appwrite# ornpm install appwriteNext, let's set up the app by creating a new Appwrite project.
Create a new Appwrite Project
We click the Create Project button to start a new project on our Appwrite web console (either local or hosted).
After that, we obtain the Project ID and API Endpoint in the project's settings tab.
In the projects root directory, we create a utils.js file to define a new Appwrite instance and other helpful application variables.
import { Appwrite } from 'appwrite';// Init your Web SDKconst appwrite = new Appwrite();appwrite .setEndpoint('http://EndpointURL.example') // Replace this with your endpoint .setProject('ProjectID'); // Replace this with your ProjectIDappwrite.account.createAnonymousSession().then( (response) => { console.log(response); }, (error) => { console.log(error); });export const db = appwrite.database;export const COLLECTION_ID = 'COLLECTION ID'; // Replace with your Collection IDTo bypass some security requirements, we created an anonymous session on Appwrite.
Creating the database collection
Appwrite provides a functional database with which we will store our blog comments.
To create a collection in our Appwrite console panel, we navigate to the Database tab, click the Add Collection button, and provide a collection name. We copy the CollectionID as we require it to interact with the collection using the client-side SDK.
At the Collection Level within the settings tab, we set the Read and Write access to have the value of role:all.

Update the data in utils.js to include the Appwrite credentials obtained.
Finally, in the attributes tab, let's create the properties for our documents. For this application, we store the comment and date of each comment.

Fetch all comments
We require a function to fetch all comments when the app loads. We do this in the script portion of App.vue with:
<script> import { COLLECTION_ID, db } from '@/utils'; export default { name: 'App', components: { // all components }, created() { this.fetchComments(); }, data() { return { comments: [], }; }, methods: { fetchComments() { let promise = db.listDocuments(COLLECTION_ID); promise.then( (res) => { console.log(res); this.comments = res.documents; }, (err) => { console.log(err); } ); }, }, }; </script>We created the comments array in the data() function to store comments we retrieve using the listDocuments API.
In the created() lifecycle method, run the fetchComments() function when the App component is created.
We update the HTML in the <template> section of the App.vue component with the following.
<template> <div class="container"> <Blog /> <div class="comment-space"> <p> {{ comments.length > 1 ? `Comments (${comments.length})` : comments.length == 1 ? `Comment (${comments.length})` : '' }} </p> </div> <div v-for="data in comments" :key="data.comment"> <!-- comment component goes here --> </div> <add-comment :fetchComments="fetchComments" /> </div> </template>The <p> tag contains a ternary operator that shows the number of comments. Using the v-for directive, we loop through and render each comment.
To reuse the function to fetch all comments after creating a new comment, we bind the :fetchComments prop to the fetchComments method we defined earlier.
Creating a blog comment
We move to the AddComment.vue file to handle a comments addition to the database.
<template> <div class="form"> <form @submit.prevent="createNewComment"> <div class="form__group"> <label>Leave a comment</label> <textarea v-model="newComment" rows="10" required cols="50" placeholder="type in your comment" /> <button>Submit</button> </div> </form> </div> </template> <script> import { COLLECTION_ID, db } from '@/utils'; export default { props: ['fetchComments'], // data () methods: { createNewComment() { if (this.newComment === '') { return; } let promise = db.createDocument(COLLECTION_ID, 'unique()', { comment: this.newComment, date: new Date(), }); promise.then( () => { this.fetchComments(); this.newComment = ''; }, (err) => { console.log(err); } ); }, }, }; </script>In the createNewComment method, we use Appwrites createDocument API to write a new comment to the database. An error message is logged if the write operation fails. We fetch an updated list of all comments after adding a new comment.
The Appwrite web console will display one document representing a comment in the image below:

Updating the Comment list Component
In the App.vue component, we update the comment components props to include the comment data and the fetchComments method.
<template> <div class="container"> <-!-- Blog component --> <-!-- Comment count --> <div v-for="data in comments" :key="data.comment"> <-!-- add this --> <comment class="message" :data="data" v-on:refreshData="fetchComments" /> </div> <-!-- add-comment component --> </div> </template> <script> // import component import Comment from '@/components/Comment'; export default { components: { // other components Comment, }, }; </script>fetchComments runs once the refreshData event is fired.
Let's update the Comment.vue component to handle comment updates and deletion. We will also include a component to edit a comment. First, we add the update comment function in the script portion with:
<script> import { db } from '@/utils'; export default { props: ['data'], data() { return { open: false, displayedComment: '', }; }, methods: { updateComment() { this.open = !this.open; }, updateCommentMethod() { let promise = db.updateDocument(this.data.$collection, this.data.$id, { comment: this.displayedComment, }); this.open = false; promise.then( () => { this.$emit('refreshData'); }, (err) => { console.log(err); } ); }, }, }; </script>We added a state variable to manage the visibility of a comments action buttons and another variable to hold the new text. Appwrites updateDocument API uses the collection ID and document ID passed as props to update the comment. Once the comment is updated, we emit the refreshData event to fetch all comments.
We update the template portion to utilize the methods and variables created.
<template> <div class="comment"> <div class="comment__flex"> <p>{{ data.comment }}</p> <div class="comment__flex-btn"> <button class="update" @click="updateComment">Update</button> <button class="del" @click="deleteComment">Delete</button> </div> </div> <div v-if="this.open" class="open"> <form @submit.prevent="updateCommentMethod"> <div class="form-group"> <textarea cols="50" rows="10" id required :placeholder="data.comment" v-model="displayedComment" /> <button class="update">Update</button> </div> </form> </div> </div> </template>Lastly, we add a method to delete a comment using Appwrites deleteDocument API.
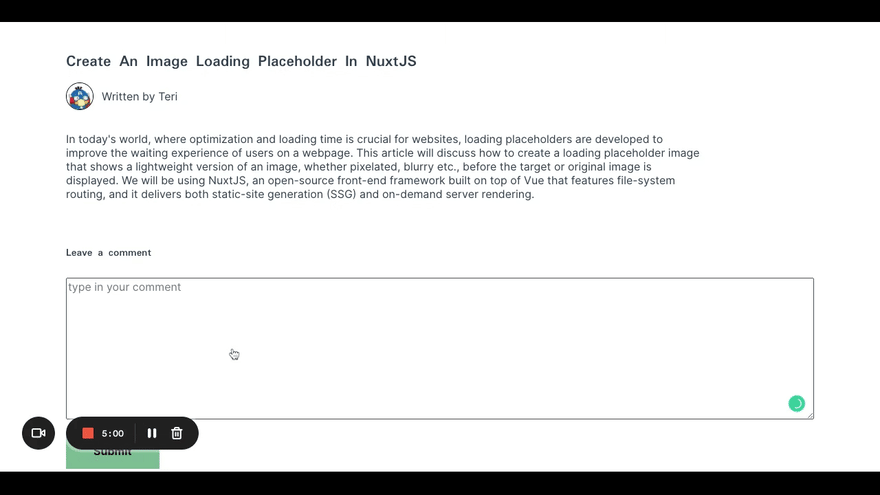
<script> export default { methods: { deleteComment() { let promise = db.deleteDocument(this.data.$collection, this.data.$id); promise.then( () => { this.$emit('refreshData'); }, (err) => { console.log('error occured', err); } ); }, } } </script>The image below is the final look of the web page.

Conclusion
This post is an in-depth guide on using Appwrite to create, display, edit, and delete blog comments. As seen, this feature doesnt require a custom backend server. Try to add more blog posts and create unique comments for each.
Learn More
Original Link: https://dev.to/hackmamba/implement-quick-blog-comments-in-vuejs-457j
Dev To
More About this Source Visit Dev To