
Some of Our Sources
- Slashdot
- Technology Review
- TutsPlus - Code
- Pearsonified
- TutsPlus - Design
- Inspiredology
- Noupe
- CSS Globe
- Stylized Web
- Specky Boy
Help Webnuz
Referal links:
From ISO to AMI - how to create your own custom AMI?
Why do we need custom AMI?
While it might be very simple to get an instance up and running in AWS, this instance might be not exactly what you have been looking for. Some files are already customized, several packages that you do not either want or need are installed and in some cases you'll want a clean kernel and not the AWS-provided version that is compatible with specific cloud tools only. So applying anything related to package updates on any other platform besides AWS will be like trying to start someone's car with your own key - it has the same functionality, but you cannot communicate with it.
You can always buy an AMI that someone prepared for such purposes. For those of us who like to do it the hard way and break their machine in the process there is an alternative way - create your own AMI from scratch.
After spending some time googling this particular task I sadly have found out that most of the tutorials are just copy-paste and do not lead to the desired goal. This is one that works. It might not be the best way or the shortest way, but it works.
What do we need?
- ISO of the distribution of your choice - I used Ubuntu 20.04 server.
- Virtual Box - there are many options to create a VM, chose your weapon according to your needs. I found Oracle VirtualBox to be the most suited for this task, I used 6.1.30 version.
- AWS account - you will need some extended privileges to create buckets, roles and policies.
- Configured
aws cli- if you have never used this tool, you can look up how to download it according to your distribution from this link. In order to use it you will need to create a pair of the access key ID and secret access key. Once you have it, runaws configurefrom your terminal and add your key ID and secret access key. The prompted region should match your working AWS region.
How to do it?
Step 1 - create a machine
- Download your favorite flavor of the ISO.
- Create a new machine in the Virtual Box and attach the ISO to it. Match the settings to your needs, my goal was to merely download and pack latest OS security patches, so the basic CPU and RAM did the job.
- Run the machine, install the distribution and set username and password. You will need them later!
- Either during the installation or afterwards install the
opensshpackage and enable the service. - If you want to connect to your future instance with a specific SSH key, import the public SSH key to the dedicated directory.
cdmkdir .sshtouch ./ssh/authorized_keysPaste you public SSH key in the authorized_keys file. Otherwise you will be able to connect to the instance only with the username and the password you have created for the VM.
- Stop the machine and convert it to OVA format.
- click on file --> export appliance --> chose your machine to export
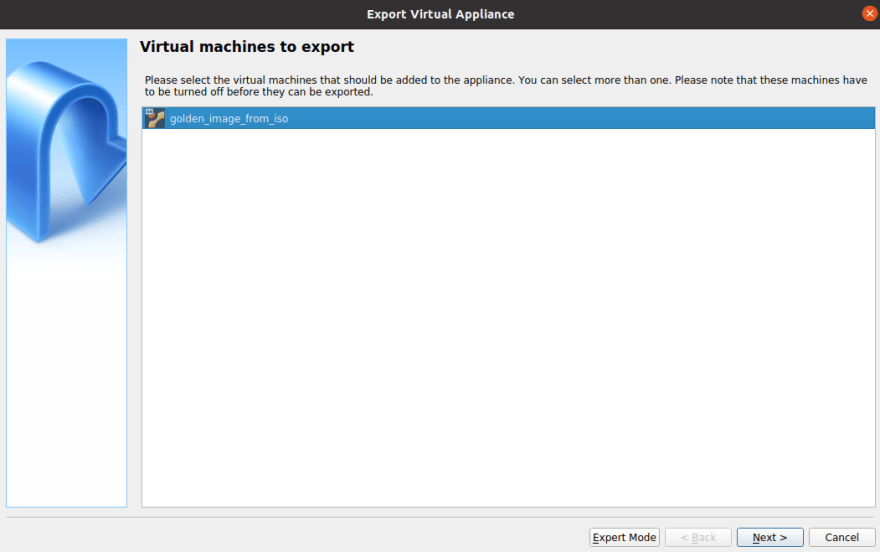 chose the destination to save OVA file
 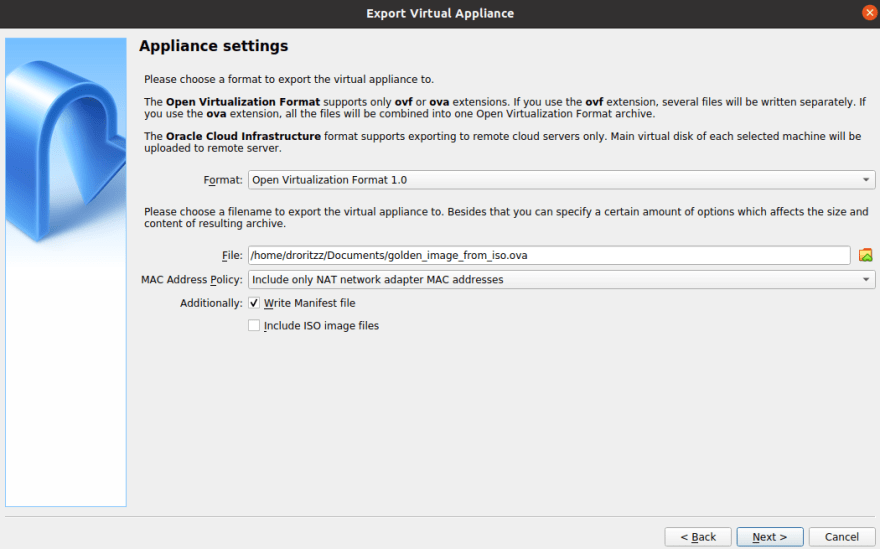 export
- click on file --> export appliance --> chose your machine to export
Step 2 - prepare AWS resources
- Go to your S3 storage and create a bucket and upload your OVA.
- Create a local directory with following files.
containers.json,role-policy.json,trust-policy.json.These files will define a role, a policy and parameters for your AMI conversion. - First setup a IAM role that will execute the conversion - vmimport. Edit
trust-policy.json:
{ "Version": "2012-10-17", "Statement": [ { "Effect": "Allow", "Principal": { "Service": "vmie.amazonaws.com" }, "Action": "sts:AssumeRole", "Condition": { "StringEquals":{ "sts:Externalid": "vmimport" } } } ]}- Then setup the policy for the role to use in the conversion process. Edit
role-policy.json, insert the name of your bucket, where the OVA is stored.
{ "Version":"2012-10-17", "Statement":[ { "Effect": "Allow", "Action": [ "s3:GetBucketLocation", "s3:GetObject", "s3:ListBucket" ], "Resource": [ "arn:aws:s3:::YOUR BUCKET", "arn:aws:s3:::YOUR BUCKET/*" ] }, { "Effect": "Allow", "Action": [ "s3:GetBucketLocation", "s3:GetObject", "s3:ListBucket", "s3:PutObject", "s3:GetBucketAcl" ], "Resource": [ "arn:aws:s3:::YOUR BUCKET", "arn:aws:s3:::YOUR BUCKET/*" ] }, { "Effect": "Allow", "Action": [ "ec2:ModifySnapshotAttribute", "ec2:CopySnapshot", "ec2:RegisterImage", "ec2:Describe*" ], "Resource": "*" } ]}- Now create the role. From your terminal run:
aws iam create-role --role-name vmimport --assume-role-policy-document "file://path/to/trust-policy.json"
- Afterwards attach the policy to it.
aws iam put-role-policy --role-name vmimport --policy-name vmimport --policy-document "file://path/to/role-policy.json"
- The last file you edit will reference the format of the image and the bucket.
containers.jsonreferences the command that will read from it and just contains all the information about your image - format, number of disks, bucket and the name (S3Key) of the image:
[ { "Description":"vm import", "Format":"ova", "UserBucket": { "S3Bucket": "YOUR BUCKET", "S3Key": "NAME OF YOUR IMAGE.ova"}}]- Start the process of conversion. Run this command from your terminal:
aws ec2 import-image --description "YOUR DESCRIPTION" --disk-containers "file://path/to/containers.json".
An output of the command will provide you with ami number, use it to check the process:
aws ec2 describe-import-image-tasks --import-task-ids import-ami-12345678
- When the process is completed your ami will be uploaded directly to your AMI directory.
Troubleshooting and aftermath
- Although it is possible to use another format of the images (vmdk, vhd), however I had no success with them. The format is important. There is a documentation for it, it might work for you.
- Another issue still needs checking - does it work for the distributions that are not supported by AWS by default.
Happy clouding!
Original Link: https://dev.to/otomato_io/from-iso-to-ami-how-to-create-your-own-custom-ami-5213
Dev To
More About this Source Visit Dev To