
Some of Our Sources
- Slashdot
- Just Creative
- Joshua Blankenship
- Vandelay Design
- Naldz Graphics
- Fudge Graphics
- Stylized Web
- Android Dissected
- Dev To
- TechPowerUp
Help Webnuz
Referal links:
Open Source Node.js Ecommerce Platform for Remix
Introduction
In this tutorial, you'll learn how to build a front-end UI for Medusa using Remix.
Medusa is an open source ecommerce platform in Node.js that provides you with many ecommerce features such as order management, RMA flows, customer management, and more. Medusa also focuses on providing a good developer experience allowing you to get started within minutes and with a strong support community and documentation to back it up.
Remix is a full-stack web framework that allows you to build slick user interfaces with a resilient user experience. It renders pages on the server, unlike most React frameworks.
For this tutorial, we'll only focus on the basics which include:
- Setting up the storefront layout
- Listing products
- Displaying a single product page with options
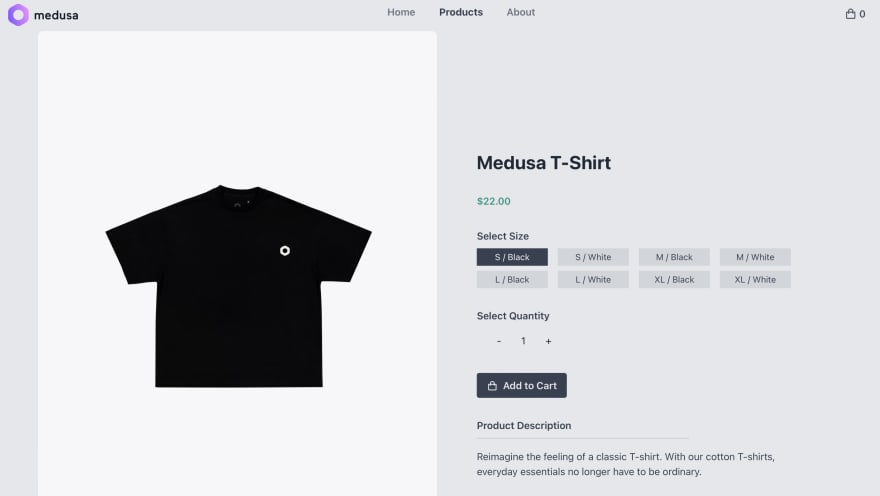
Below is a snapshot of what we'll be building:
You can find the complete project in this GitHub repository.
Prerequisites
This article is for intermediate to advanced React developers. You need to be familiar with the following:
Why Remix
Remix is a newer React framework that has been quickly gaining popularity in the last couple of years. It's been built by the authors of the popular React Router library.
For ecommerce, server-based frameworks are recommended in order to provide better search engine optimization capabilities, enhanced API security and faster dynamic pages for end users. Remix has a lot of key advantages including:
- It renders dynamic content really fast as content processing and third-party API calls are done on the server and not on the client
- It performs really well on slow networks such as 2G and 3G
- Remix websites work even if JavaScript is disabled in the browser
- Build times and performance are not affected by the size of the data
Why Medusa
Medusas headless architecture makes it easier to create a storefront with the language or framework of choice. Whether you choose Remix, Gatsby, Next.js, or any other framework, you can utilize Medusas APIs to create a storefront that has all main ecommerce capabilities.
You can also connect your Medusa server to the Medusa admin take full power over your ecommerce store. The Medusa admin allows store operators to manage products, orders, customers, discounts, and much more.
Medusa Server Setup
The first step in this tutorial is to set up a Medusa server where data storage and backend processing are handled. First, install the software locally as follows:
# Install Medusa CLInpm install -g @medusajs/medusa-cli# Create a new Medusa projectmedusa new my-medusa-store --seedThe --seed option adds dummy products to your store as well as some other configuration.
Set up Medusa Admin
As mentioned before, Medusa provides a strong admin interface that you can use to manage your store, products, orders, and much more! The admin is easy to install and use, however it is completely optional. So, if youre not interested in an admin you can skip to the next section.
In a separate directory, run the following command to install the admin:
git clone https://github.com/medusajs/admin medusa-adminThis will create a new directory medusa-admin. Change to that directory and install the dependencies:
npm installNow, run the Medusa server from the my-medusa-store directory:
npm startThen, run your Medusa admin from the medusa-admin directory:
npm run developIf you open localhost:7000 in your browser, youll see a login screen. The --seed option you used earlier when you created your Medusa store adds an admin user with the email [email protected] and password supersecret.
Then, from the sidebar, choose Products. Youll see the list of products available in your store and you can add a new product using the New Product button at the top right.

If you click New Product or you click on an existing product to edit it, youll be able to enter a lot of information about the product. Youll also be able to add variants, upload images, and much more.

Remix + Tailwind CSS Setup
In this section, youll quickly create a Remix project and set up Tailwind CSS for rapid UI styling. The UI wont be fully responsive for the sake of the simplicity of the tutorial.
Youll also use JavaScript to write the code, however, I highly recommend using TypeScript and a Test-Driven Development framework for real-world production frontends.
We can quickly create our Remix project as follows:
npx create-remix@latest remix-medusa-storefront? What type of app do you want to create? Just the basics? Where do you want to deploy? Remix App Server? TypeScript or JavaScript? JavaScript? Do you want me to run `npm install`? (Y/n) YAfter installation, navigate to the project folder via terminal and confirm that everything is working by executing the command npm run dev. Check to see that localhost:3000 is loading properly. If everything loads fine, kill the dev server before proceeding to the next step.
Next, with the help of the official Tailwind CSS Remix integration guide, set up Tailwind CSS in your remix-medusa-storefront project as follows:
Step 1: Install package dependencies
# Install Dev packagesnpm install -D tailwindcss postcss autoprefixer concurrently# Generate `tailwind.config.js` filenpx tailwindcss init -pStep 2: Update the content field in tailwind.config.js to configure the files used for Tailwind CSS purging process.
module.exports = { content: ["./app/**/*.{js,jsx}"], theme: { extend: {}, }, plugins: [],};Step 3: Change the dev and build scripts in package.json to add the CSS compilation steps:
"scripts": { ..., "build": "npm run build:css && remix build", "build:css": "tailwindcss -m -i ./styles/app.css -o app/styles/app.css", "dev": "concurrently \"npm run dev:css\" \"remix dev\"", "dev:css": "tailwindcss -w -i ./styles/app.css -o app/styles/app.css" },Step 4: Create the file ./styles/app.css at the root of the project with the following content:
@tailwind base;@tailwind components;@tailwind utilities;Step 5: Add this code to app/root.jsx to allow loading of Tailwind's compiled CSS onto the pages:
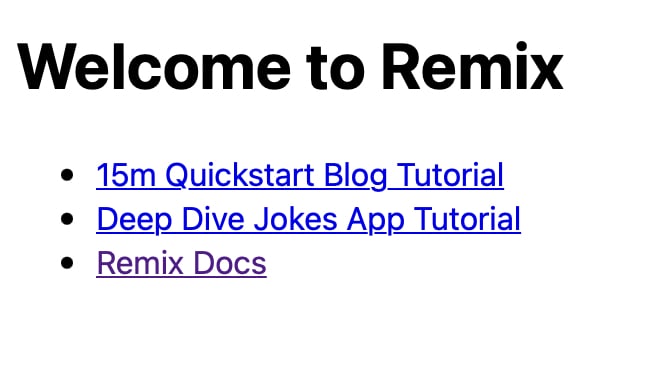
import styles from "~/styles/app.css";export function links() { return [{ rel: "stylesheet", href: styles }];}Step 6: Test your Tailwind CSS setup by replacing the code in app/routes/index.jsx with the following code:
export default function Index() { return ( <div className="container mx-auto mt-8"> <h1 className="text-3xl font-bold text-gray-700 underline"> Hello world! </h1> </div> ); }Execute npm run dev and confirm that Tailwind CSS styles are being loaded at the index page on localhost:3000/.

Do note that when you launch your project, whether in dev or build mode, the file /app/styles/app.css gets generated for you based on the source input of ./styles/app.css. Hence, you shouldn't touch the generated file when making CSS customizations.
Adding /app/styles/app.css to .gitignore is a good idea since the file will be generated during the deployment stage.
Site Layout
Now that you have successfully integrated Tailwind CSS in a working Remix project, you can proceed with setting up a basic layout for your Storefront. Create the app/layouts folder and create the following files inside this folder:
footer.jsxnavbar.jsxindex.jsx
In app/layouts/footer.jsx add the following code:
export default function Footer() { const currentYear = new Date().getFullYear(); return ( <div className="py-4 text-sm text-center text-gray-200 bg-gray-800"> © Copyright {currentYear} [Brand name]. All Rights Reserved </div> ); }This snippet simply displays copyright information in the current year.
For the Navbar, you need to display:
- Logo
- Navigation links
- Shopping cart icon
For the logo, you can include your own logo or you can copy this placeholder logo for now. Rename the filename to logo.svg and place it in the /public directory.
For navigation links, youll use [<NavLink>](https://remix.run/docs/en/v1/api/remix#navlink) which is a special kind <Link> that knows whether or not the page is the currently loaded page. Youll need to provide styling for .active CSS class to provide a visual indication.
For the shopping cart icon, youll simply import from the React Icons package. Install as follows:
npm install react-iconsWith the required resources now set up, you can now proceed with inserting the following code in app/layouts/navbar.jsx
import { Link, NavLink } from "@remix-run/react";import { BiShoppingBag } from "react-icons/bi";export default function Navbar() { const links = [ { label: "Home", url: "/", }, { label: "Products", url: "/products", }, { label: "About", url: "/about", }, ]; return ( <nav className="flex items-center justify-between px-8 pt-2"> {/* Site Logo */} <div className="font-mono text-3xl font-extrabold uppercase"> <Link to="/"> <img className="w-28" src="/logo.svg" alt="Medusa" /> </Link> </div> {/* Navigation Links */} <div className="space-x-4"> {links.map((link, index) => ( <NavLink key={index} to={link.url} className="navlink"> {link.label} </NavLink> ))} </div> {/* Shopping Cart Indicator/Checkout Link */} <div className="font-semibold text-gray-600 hover:text-emerald-500"> <NavLink to="/checkout" className="inline-flex items-center space-x-1 transition-colors duration-300" > <BiShoppingBag className="text-xl" /> <span>0</span> </NavLink> </div> </nav> );}Next, insert the following code in app/layouts/index.jsx which will be your main site layout:
import Footer from "./footer";import Navbar from "./navbar";export default function Layout({ children }) { return ( <> <header className="border-b"> <Navbar /> </header> <main className="container flex justify-center flex-grow mx-auto"> {children} </main> <Footer /> </> );}Add this code to ./styles/app.css after Tailwinds base styles to include your custom layout and navigation styles:
/*Layout styling*/html { @apply antialiased font-sans text-gray-800 bg-gray-200; } body { @apply flex flex-col min-h-screen overflow-x-hidden; } /* Typography styling */ h1 { @apply text-3xl font-bold; } h2 { @apply text-xl; } p { @apply text-gray-700; } /* Navigation menu styling */ .navlink { @apply inline-block w-20 py-2 font-semibold text-center text-gray-500 hover:text-emerald-500; } .navlink:after { @apply block pb-2 border-b-2 border-emerald-400 transition ease-in-out duration-300 origin-[0%_50%] content-[""] scale-x-0; } .navlink:hover:after { @apply scale-x-100; } a.active { @apply font-bold text-gray-700; }Finally, replace the entire code in app/root.jsx which includes your new site layout:
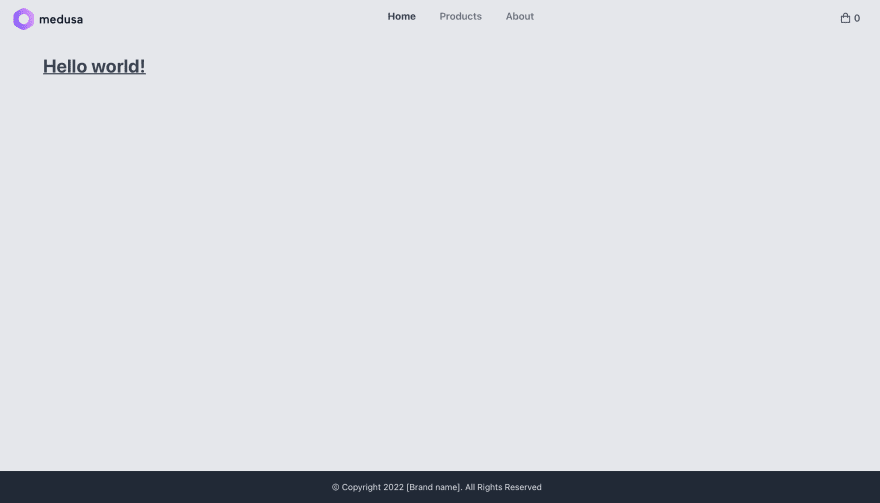
import { Links, LiveReload, Meta, Outlet, Scripts, ScrollRestoration,} from "@remix-run/react";import Layout from "./layouts";import styles from "~/styles/app.css";export function links() { return [{ rel: "stylesheet", href: styles }]; } export function meta() { return { charset: "utf-8", title: "Medusa Remix StoreFront", viewport: "width=device-width,initial-scale=1", }; } export default function App() { return ( <Document> <Layout> <Outlet /> <ScrollRestoration /> <Scripts /> <LiveReload /> </Layout> </Document> ); } function Document({ children }) { return ( <html lang="en"> <head> <Meta /> <Links /> </head> <body>{children}</body> </html> ); } export function ErrorBoundary({ error }) { return ( <Document> <Layout> <div className="text-red-500"> <h1>Error</h1> <p>{error.message}</p> </div> </Layout> </Document> ); }You can now start the dev server again by running the command npm run dev. Your localhost:3000 index page should now appear similar to the screenshot below:
Page Routes
Youll now add the products, about, and checkout pages. Create the following files in app/routes folder:
products/index.jsxabout.jsxcheckout.jsx
You won't implement any logic for this section. Youll simply place some placeholder code starting with app/routes/products/index.jsx:
export default function ProductsIndexRoute() { return ( <div className="w-full mt-8"> <h1>Products Page</h1> <p>List of products</p> </div> ); }Copy the following final code for app/routes/about.jsx:
export default function AboutRoute() { return ( <div className="w-full mt-8"> <h1>About</h1> <p className="mt-4 text-justify"> Lorem ipsum dolor sit amet, consectetur adipisicing elit. Labore aperiam maxime assumenda dolore excepturi ipsam accusantium repudiandae ducimus eum, voluptatibus, adipisci nam temporibus vel ex! Non iure dolore at mollitia. </p> </div> ); }Copy the following placeholder code for app/routes/checkout.jsx:
export default function CheckoutRoute() { return ( <div className="w-full mt-8"> <h1>Checkout Page</h1> </div> ); }Finalize the home page by implementing a simple Hero banner inspired by TailwindUI. Replace the entire code in app/routes/index.jsx with the following:
import { Link } from "@remix-run/react";export default function IndexRoute() { return ( <div> {/* Hero Banner */} <div className="px-12 py-32 text-center text-gray-200 bg-gray-800"> <h1 className="text-5xl text-gray-100">New arrivals are here</h1> <p className="px-8 mt-2 font-semibold text-gray-300"> The new arrivals have, well, newly arrived. Check out the latest options from our summer small-batch release while they're still in stock. </p> <Link to="/products" className="inline-block px-6 py-2 mt-8 text-sm font-semibold text-gray-700 transition duration-300 bg-gray-100 rounded-md hover:bg-white hover:text-gray-900 hover:scale-110 color" > Shop New Arrivals </Link> </div> </div> );}Your home page should appear similar to the screenshot below:

Navigate and check all pages to ensure that the placeholder code is working properly. In the next section, youll start implementing the logic for the /products route.
Products Page
In this section, youll implement the Products page by pulling data from the Medusa server and in a CSS grid.
First, ensure your Medusa Store server is running at localhost:9000. If it's not, you can navigate to Medusa's project folder in the terminal and execute the command npm start. Once it's running, you can proceed to the next step.
Coming back to your remix-medusa-storefront project, install the Medusa JS Client package to provide you with easy access to the Medusa API:
npm install @medusajs/medusa-jsNext, you need to create a utility that will help you create and access an instance of the medusa-js client. Create the file app/utils/client.js with the following code:
import Medusa from "@medusajs/medusa-js";const BACKEND_URL = process.env.PUBLIC_MEDUSA_URL || "http://localhost:9000";export const createClient = () => new Medusa({ baseUrl: BACKEND_URL });Next, open apps/routes/products/index.js and replace with the following:
import { json } from "@remix-run/node";import { useLoaderData } from "@remix-run/react";import { createClient } from "~/utils/client";export const loader = async () => { const client = createClient(); const { products } = await client.products.list(); return json(products);};export default function ProductsIndexRoute() { const products = useLoaderData(); return ( <div className="w-full mt-8"> <h1>Latest Arrivals</h1> <ul> {products.map((product) => ( <li key={product.id}>{product.title}</li> ))} </ul> </div> );}In the above code, you are using Remix's data loading feature to query data from the Medusa server. This data is passed on to the rendering function via the useLoaderData hook. Check out Medusa's Product API and examine what the JSON structure looks like. You should expect the following output on the /products page:

Now that you have the data, you can start building the UI using CSS grids and Product Cards. But first, we need to create a little helper that will display the product's price.
In Medusa, a product contains multiple variants, and each variant has different prices for multiple currencies.
The data you seeded earlier when you created the Medusa server contains pricing for USD and EUR for each product variant. Since this is an introductory tutorial that aims to be simple, youll not be able to fully implement all the necessary logic for a production app which includes:
- Auto-detecting users region and currency using geolocation
- Giving users the options for choosing region and currency
- Displaying product prices based on the selected region/currency
Create the file app/utils/prices.js and copy the following simplified code:
// TODO: Detect user languageconst locale = "en-US";// TODO: Detect user currency/Allow currency selection (usd | eur)const regionCurrency = "usd";export function formatPrice(variant) { const price = variant.prices.find( (price) => price.currency_code == regionCurrency ); return new Intl.NumberFormat(locale, { style: "currency", currency: regionCurrency, }).format(price.amount / 100);}The code above uses hard-coded constants in place of configurable variables. The function formatPrice accepts a Product Variant as input and returns the price as a formatted String currency.
Next, youll need to create the component ProductCard which will display:
- Thumbnail
- Title
- Price (for the 1st variant)
Create the file app/components/product-card.jsx and copy the following code:
import { Link } from "@remix-run/react";import { formatPrice } from "~/utils/prices";export default function ProductCard({ product }) { const variant = product.variants[0]; return ( <section className="overflow-hidden bg-white rounded-lg shadow:md hover:shadow-lg w-80"> <Link to={`/products/${product.id}`}> <img className="w-80" src={product.thumbnail} alt={product.title} /> <div className="p-4"> <h3 className="text-lg font-bold text-gray-700 hover:underline"> {product.title} </h3> <p className="font-semibold text-teal-600">{formatPrice(variant)}</p> </div> </Link> </section> );}Finally update the code in apps/routes/products/index.js as follows:
import { json } from "@remix-run/node";import { useLoaderData } from "@remix-run/react";import ProductCard from "~/components/product-card";import { createClient } from "~/utils/client";export const loader = async () => { const client = createClient(); const { products } = await client.products.list(); return json(products);};export default function ProductsIndexRoute() { const products = useLoaderData(); return ( <div className="w-full p-4 my-8"> <h1 className="text-center">Latest Arrivals</h1> <div className="grid grid-cols-1 gap-6 px-4 mt-8 md:px-12 lg:px-6 xl:px-4 xl:gap-6 2xl:px-24 2xl:gap-6 justify-items-center md:grid-cols-2 lg:grid-cols-3 2xl:grid-cols-4"> {products.map((product) => ( <ProductCard key={product.id} product={product} /> ))} </div> </div> );}Implementing these updates should yield the following result:

Single Product Page
To create a single product page, you need to use the slug file naming convention. Create the file apps/routes/product/$productId.jsx with the following content:
import { useState } from "react";import { json } from "@remix-run/node";import { useLoaderData } from "@remix-run/react";import { BiShoppingBag } from "react-icons/bi";import { createClient } from "~/utils/client";import { formatPrice } from "~/utils/prices";export const loader = async ({ params }) => { const client = createClient(); const { product } = await client.products.retrieve(params.productId); return json(product);};export default function ProductRoute() { const product = useLoaderData(); const [variant, setVariant] = useState(product.variants[0]); const [image, setImage] = useState(product.images[0]); const [quantity, setQuantity] = useState(1); const handleVariantChange = (index) => { setVariant(product.variants[index]); setQuantity(1); }; const handleQuantityChange = (action) => { switch (action) { case "inc": if (quantity < variant.inventory_quantity) setQuantity(quantity + 1); break; case "dec": if (quantity > 1) setQuantity(quantity - 1); break; default: break; } }; const handleImageChange = (id) => { setImage(product.images.find((img) => img.id === id)); }; return ( <div className="w-full"> <div className="grid items-center md:grid-cols-2"> <div> <img className="w-full rounded-lg" src={image.url} alt={product.title} /> <div className="flex justify-center p-4 space-x-2"> {product.images.map((imageItem) => ( <img className={`w-16 border-2 rounded-lg ${ imageItem.id === image.id ? "border-teal-400" : null }`} key={imageItem.id} src={imageItem.url} alt={product.title} onClick={() => handleImageChange(imageItem.id)} /> ))} </div> </div> <div className="flex flex-col px-16 py-4 space-y-8"> <h1>{product.title} </h1> <p className="font-semibold text-teal-600">{formatPrice(variant)}</p> <div> <p className="font-semibold">Select Size</p> <div className="grid grid-cols-3 gap-2 mt-2 md:grid-cols-2 xl:grid-cols-4"> {product.variants.map((variantItem, index) => ( <button key={variantItem.id} className={`px-2 py-1 mr-2 text-sm hover:brightness-90 ${ variantItem.id === variant.id ? "bg-gray-700 text-gray-100" : "bg-gray-300 text-gray-700" }`} onClick={() => handleVariantChange(index)} > {variantItem.title} </button> ))} </div> </div> <div> <p className="font-semibold">Select Quantity</p> <div className="flex items-center px-4 mt-2 space-x-4"> <button className="px-4 py-2 hover:shadow-sm hover:text-teal-500 hover:font-bold" onClick={() => handleQuantityChange("dec")} > - </button> <span>{quantity}</span> <button className="px-4 py-2 hover:shadow-sm hover:text-teal-500 hover:font-bold" onClick={() => handleQuantityChange("inc")} > + </button> </div> </div> <div> <button className="inline-flex items-center px-4 py-2 font-semibold text-gray-200 bg-gray-700 rounded hover:text-white hover:bg-gray-900"> <BiShoppingBag className="mr-2 text-lg" />{" "} <span>Add to Cart</span> </button> </div> <div> <p className="font-semibold">Product Description</p> <hr className="w-2/3 mt-2 border-t-2 border-gray-300" /> <p className="mt-4 text-gray-700">{product.description}</p> </div> </div> </div> </div> );}Lets break down the logic into multiple stages. First, you load the single product using the productId route parameter.
import { json } from "@remix-run/node";import { useLoaderData } from "@remix-run/react";import { createClient } from "~/utils/client";import { formatPrice } from "~/utils/prices";export const loader = async ({ params }) => { const client = createClient(); const { product } = await client.products.retrieve(params.productId); return json(product);};export default function ProductRoute() { const product = useLoaderData(); return ( <div className="w-full mt-8"> <h1>{product.title}</h1> <p>{formatPrice(variant)}</p> <p>{product.description}</p> </div> );}You should be familiar with this code as it's quite similar to app/components/product-card.jsx. The main difference is that you are using Medusa's client.products.retrieve(id) to retrieve data for a single product.
Second, you need to give customers the ability to select product variants, which in this case are sizes. You can implement this feature with the help of the useState React hook:
import { useState } from "react";export default function ProductRoute() { const product = useLoaderData(); const [variant, setVariant] = useState(product.variants[0]); const handleVariantChange = (index) => { setVariant(product.variants[index]); setQuantity(1); }; return ( <div> ... <div> {product.variants.map((variantItem, index) => ( <button key={variantItem.id} onClick={() => handleVariantChange(index)} > {variantItem.title} </button> ))} </div> </div> )}The code above will generate a series of clickable buttons corresponding to each variant that the product has.
Third, you need to give end-users the ability to view different images of the product. Heres the logic for this feature:
import { useState } from "react";export default function ProductRoute() { ... const [image, setImage] = useState(product.images[0]); const handleImageChange = (id) => { setImage(product.images.find((img) => img.id === id)); }; return ( <div> ... <div> <img src={image.url} alt={product.title} /> <div> {product.images.map((imageItem) => ( <img className={`w-16 border-2 rounded-lg ${ imageItem.id === image.id ? "border-teal-400" : null }`} key={imageItem.id} src={imageItem.url} alt={product.title} onClick={() => handleImageChange(imageItem.id)} /> ))} </div> </div> </div> )}The snippet above will display a list of clickable thumbnails below the main product image that users can click to switch and view different images of the product.
Fourth, you need to provide end-users with a quantity input. You need to validate this input to ensure that:
- Quantity is not less than 0
- Quantity is not more than the variant's inventory
Here's the logic for the quantity input:
import { useState } from "react";export default function ProductRoute() { ... const [quantity, setQuantity] = useState(1); const handleQuantityChange = (action) => { switch (action) { case "inc": if (quantity < variant.inventory_quantity) setQuantity(quantity + 1); break; case "dec": if (quantity > 1) setQuantity(quantity - 1); break; default: break; } }; return ( <div> ... <div> <p>Select Quantity</p> <div> <button onClick={() => handleQuantityChange("dec")}> - </button> <span>{quantity}</span> <button onClick={() => handleQuantityChange("inc")}> + </button> </div> </div> </div> )}The + and - buttons will allow users to increment or decrement the desired quantities of a particular variant. The function handleQuantityChange performs the validation for this input.
Now that you have understood the different logic sections of a Single Product page, lets see what the completed page looks like in the browser:

You should be able to select variants (size), thumbnails and set the quantity. Make sure every product page is loading without errors.
Whats Next
There are more important ecommerce functionalities that you still need to implement. Those include checkout, payment, shipping, and customer accounts, among other features.
You can check out the Medusa documentation for more details on how you can go forward including:
- How to Add Plugins. You can also check the list of plugins available in Medusa:
- Add payment methods like Stripe.
- Add custom shipping methods.
- Add product search using Algolia.
If youre interested in a storefront with all the ecommerce features ready to use, Medusa has Next.js and Gatsby storefronts that you can use. These storefronts include functionalities like customer accounts, product listings, cart management, and full checkout workflow.
Should you have any issues or questions related to Medusa, then feel free to reach out to the Medusa team viaDiscord. You can also reach out to the Remix team for support via Discord.
Original Link: https://dev.to/medusajs/open-source-nodejs-ecommerce-platform-for-remix-3p6f
Dev To
More About this Source Visit Dev To