
An Interest In:
Web News this Week
- April 27, 2024
- April 26, 2024
- April 25, 2024
- April 24, 2024
- April 23, 2024
- April 22, 2024
- April 21, 2024
Some of Our Sources
- Simplebits
- The Logo Smith
- Creative Curio
- Fuel Your Creativity
- Web Designer Depot
- Wal You
- Android Dissected
- Daily Now
- Dev To
- The Verge
Help Webnuz
Referal links:
Building a Slack App with Native SFDC Integration
Building a Slack App: Designing a UI
This post is a continuation of our series based on a video series explaining how to build Slack Apps that integrate with Salesforce APIs. With the Slack Starter Kit from Salesforce, Slack app developers can offload common concerns like Salesforce authentication, directory hierarchies, reusable code, and deployments to Heroku. The end result is less time spent wrangling code and more time building features for your app.
In our last post, we familiarized ourselves with the starter kit and set up our development environment to build a basic Slack app. In this post, well continue building on that Slack app, focusing on how the Slack Starter Kit makes it easy to develop two essential components of every Slack app:
- Listening for user interactions
- Drawing a user interface.
Responding to events
If youve ever developed a front-end web app using JavaScript or CSS, youre probably familiar with the basic tenets of event handling. Events in this context are defined as the actions a user takes on your website. For example, a mouse pointer clicking on a link emits an onclick event; a pointer linking over a piece of text emits onhover; a keyboard keystroke emits onkeypressed; and so on.
 on[ Unsplash](https://unsplash.com/s/photos/slack?utm_source=unsplash&utm_medium=referral&utm_content=creditCopyText)](https://res.cloudinary.com/practicaldev/image/fetch/s--PS6FYRTf--/c_limit%2Cf_auto%2Cfl_progressive%2Cq_auto%2Cw_880/https://dev-to-uploads.s3.amazonaws.com/uploads/articles/ahqj3m9moouphx6lbvfp.jpg)
Photo by Stephen Phillips - Hostreviews.co.uk on Unsplash
In Slack, theres a multitude of events you can listen to, ranging from individual events (when a message is posted or pinned) to global changes (when channel names or visibilities are changed) to the administrative (when an app is installed or a new emoji is uploaded). The full list of emitted events is truly impressive. The process for listening to an event is as follows:
- First, your app needs to define a webhook URL. This is a path on your server which can receive POST requests from Slack.
- Next, in your App Manifest, you identify the events which youd like to capture.
- When an event occurs in a workspace where your app is installed, a JSON payload is sent to your app. Every event has its own unique payload.
When your app receives the event from Slack, you can do anything you want: respond to the user, pop open a dialog to ask for more information, or simply store some information away in your database. Theres only one important point to remember: you must respond to Slack within three seconds. This is to let Slack know that your app received its payload and is working on a response. You can do that work in the backgroundperhaps on a different thread, taking as long as you needbut only after you let Slack know everything is 200 OK.
Lets take a look at how event handling works in practice. Head on over to your App Manifest, and scroll down to the bottom of the page, near the settings key. It should look like this:
settings: event_subscriptions: request_url: https://<your-app-name>.herokuapp.com/slack/events bot_events: - app_home_opened interactivity: is_enabled: true request_url: https://<your-app-name>.herokuapp.com/slack/eventsThis section identifies where Slack should send its payload once an event occurs. The bot_events key already defines one event to listen to, app_home_opened, which is triggered once your app is opened in Slack.
Now, open up the local copy of your Starter Kit in your IDE; navigate to apps/slack-salesforce-starter-app/listeners/events/app-home-opened.js. As we saw in the last post, the Starter Kit has an opinionated directory structure to resolve any ambiguities as to where modifications should be made. In this case, the events folder is responsible for defining all of our event responses, just like the shortcuts folder defined our slack command in the previous article. Search for the first occurrence of the following line:
client.views.publishAs the method name implies, this function uses a Slack SDK to call an API named views.publish. The main view for this event is created by a function called authorization_success_screen, which can be found in apps/slack-salesforce-starter-app/user-interface/app-home/auth-success.js.
Lets make a few changes to these files. On line 16, add this line to fetch the timestamp of the event:
let event_ts = event.event_ts;Change both authorization_success_screen calls to include this variable as a new argument:
view: authorization_success_screen( currentuser.username, event_ts)Finally, open up auth-success.js, change the method signature to include event_ts, and modify the displayed string to include this information:
'use strict';const { HomeTab, Blocks } = require('slack-block-builder');const authorization_success_screen = (username, event_ts) => { // preceding code remains unchanged Blocks.Section({ text: `It's ${event_ts}, and you are successfully authenticated to Salesforce as ${username}.` }) );// continued code remains unchangedCommit this change, and deploy it to Heroku as before:
$ git add .$ git commit -m "Add event timestamp"$ git push heroku mainWhen the deployment is done, navigate to your apps tab in the left-hand Slack menu. You should see a different string, which shows the timestamp of when you opened the app.
Creating a UI
Responding to app_home_opened can be a useful event to listen to whenever your app needs a centralized location to fetch data. Because of this, our next step will be to fetch data from Salesforce and present it in our Slack UI.
To design and present layouts, Slack provides a system known as Block Kit. Just as HTML is a markup language for the web, and Visualforce is a markup language for Salesforce, Block Kit is a markup language for Slackexcept it uses JSON. For example, heres what a button designed in Block Kit might look like:
{ "type": "button", "text": { "type": "plain_text", "text": "Save" }, "style": "primary"}Block Kit ensures that every Slack App has a consistent user interface. Because of this, theres a limited set of UI elements that you can use.
When working with Block Kit, you design your layout in JSON. Then, you use the Slack API to POST that JSON to a channel, tab, or direct message.
We already have a system in place for listening to an event and presenting text, so lets build on that foundation. Before we work in Slack, though, lets add some data to our fresh Salesforce org. To launch your browser directly to your Salesforce org, you can run the following command:
sfdx force:org:openIn the Setup menu, search for the Data Import Wizard. Choose CSV as your data type, then copy-paste the following lines into a new file called data.csv:
Contact First Name, Contact Last Name, Contact DescriptionArden, Isabela, Lorem ipsum dolor sit ametRowina, Arti, Proin a est sit amet quam varius efficitur.Aislin, Oedipus, Praesent et euismod semSindri, Filbert, Proin facilisis sit amet libero vulputate sodalesCyril, Gratien, Nulla at massa eu turpis venenatis egestasUpload this file as your data source. Importing this data should only take a minute or two. You can navigate to the Contacts tab if youd like to be extra sure and verify that these names exist.
Next, were going to make changes similar to the ones we made before when adding the event timestamp. A variable called conn is available to use, which serves as a connection to Salesforce. We can use it to query for Contact data, which is what were interested in displaying in Slack.
Navigate to apps/slack-salesforce-starter-app/user-interface/app-home/auth-success.js. Well await the resolving of the promise in this function, and well include the existing connvariable as a new argument:
view: await authorization_success_screen( currentuser.username, event_ts, conn )And once again, open up auth-success.js and change the method signature to include conn. You also need to declare the function as async:
'use strict';const { HomeTab, Blocks } = require('slack-block-builder');const authorization_success_screen = async (username, event_ts, conn) => {// continued code remains unchanged for nowNext, with this connection, were going to issue a query to Salesforce to get our newly created Contact records. Well then display them in the Home tab of our Slack app.
Since we already have a connection to Salesforce, fetching the data is as easy as issuing an SQL query. Place this code right before the place where the homeTab variable is defined:
const result = await conn.query( `SELECT Name, Description FROM Contact`);let records = result.records;let fields = records.map((record) => { return `*${record.Name}*: ${record.Description}`;});Then, at the bottom of the blocks method call, add these lines, which represent the UI youre constructing out of Block Kit:
Blocks.Section({  text: `It's ${event_ts}, and you are successfully authenticated to Salesforce as ${username}.`}),Blocks.Header({ text: 'Contacts' }),Blocks.Divider(),Blocks.Section({  text: fields.join('
')})
If you navigate back to your Slack Apps Home tab, youll see your organizations list of contacts!
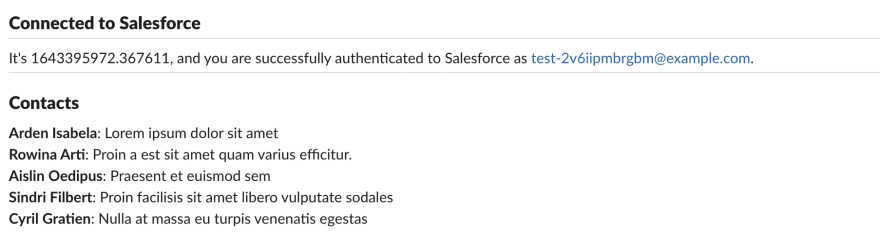
Learning more
Weve built a Slack app that fetches data from Salesforce and presents that data in a UI using a framework called Block Kit. In our next post, well send data from Slack back to Salesforce!
Before then, you might want to familiarize yourself with how Block Kit works. Slack provides the Block Kit Builder, which is a playground for their UI elements. Under the hood, the Slack Starter Kit uses the Block Builder to simplify the UI assemblage we worked with.
Original Link: https://dev.to/salesforcedevs/building-a-slack-app-with-native-sfdc-integration-4m4m
Dev To
More About this Source Visit Dev To