
An Interest In:
Web News this Week
- April 2, 2024
- April 1, 2024
- March 31, 2024
- March 30, 2024
- March 29, 2024
- March 28, 2024
- March 27, 2024
Some of Our Sources
- Slashdot
- The Logo Smith
- Smashing Magazine
- Abduzeedo
- FanExtra - PSD
- Reencoded
- CSS Globe
- Design Modo
- Daily Now
- Dev To
Help Webnuz
Referal links:
Deploy Laravel Projects With Database For Free!
Good day everyone
In this article i'm going to explain how to host and deploy your Laravel project free on Heroku step by step, and it will work.
Let's get to it?
0- I'm using:
- Laravel 8.8
- PHP 8
- Windows Terminal
- GitHub
- Git Commands
- Heroku Toolbelt
1- Install Nodejs and npm:
- First thing you need to make sure that you have Node and npm installed on your machine.
- You can check that by opening up the terminal and type those two commands:
npm -v
node -v
- If you need to install them DOCs for downloading Node and npm
- If you got that converged, move on
PS C:\Users\Moose> node -vv16.13.2PS C:\Users\Moose> npm -v8.4.02- Start your Laravel Project:
- If you already have a project, you can skip this step .
- I use composer to create Laravel projects.
- You can download composer from here: https://getcomposer.org/
- Open up your terminal and create your Laravel project in the desired directory.
- I already have Laravel project created but here is the terminal command to create a new project via composer.
- Instead of 'example-app' just name your project.
PS C:\Users\Moose> composer create-project laravel/laravel example-app3- Create Account and Download Heroku Toolbelt:
- Sign up for a free account on Heroku from HERE. If you already have an account, move on to next step
- For the sake of keeping everything simple and smooth, download Heroku Toolbelt for free from HERE.
- Just keep pressing next and leave everything to default.
4- Procfile Creation:
- Now we need to add a new file to our project in the main directory.
- Head to your project folder and create new file and name it
Procfilewithout extension and insure that first letter is in uppercase. - Inside the file, leave the below code and then save.
web: vendor/bin/heroku-php-apache2 public/- Just like this
5- New to GitHub? :
- I'm sure you have GitHub account but if you don't, you need to create one and connect to it.
- Since this is not GitHub tutorial, please visit the following LINK for a complete guide how to create GitHub account.
- Also if you're new to Git, don't forget to setup your username through terminal. Visit this LINK to know how.
6- Git:
- You can skip this if you already have a Laravel project and it is on GitHub. In this case all you need to do is to push the changes with Procfile to GitHub normally.
- Assuming you're creating a new repo for your project. Open you terminal in the project directory and type the below commands in the same order one by one.
- Please note that in my case,
PS F:\Projects\Zarafah>is my project main directory path.
PS F:\Projects\Zarafah> git initPS F:\Projects\Zarafah> git add .PS F:\Projects\Zarafah> git commit -m "initial release"7- Create Heroku App:
Please follow carefully for best results.
- Open you terminal in the project directory and type the below commands in the same order one by one.
- In command number 4, you'll find that i'm renaming my app to 'zarafah'. You can name it whatever you want but it is recommended to name it exactly the same name on github.
PS F:\Projects\Zarafah> heroku createPS F:\Projects\Zarafah> git remote rm herokuPS F:\Projects\Zarafah> heroku createPS F:\Projects\Zarafah> heroku rename zarafah- Time to push this project to heroku.
PS F:\Projects\Zarafah> git push heroku master8- Setting Up Heroku App:
- Now, if we try to open app through Heroku it will get us
error 500. - Open up Heroku Dashboard and follow the below path:
Select your project - Select settings - Scroll down and click on 'Reveal Config Vars' - You will find one input for key and other for value.

- Head to your project main folder and open your
.envfile. - Look for the below.
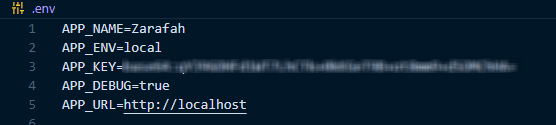
- Copy 'APP_DEBUG' and insert it in key input and copy 'true' and insert it in value input.
- Do the same for 'APP_KEY' and it's value.
9- Adding to Heroku Config:
- Have your
.envfile open. - Open the terminal in your project directory and hit the below commands.
- In the terminal we will write
heroku config:add (key value)and then we add a space and give the key and value. - Find an example below but keep in mind that the values are set according to your
.env file. - For app Env, make sure to insert the value 'production'.
PS F:\Projects\Zarafah> heroku config:add APP_NAME=ZarafahPS F:\Projects\Zarafah> heroku config:add APP_ENV=production- In APP_URL, insure to copy the url for your app from Heroku.
- In my case
PS F:\Projects\Zarafah> heroku config:add APP_URL=https://zarafah.herokuapp.com/10- Setting up DataBase in Heroku:
By now if you don't have any database connections in your Laravel project, your app show open and work on Heroku normally
In case you do have Database connections like me, continue
- Head to Heroku Dashboard.
- Press on your App.
- Click on 'Resources'
- Search for 'heroku postgres'
- Click 'Provision'.
Next step is very important, we're going to get our add-on credentials from heroku and update them one by one.
- Open up the terminal in your main project folder.
PS F:\Projects\Zarafah> heroku pg:credentials:url- You will get a response with all the credentials and we will be adding them one by one.
- Have your
.envfile open. - We will copy the keys from .env file and the values from the response we got from the terminal.
- In the below example i'm just going to write down '...' instead of the actual credentials.
PS F:\Projects\Zarafah> heroku config:add DB_CONNECTION=pgsqlPS F:\Projects\Zarafah> heroku config:add DB_HOST= ...PS F:\Projects\Zarafah> heroku config:add DB_PORT= ...PS F:\Projects\Zarafah> heroku config:add DB_DATABASE= ...PS F:\Projects\Zarafah> heroku config:add DB_USERNAME= ...PS F:\Projects\Zarafah> heroku config:add DB_PASSWORD= ...11- Migration and seed:
- Now we can migrate with our new Database.
- Note that you can't migrate your
--seedsince Heroku add-on doesn't support Laravel Factory. - Run the below code to proceed with your migration
PS F:\Projects\Zarafah> heroku run php artisan migrate12- Finishing:
Congratulations your Laravel project is now live on Heroku with database for free
You can visit the app with the url that heroku created.
This is a great opportunity for you to test your app and see it going live and share it with others.
If you have any questions please ask me in the comments below or find me on Twitter
Thank you for reading
Original Link: https://dev.to/moose_said/deploy-laravel-projects-with-database-for-free-5778
Dev To
More About this Source Visit Dev To