
An Interest In:
Web News this Week
- April 2, 2024
- April 1, 2024
- March 31, 2024
- March 30, 2024
- March 29, 2024
- March 28, 2024
- March 27, 2024
Some of Our Sources
- Engadget
- Pearsonified
- Six Revisions
- Vandelay Design
- Creative Curio
- Line 25
- Stylized Web
- Specky Boy
- Web Resource Source
- Codrops
Help Webnuz
Referal links:
Laravel Seeding: Generate mock data using Faker
Seeding, also commonly known as database seeding is the process of generating mock data into your application database. Whether it's for testing purposes or other use cases, seeding can be very useful when we don't want to start with a clean slate or add mock data manually.
Prerequisites
- A running Laravel project
- A SQL database
What is Faker?
FakerPHP (I'll refer to it as Faker henceforth) is a package that allows you to generate different types of random data that match your database schema, From basic names, usernames, and random numbers to credit card details (fake obviously), you can generate basically any type of fake data into your application database.
Connecting the database
To connect your database to your Laravel application, you need to have a SQL database, either a local one like PHPMYADMIN which I'll be using in this tutorial it comes with WAMPSERVER installation or a managed one like the Managed Heroku Postgres database.
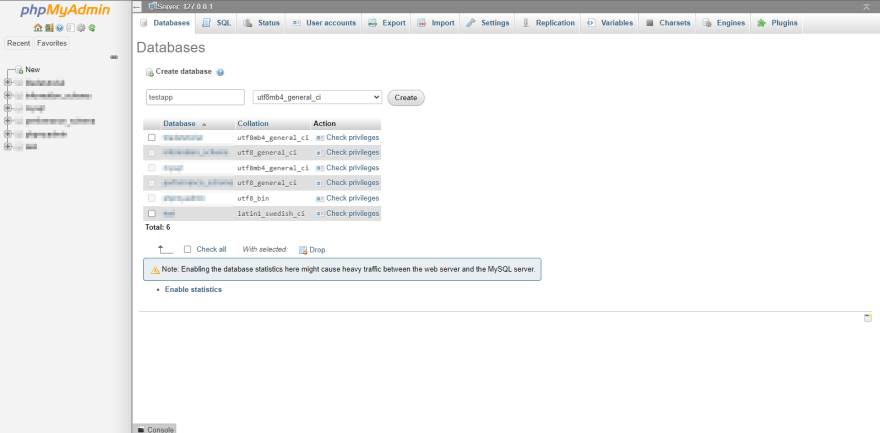
To connect your database, you need to first create a database with your preferred name, in my case I'll create a database called testapp inside PHPMYADMIN GUI like so:
Once that's done, open the .env file in your editor, and fill the following values with your database credentials:
DB_CONNECTION=DB_HOST=DB_PORT=DB_DATABASE=DB_USERNAME=DB_PASSWORD= And that's it! you've connected your Laravel application to your SQL database. the next thing now is to generate the necessary files.
Generate model, migration, and factory files
As Laravel creators are very much interested in developers' productivity, Laravel supports Faker out of the box, which means there will be no need for installation from your end. With installation out of the way, the next thing to do is to generate your model, migration, and factory files, I'll be working with a post model in this tutorial so I'll run the following command to generate the three files at once:
php artisan make:model Post -m --factoryThat should generate (in my case), a Post model inside app/models, a factory class inside database/factories, and a migration file inside database/migrations.
The Post model
I would like the posts table to contain the following columns title, body, likes, author, draft so I'll be adding a $fillable array inside my /app/models.Post.php file like so:
protected $fillable = ['title', 'body', 'likes', 'author', 'draft'];Next thing is to define your Post schema.
The Post migration
To define how you want your schema to look like and the types of data they should contain, you need to open your /database/migrations/2022_01_21_211528_create_posts_table.php (your file name will be different), and inside the up function, you need to define your schema, for my Post table it will look like this:
public function up() { Schema::create('posts', function (Blueprint $table) { $table->id(); $table->string('title'); $table->longText('body'); $table->string('author'); $table->integer('likes'); $table->boolean('draft'); $table->timestamps(); }); }You can find the list of available column types in Laravel here,
after that's done, we need to structure how you want Faker to generate your data inside the Factory class you generated earlier.
The Factory class
In order for Faker to generate your data properly, you need to explicitly define how it should do so inside the definition function that was generated inside the database/factories/PostFactory.php file, you just need to edit it to fit your columns and their types, in my case I'll edit it to look like so:
public function definition() { return [ 'title' => $this->faker->words(5, true), 'body' => $this->faker->sentence(45), 'likes' => $this->faker->randomNumber(5), 'author' => $this->faker->name(), 'draft' => $this->faker->boolean() ]; }The above function will generate:
title- 5 wordsbody- 45 sentenceslikes- random 5 digit numbersauthor- random Nigerian namedraft- random boolean 1 or 0 (1 istrue, while 0 isfalse).
Notice how I omitted the id and timestamps as they will be generated automatically. Next, you need to connect the PostFactory to the Post model by adding the following line to the top of your factory file like so:
namespace Database\Factories;use App\Models\Post;// other dependenciesclass PostFactory extends Factory{ protected $model = Post::class; /** * Define the model's default state. * * @return array */ public function definition() { // same as above }} Run factory class through DatabaseSeeder.php file
After defining the definition function inside the factory class, the next thing you need to do is to add the newly created factory inside the /database/seeders/DatabaseSeeder.php file by adding it inside the run method like so:
\App\Models\Post::factory(200)->create();The 200 in the line of code above defines how many posts you would like to generate.
Run the migrations and seeders
After all the above steps have been completed successfully, the next thing you need to do is to run your migrations and seeders, and thanks to Laravel's awesome cli tool we can do both with just a single command like so:
php artisan migrate --seedOnce that runs successfully you should see something like below in your command line:

Next, navigate to your database manager to see the result; you should see something similar to the below screenshot:

The post table was created successfully, including the default Laravel tables. Notice the little green box?, that's our posts table containing 200 rows of data all generated by Faker!, click on the table to see its contents:
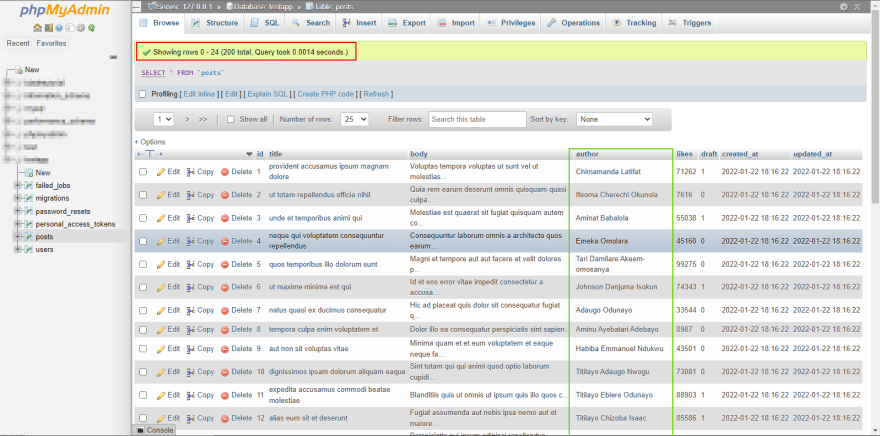
That's our post table filled with data!.
Generating local data
Notice that the author column contains random Nigerian names? that's another awesome thing about Faker, it lets you generate local data where possible, and all you need to do is set your faker_locale inside the config/app.php to your preferred country. You can find the list of supported regions here.
Conclusion
Adding mock data manually to test your application can be daunting, So In this tutorial, you learned how to seed data into your Laravel application database using Faker.
If you have any, I'll really appreciate your honest feedback
Original Link: https://dev.to/olodocoder/laravel-seeding-generate-mock-data-using-faker-5473
Dev To
More About this Source Visit Dev To